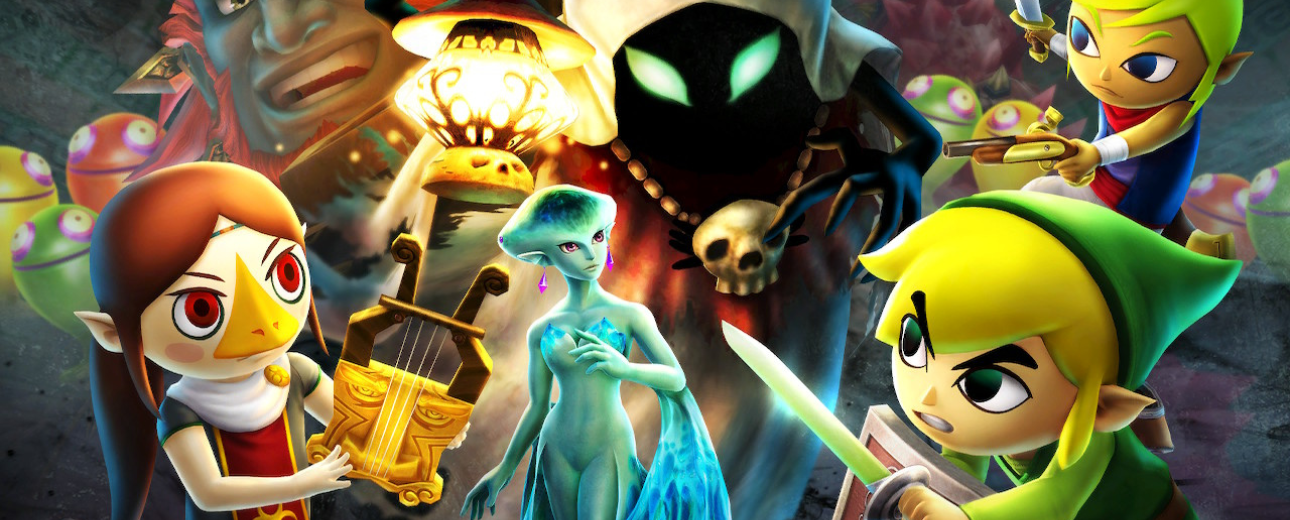
The clash of steel echoes across battlefields where Hyrule’s greatest legends converge. Hyrule Warriors Definitive Edition stands as the ultimate celebration of The Legend of Zelda franchise, transforming beloved characters into unstoppable warriors commanding massive armies in epic conflicts that span time, space, and alternate dimensions. Whether you’re a Dynasty Warriors veteran or a Zelda enthusiast stepping into musou gameplay for the first time, this comprehensive guide will transform you from a battlefield novice into a legendary warrior worthy of the Triforce itself.
Since its original Wii U release in 2014, followed by the 3DS adaptation and finally the Definitive Edition on Nintendo Switch in 2018, Hyrule Warriors has evolved into the most content-rich collaboration between Koei Tecmo’s Warriors formula and Nintendo’s treasured Zelda universe. The Definitive Edition deserves its name—every character, every map, every mode from all previous versions unified into one spectacular package, enhanced with improved performance and portability that makes this the definitive way to experience Link’s most ambitious battle yet.
Understanding Hyrule Warriors: What Makes This Game Unique
Before diving into advanced strategies and character breakdowns, understanding what Hyrule Warriors actually is will fundamentally shape your approach to mastering it. This isn’t your traditional Legend of Zelda adventure, and recognizing these differences early saves frustration and unlocks enjoyment.
The Musou Formula Meets Zelda Magic
Hyrule Warriors belongs to the “musou” or “Warriors” genre, pioneered by Koei Tecmo’s Dynasty Warriors series. The core gameplay loop involves controlling a single powerful character on sprawling battlefields filled with hundreds—sometimes thousands—of enemies. Your objective isn’t careful, tactical combat against individual foes but rather sweeping through massive crowds with flashy combo attacks, capturing strategic keeps, completing battlefield objectives, and turning the tide of large-scale conflicts through your personal intervention.
What makes Hyrule Warriors special is how seamlessly it integrates Zelda’s iconography, characters, and mechanics into this formula. Link doesn’t just slash through enemies—he uses bombs, hookshots, and elemental rods exactly as you’d expect from Zelda games. Zelda herself commands light arrows and magical barriers. Every character’s moveset references their source material, creating familiar satisfaction even within an unfamiliar gameplay structure. Boss battles against King Dodongo, Gohma, and Manhandla retain their Zelda DNA—requiring specific items or tactics rather than pure button-mashing—creating wonderful moments where musou meets traditional Zelda puzzle-boss design.
The game respects both its parent franchises equally. Dynasty Warriors fans recognize the strategic layer of battlefield management, keep capturing, and officer duels. Zelda fans delight in references spanning the entire franchise timeline, from Skyward Sword to Breath of the Wild, with fan-favorite characters finally becoming playable warriors. This fusion creates something genuinely unique: a game that simultaneously honors both lineages while creating an identity distinctly its own.
What the Definitive Edition Brings to the Table
The Nintendo Switch’s Definitive Edition represents the culmination of Hyrule Warriors’ evolution, incorporating content from the original Wii U game, the Legend Mode storyline from that version, all DLC characters and maps, the 3DS version’s exclusive Adventure Mode maps and characters (Linkle, Toon Link, King Daphnes, etc.), the Wind Waker and Twilight Princess themed content packs, and the substantial Breath of the Wild content featuring Champions and a unique Master Sword mechanic.
This consolidation means the Definitive Edition contains 29 playable characters (many with multiple weapon types totaling over 40 unique movesets), eight Adventure Mode maps representing different Zelda games with hundreds of challenges each, countless costumes and alternate colors, co-op multiplayer both locally and online, improved performance targeting 60fps in docked mode and 30fps in handheld, all previously released DLC included at no extra cost, and quality-of-life improvements refined through multiple versions.
For newcomers, this overwhelming amount of content can feel daunting. The game doesn’t withhold this content as late-game rewards—characters, modes, and maps unlock steadily as you progress, meaning within a few hours of play, you’ll have access to modes offering hundreds of hours of gameplay. Understanding what each mode offers and how they interconnect helps you chart a course through this massive game without feeling lost.
Story vs. Adventure vs. Challenge Mode
The game structures its content across three primary modes, each serving different purposes and rewarding different play styles. Understanding these distinctions early helps you focus your energy where it matters most for your goals.
Legend Mode presents the game’s original story, a dimension-hopping narrative where the sorceress Cia, corrupted by her obsession with the legendary Hero, tears open dimensional gates bringing together heroes and villains from across Zelda history. This mode functions as the tutorial and campaign, introducing characters, mechanics, and the basic flow of musou gameplay while telling a surprisingly ambitious tale that respects Zelda lore. Completing Legend Mode unlocks most characters and provides essential resources for powering up your roster. Think of this as the main campaign—the structured, narrative-driven experience that most new players should tackle first.
Adventure Mode represents the game’s true endgame and longevity, offering grid-based maps inspired by the original Legend of Zelda’s overworld where each square represents a unique challenge with specific victory conditions, character restrictions, and rewards. These maps contain hundreds of missions—the initial Adventure Map alone has 128 squares, and the Definitive Edition includes eight maps total. Rewards include new weapons, costumes, materials for badges, heart pieces and containers, powerful weapon skills, and character unlocks. Adventure Mode is where serious players spend hundreds of hours perfecting strategies, grinding materials, and chasing the most powerful equipment. If Legend Mode is the appetizer, Adventure Mode is the main course and dessert combined.
Challenge Mode offers specialized trials testing specific skills: rack up the highest KO count in limited time, survive waves of enemies with restricted hearts, race through courses for best times, defeat bosses with specific characters, and similar focused challenges. While less extensive than Adventure Mode, these challenges offer unique rewards and test your mastery in ways the other modes don’t. They’re excellent for practicing specific characters or techniques in controlled environments.
The modes interconnect through shared progression—levels, weapons, and materials earned in any mode carry over to all modes. A powerful weapon earned in Adventure Mode makes Legend Mode battles easier. Experience gained in Challenge Mode levels up characters for Adventure Mode. This unified progression means nothing you do feels wasted; every battle contributes to your overall strength.
Legend Mode Walkthrough: Conquering the Story Campaign
The story campaign serves multiple crucial functions: introducing gameplay systems gradually, unlocking the majority of playable characters, providing narrative context for the crossover chaos, teaching battlefield tactics through scripted scenarios, and rewarding players with weapons, materials, and rupees to jumpstart their progression. Let’s break down how to maximize your Legend Mode experience.
The Opening Acts: Learning the Basics
The tutorial stages ease you into musou combat through carefully designed scenarios that introduce one concept at a time. The first few missions playing as Link teach the fundamental rhythm: light attacks build combos, heavy attacks finish combos with powerful finishers, different button combinations create different combo strings, weak point gauges appear above officers’ heads when they’re vulnerable, and capturing keeps involves defeating the keep boss.
Pay attention during these early missions because the skills they teach remain relevant throughout the entire game. The combo system—where you press light attack multiple times then finish with heavy attack at different points in the string—creates vastly different moves. For example, Link’s sword: Y-Y-Y-Y-X creates a spinning sword beam, Y-Y-Y-X launches enemies, and Y-X creates a quick finishing strike. Experimenting with these combinations for each character reveals their full moveset. The game shows combo inputs on loading screens, but hands-on experimentation teaches the timing and positioning better than any list.
Keep capture mechanics establish the strategic layer. Keeps are fortified positions on the battlefield indicated by colored flags—blue for allies, red for enemies, gray for neutral. Capturing keeps involves entering the keep circle and defeating the keep boss (a slightly stronger enemy with a health bar). Captured keeps spawn allied soldiers, provide map control, and often trigger reinforcements or events. Most missions require capturing specific keeps to advance the battle, making keep management essential strategy rather than optional objectives.
The weak point gauge system creates the game’s rhythm of combat. When you attack officers (named enemies with substantial health) enough, a purple gauge appears above their head. Once filled completely, they enter a vulnerable state indicated by a flashing weak point gauge. Attacking during this window deals massive damage, often depleting half their health or more. Learning to recognize when enemies are about to expose weak points—certain attacks, patterns, or after specific moves—transforms combat from button-mashing to strategic burst damage windows. Some officers won’t expose weak points through normal attacks; you must use specific items (bombs for armored enemies, boomerangs for aerial enemies, etc.), introducing item usage into the combat loop.
Mid-Campaign: Character Variety and Story Development
As Legend Mode progresses, missions introduce new playable characters, each joining the cause against Cia’s dimensional chaos. Impa, Sheik, Lana, and others unlock through story progression, and the game often requires you to play as these characters in specific missions. This forced variety serves two purposes: it prevents over-reliance on a single character, and it showcases each character’s unique playstyle, helping you discover favorites.
Don’t resist these forced character switches—embrace them as opportunities to learn. Each character has dramatically different approaches to combat. Link (sword) offers balanced all-around abilities with decent crowd control and single-target damage. Impa (giant blade) specializes in wide sweeping attacks perfect for crowd clearing. Lana (tome) uses magical area effects and summoning. Sheik emphasizes speed and musical attacks. Finding characters that match your preferred playstyle makes the game significantly more enjoyable, and you can’t discover your favorites without trying everyone.
The story missions gradually increase complexity, introducing multi-stage battles where the battlefield evolves mid-mission. Reinforcements appear changing the tactical situation, allied commanders require protection or they’ll retreat, boss characters appear requiring different strategies than normal officers, and mission objectives chain together requiring you to think several steps ahead. These complex missions prepare you for Adventure Mode’s similarly intricate scenarios while keeping Legend Mode fresh and varied.
Boss battles deserve special mention as they break up the musou combat with Zelda-style encounters. King Dodongo requires bombs in his mouth when he prepares his fire breath, Gohma needs hookshot or arrows to her eye when exposed, Manhandla requires cutting all four heads with charged spin attacks or bombs, and Argorok demands switching between ground combat and hookshot aerial sections. These bosses transplant traditional Zelda boss mechanics into Warriors gameplay, creating satisfying moments of recognition for series veterans. Pay attention to the on-screen prompts and your item availability—having the right items equipped before these encounters speeds them dramatically.
Maximizing Legend Mode Rewards
Every mission completion rewards skulltulas (if conditions are met), heart pieces, weapons, materials, and rupees. Efficient Legend Mode play involves understanding how to maximize these rewards rather than just rushing to the end.
Skulltulas are golden spiders hidden in each Legend Mode mission, appearing only when specific conditions are met (usually defeating 1,000 enemies within a time limit, or 1,200 enemies total). When conditions are met, a jingle plays and the skulltula appears in a specific location on the map—check the map for a golden spider icon. Collecting skulltulas unlocks illustrations in the gallery and provides material rewards. The 1,000 enemies in time limit is usually the trickiest—focus on areas with dense enemy spawns and use characters with excellent crowd control. Some missions have easier skulltula conditions; prioritize those when farming illustrations.
Weapon drops occur when you defeat enemies while they’re dropped items, indicated by a glowing item appearing on the battlefield. Each mission has a weapon drop table, and defeated officers have chances to drop weapons. The weapons’ quality (star ratings, number of slots, base attack) improves based on difficulty setting—Normal mode drops weaker weapons, while Hard and Hero difficulties drop increasingly powerful options. Early Legend Mode on Normal provides adequate weapons for progression, but replaying missions on higher difficulties once you’re stronger yields the equipment necessary for late-game challenges.
Materials drop from defeated enemies and appear as small icons on the battlefield. Bronze, silver, and gold materials drop from regular soldiers, captains, and officers respectively, with gold materials being rarest and most valuable. Materials are used in the Training Dojo (unlocked later) to craft badges that permanently upgrade characters. Don’t obsess over material farming during your first Legend Mode playthrough—just collect what appears naturally. Adventure Mode provides better farming opportunities later with missions specifically designed for material grinding.
Heart pieces and containers permanently increase your maximum health for specific characters. Legend Mode missions reward both, alongside Adventure Mode missions. Increasing health is crucial for harder difficulties where enemies hit significantly harder. Prioritize heart pieces when choosing which optional objectives to complete during missions.
Difficulty Settings and When to Increase Them
Legend Mode offers three difficulties: Normal, Hard, and Hero, each affecting enemy health, damage output, and reward quality. Normal mode is perfectly appropriate for first-time players learning the systems. Enemies die quickly, allowing you to learn combos and mechanics without constant pressure. Hard mode increases enemy health and damage modestly while improving weapon drop quality—suitable for players comfortable with combat fundamentals wanting better rewards. Hero mode makes enemies significantly tankier and more dangerous but offers the best weapon drops and material rates.
The smart approach is completing Legend Mode initially on Normal to learn the story and mechanics without frustration, then replaying specific missions on Hard or Hero once you’ve leveled characters and obtained better weapons, targeting missions with good weapon drop tables or skulltula rewards you missed. The game allows freely selecting difficulty before each mission, so you’re never locked into a choice.
Don’t feel pressured to play on Hero mode immediately. The difficulty spike is substantial, and struggling through missions on Hero with weak characters and poor weapons is an exercise in frustration. Build your power through Normal mode Legend Mode completion, then early Adventure Mode progression, then return to Legend Mode on higher difficulties to farm better equipment. This progression curve feels more natural and rewarding than stubbornly banging your head against Hero mode prematurely.
The Complete Character Roster and Unlock Conditions
Legend Mode unlocks the majority of playable characters through story progression, but some require Adventure Mode or specific conditions. Understanding who unlocks when helps you plan character development.
Characters unlocked through Legend Mode (in approximate order):
- Link (Sword) – Starting character
- Impa (Giant Blade) – Chapter 2
- Sheik (Harp) – Chapter 3
- Lana (Tome) – Chapter 3
- Zelda (Rapier) – Chapter 4
- Link (Gauntlets) – Chapter 5
- Midna – Chapter 6
- Agitha – Chapter 6
- Zant – Chapter 7
- Fi – Chapter 7
- Ghirahim – Chapter 7
- Ganondorf – Chapter 8 (final chapter)
Additional characters require Adventure Mode or DLC map completion:
- Ruto unlocks on the initial Adventure Map
- Darunia unlocks on the initial Adventure Map
- Linkle requires Master Wind Waker map progression
- Toon Link requires Termina Map completion
- Tetra requires Master Wind Waker map
- King Daphnes requires Termina Map
- Skull Kid requires Termina Map
Breath of the Wild characters (Mipha, Daruk, Revali, Urbosa) unlock through the Breath of the Wild Adventure Map included in Definitive Edition.
The staggered unlocks mean you’ll constantly have new characters to experiment with, keeping the experience fresh throughout the 15-20 hour Legend Mode campaign. Don’t feel obligated to master every character immediately—focus on a core team of 3-5 favorites while sampling others to find hidden gems.
Combat Mastery: Advanced Techniques and Strategies
Understanding basic combos gets you through Legend Mode on Normal, but mastering advanced techniques separates competent warriors from legendary heroes who can conquer Adventure Mode’s brutal challenges efficiently.
The Focus Spirit and Special Attack System
Focus Spirit represents your super mode, activated by pressing R when the magic meter is full. During Focus Spirit, you gain increased attack power and speed, infinite weak point smash windows on officers, automatic weak point gauge building, crowd control immunity, and a finishing special attack when the timer expires or you manually end it. The magic meter fills by defeating enemies, collecting magic jars, or using certain badges.
Strategic Focus Spirit usage transforms difficult encounters into manageable ones. Rather than activating immediately when available, save Focus Spirit for critical moments: when overwhelmed by multiple officers, when a boss enters its vulnerable phase (doubling your damage output), when racing against time limits in timed missions, or when needing to quickly clear specific enemies for objectives. The finishing special attack deals massive damage in a wide area and can defeat weakened officers instantly, so positioning before ending Focus Spirit maximizes its impact.
Special attacks (activated with A button when the special meter is full) serve different purposes. Each character’s special attack has unique properties—some excellent for crowd control, others for single-target damage, some providing battlefield utility like stunning all nearby enemies. Link’s sword special fires a massive beam in a line (great for crowds), while Sheik’s harp special creates a massive damaging circle (excellent area coverage). Learning which specials excel at which tasks lets you deploy them optimally rather than wasting them on situations where regular combos would suffice.
The special meter fills by attacking enemies and collecting special attack jars. Unlike Focus Spirit’s steady buildup, special attacks can be triggered more frequently, making them your go-to tool for emergency situations. That said, don’t hoard special attacks excessively—if your meter is full and you’re not in immediate danger, using the special to quickly clear a keep or soften an officer is generally worth it since you’ll refill the meter shortly anyway.
Weak Point Management and Officer Combat
Every officer in the game has a weak point system, but exposing that weak point varies dramatically by enemy type. Understanding these patterns accelerates officer defeats from minute-long slogs to five-second eliminations.
Standard officers expose weak points when you attack them sufficiently with any combos. The purple gauge fills gradually as you deal damage, then when maxed, they enter the vulnerable state. Simple but time-consuming. Enhanced officers (silver or gold) require specific triggers: some expose weak points after specific attack patterns (watch for tells like extended windups), some require using specific items (bombs for armored enemies, boomerang for aerial foes, hookshot for shielded enemies), and some need you to dodge their attacks perfectly, creating an opening. Learning these triggers is essential—fighting a Dinolfos without knowing to dodge its jump attack leaves you chipping away for ages, while dodging the jump causes instant weak point exposure for quick elimination.
Boss characters have even more specific weak point mechanics, often borrowed directly from their original Zelda game appearances. Imprisoned (from Skyward Sword) requires you to destroy its toes while it’s standing, causing it to fall and exposing its seal for massive damage. Phantom Ganon requires reflecting his energy balls with sword strikes until he’s stunned. The Helmaroc King needs arrows to its mask until shattered, exposing its face for damage. These borrowed mechanics feel great for Zelda fans and reward game knowledge—if you’ve fought these bosses in their original games, you’ll intuitively know the strategy.
Mastering weak point smashes involves recognizing the vulnerable state immediately and unleashing your highest damage combo. The exposed state doesn’t last long—maybe 5-7 seconds—so you need muscle memory to start your best damage combo instantly. For most characters, this means landing your final combo finisher (like Link’s Y-Y-Y-Y-Y-X six-hit combo) during the window. Practice against Adventure Mode officers until recognizing and capitalizing on weak points becomes automatic.
Item Usage and Puzzle Elements
The item system integrates Zelda’s traditional tools into Warriors gameplay, creating utility beyond just combat. You can equip up to two items at once (selected pre-mission), and these items open shortcuts, solve puzzles, and expose boss weak points.
Bombs destroy cracked walls revealing shortcuts and treasure chests, damage groups of enemies, and stun armored foes. Boomerang targets multiple enemies in sequence, stunning them briefly, and can trigger distant switches. Hookshot pulls you to specific targets, allowing aerial approaches and pulling flying enemies from the sky. Bow allows precise long-range attacks and hitting distant switches. Fire Rod, Ice Rod, and Lightning Rod create elemental area effects damaging enemies and solving element-based puzzles (melting ice, lighting torches, etc.).
The key to efficient item use is pre-mission planning. Check the mission description and map layout—if you see cracked walls marked on the map, bring bombs. If many aerial enemies appear, pack the hookshot or boomerang. Boss encounters requiring specific items are usually telegraphed, but having bombs and either boomerang or hookshot covers most situations. You can’t switch items mid-mission, so choosing correctly is crucial for smooth runs.
Items consume weapon gauge (the green bar below your health), which refills slowly over time or quickly by attacking enemies. Managing this gauge means balancing item usage with combat needs—don’t spam bombs thoughtlessly then lack gauge when you desperately need one to break a barrier. Conversely, maintaining a full weapon gauge provides no benefit, so use items proactively rather than hoarding meter.
Puzzle elements in missions often require items. You’ll encounter: ice blocking paths requiring fire rod to melt, unlit torches needing fire to activate switches, distant switches requiring arrows or boomerang, high platforms requiring hookshot access, and cracked walls hiding optional objectives or treasure. Observing your environment and thoughtfully deploying items speeds missions dramatically—missing a shortcut can add minutes to completion time.
Character-Specific Advanced Techniques
Each character has unique quirks, optimal combos, and advanced techniques that dramatically improve their effectiveness when mastered. Covering all 29 characters exhaustively would fill its own guide, but understanding the principles allows you to discover each character’s potential.
Crowd control capabilities vary wildly. Some characters excel at sweeping huge groups quickly (Ganondorf’s sword, Impa’s naginata, Young Link’s mask), while others focus on single-target devastation (Sheik, Ghirahim, Midna). For missions emphasizing enemy KO counts or defending keeps against waves, prioritize crowd controllers. For missions with multiple tough officers or bosses, bring single-target specialists.
Mobility differences matter more than you might expect. Characters like Sheik and Link (gauntlets) move quickly and cover ground easily, valuable in timed missions or when defending multiple locations. Slower characters like Darunia or Ganondorf sacrifice speed for power and range. Fast characters excel in Adventure Mode missions with tight time limits, while slow powerhouses work better when objectives don’t involve racing across the map.
Combo finishers serve different purposes. Some launch enemies (useful for controlling dangerous officers by keeping them airborne), others create wide area effects (optimal crowd clear), and some deal concentrated damage to single targets. Knowing which finisher achieves which effect lets you select the right tool mid-combat. For example, if surrounded by weak enemies but one dangerous officer, use the area-effect finisher to clear crowds, then switch to single-target combos for the officer.
Character weapons unlock alternative movesets for some characters. Link alone has seven distinct weapon types (Sword, Gauntlets, Spinner, etc.), each playing completely differently. Zelda has multiple weapons (Rapier, Baton, Dominion Rod), as do Lana, Link, Linkle, and others. These aren’t just cosmetic—they’re effectively different characters sharing the same level and stats. If you dislike a character’s starting weapon, try their alternatives before writing them off entirely. I personally bounced off Zelda’s Rapier but love her Baton for its crowd control and Wind Waker aesthetic.
Dodging, Defense, and Damage Reduction
Defense in Hyrule Warriors seems deceptively simple—you have a dodge and a block—but mastering defensive techniques is crucial for high-level play where enemies can kill you in 3-4 hits.
Dodging (pressing B) provides brief invincibility frames if timed correctly, allowing you to phase through attacks. Perfect dodging takes practice but becomes essential in Hero mode Adventure missions where getting hit is devastating. Watch enemy wind-ups and attack tells, dodge just as the attack would connect, and you’ll often see your character flash white indicating successful invincibility. This timing varies slightly by character based on their dodge animation, but the principle remains consistent.
Some attacks cannot be dodged and must be blocked or avoided entirely. These are telegraphed by the attacking enemy glowing or flashing—if you see this, create distance rather than attempting to dodge through. Getting hit by these super attacks often depletes half your health or more, making avoidance critical. Blocking (holding ZL) reduces damage significantly but locks you in place and doesn’t provide invincibility, making it inferior to dodging in most situations but useful as a panic button when caught mid-combo.
Interrupting enemy attacks before they land is often superior to dodging reactively. If you see an officer winding up for a big attack, hitting them with any attack will usually stagger them, canceling their assault. This proactive defense requires awareness—constantly monitoring what enemies around you are doing rather than tunnel-visioning on your own combos. Against multiple officers, this “hit them before they hit you” approach is often the only sustainable defense.
Environmental awareness prevents damage more effectively than any defensive technique. Positioning yourself so enemies attack from one direction rather than surrounding you reduces the attacks you need to defend against. Fighting near walls or keep barriers limits enemy approach angles. Clearing weak enemies before engaging officers prevents chip damage from random soldiers while you’re focused on the bigger threat. Map awareness and tactical positioning dramatically improve survivability.
Adventure Mode Deep Dive: The True Endgame
If Legend Mode is Hyrule Warriors’ introduction, Adventure Mode is its heart and soul—hundreds of missions across multiple themed maps, each offering unique challenges, powerful rewards, and tests of mastery that will occupy you for hundreds of hours.
Understanding Adventure Mode Structure
Adventure Mode presents a grid-based overworld inspired by the original Legend of Zelda, where each square on the grid represents a unique mission. The Definitive Edition includes eight different Adventure Maps, each themed around different Zelda games: Adventure Map (original LoZ), Twilight Map (Twilight Princess), Termina Map (Majora’s Mask), Master Quest Map (Master Quest dungeon layouts), Master Wind Waker Map (Wind Waker), Koholint Map (Link’s Awakening), Grand Travels Map (multiple games), Breath of the Wild Map (BotW themed).
Each map contains 100+ missions, with the original Adventure Map featuring 128 squares. Missions are unlocked progressively—you must complete adjacent squares to unlock the next tier, though some squares require items (found on the map or earned from other squares) to unlock. This creates a natural progression path while allowing some player choice in which challenges to tackle when.
Mission types vary significantly: defeat specific enemies within time limits, capture all keeps before time expires, rack up certain KO counts, defeat bosses with specific characters, protect allied commanders, defeat all commanders without time limits, quiz challenges testing Zelda knowledge, and many other variations. This variety prevents the mode from feeling repetitive despite hundreds of missions—each square demands slightly different strategies and character selections.
Rewards for mission completion are the real draw. Each mission awards: a primary reward (weapon, heart piece/container, costume, character unlock, etc.) for simply completing the mission, an A-rank reward (better weapons, rare materials) for meeting performance thresholds, and a Network Link reward (special items, fairy food) accessible by achieving A-rank and using a Network Link feature.
Ranking is determined by four metrics: time to completion, damage taken, total enemies defeated (KO count), and a Special Attack bonus. Achieving thresholds in all four grants A-rank, though some metrics matter more than others (time and damage taken are usually strictest). The ranking system creates natural replayability—you might complete a mission for the basic reward, then return later with a stronger character to achieve A-rank for the superior weapon.
Item Cards and Map Navigation
Adventure Maps employ an item card system borrowed from the original Legend of Zelda, where you use items like candles, compasses, and bombs to reveal secrets on each square before attempting the mission. Using the right item reveals hidden rewards, weakens enemies, or unlocks better weapon drops. Using the wrong item wastes the card with no benefit, so puzzle-solving becomes part of Adventure Mode.
Each square shows a small 8-bit style snippet of terrain from the original game. These visual hints indicate which item to use: cracked walls suggest bombs, dark areas suggest the candle, water might need the raft, and so on. Compasses and maps reveal the square’s secrets without guessing. If you’re unsure, compasses are always safe—they show you what’s hidden without requiring correct guessing.
Item cards are consumable but readily available. You earn them as mission rewards, buy them in the bazaar, and find them exploring. Early Adventure Mode progression requires strategic item usage—you likely won’t have enough to reveal every square’s secrets, so prioritize squares with rewards you actually need (weapons for your main characters, heart pieces, etc.). Later, with abundant resources, you can reveal everything systematically.
The network link feature allows spending Network Links (earned through various means) to access hidden rewards on A-ranked squares. These often include rare materials, powerful weapon skills, or fairy food. Network Links are limited early but become more available as you progress, creating another decision point of where to spend them.
The Difficulty Curve and Power Progression
Adventure Maps’ difficulty escalates brutally, with later squares featuring enemies at level 150+ with massive health pools and devastating damage output. This difficulty curve is intentional—Adventure Mode is designed for long-term engagement where you gradually power up your characters, obtain better weapons, and craft badges until challenges that seemed impossible become manageable.
Early Adventure Map squares (levels 20-30) are accessible immediately after completing Legend Mode. These provide training wheels while rewarding you with resources to strengthen your roster. Middle sections (levels 40-70) require focused character building—leveling key characters, obtaining solid weapons (rank 2-3 stars), and crafting essential badges. Late sections (levels 100+) demand optimized builds with top-tier weapons, maxed badges, and mastery of character mechanics.
Power progression comes from multiple sources working synergistically:
Character levels increase stats gradually, unlocked by spending rupees in the Training Dojo. Levels 1-50 are relatively cheap, 51-99 become expensive, and reaching level 150+ is a major rupee investment. Prioritize leveling your favorite 5-10 characters rather than spreading resources thinly across the roster.
Weapons provide your primary damage stat through their base attack value. Weapons range from 1 to 4+ stars (4+ being best), with higher stars meaning higher base attack. Weapons also have between 0-8 slots that can hold weapon skills (passive abilities). A 4+ star weapon with 8 slots and powerful skills is exponentially better than a 2-star weapon with 2 slots.
Badges are permanent character upgrades crafted at the Smithy using materials from defeated enemies. Badges provide stat bonuses, unlock new combos, add special effects (elemental damage, healing), increase weapon skill effectiveness, and more. Each character has multiple tiers of badges requiring progressively rarer materials. Crafting all badges for a character is a significant investment but transforms them from baseline to optimized.
The power progression loop involves: completing Adventure missions to earn weapon drops and materials, selling unwanted weapons for rupees, using rupees to level characters and upgrade the Smithy/Training Dojo, using materials to craft badges, and using improved characters to tackle harder missions for even better rewards. This loop is deeply satisfying when you return to a mission that brutalized you previously and steamroll it with your newly upgraded warrior.
Character-Specific Challenges and Restrictions
Many Adventure missions restrict which characters you can use, forcing you to develop a wide roster rather than relying solely on favorites. A mission might require: playing as a specific character (e.g., “Link (Spinner) only”), playing as characters from a specific game (e.g., “Twilight Princess characters only”), playing with a weapon type restriction (e.g., “Only sword-users”), or gender restrictions (rare but present).
These restrictions create interesting dynamics. You might need to build up a character you’ve neglected because three separate missions require them. This forced variety is actually Adventure Mode’s strength—it prevents the mode from becoming monotonous by pushing you out of your comfort zone. Characters you dismissed initially might become favorites once you’re forced to learn their nuances.
Character unlock missions are particularly notable, often requiring you to complete challenges with specific parameters to unlock characters like Ruto, Darunia, or the various DLC characters. These missions are sometimes brutal, asking you to defeat tough bosses with under-leveled characters. Plan for these—if you see a character unlock mission coming up on the map progression, start preparing the required character early by leveling them and obtaining a decent weapon from easier missions.
The DLC Adventure Maps (Master Wind Waker, Termina, etc.) significantly increase in difficulty over the base Adventure Map. They assume you’ve mastered the basics and have a well-developed roster. Don’t feel pressured to tackle these immediately—they’re designed as endgame content for players who’ve exhausted the base map and want even more challenges.
Efficient Farming Routes and Material Grinding
Adventure Mode is where you’ll farm materials for badges, and certain missions are significantly more efficient than others. Understanding optimal farming routes accelerates your progression dramatically.
Material types correspond to enemy types: bronze materials drop from regular soldiers, silver from captains, gold from officers, and giant boss materials from massive bosses. Each enemy type has multiple material tiers (like Bokoblin Horns, Boko Clubs, Boko Fangs), with rarer tiers dropping less frequently. Badges require specific material types in specific quantities, sometimes demanding dozens of rare gold materials for a single badge.
Efficient farming involves identifying missions with high concentrations of the enemy types you need. Some Adventure missions spawn hundreds of a specific enemy type, making them ideal farms. For example, missions asking you to defeat 1,200 enemies often spawn massive waves of weak soldiers, perfect for bronze material farming. Missions with multiple named officers yield gold materials efficiently.
The Great Sea map from the Wind Waker DLC is famous for material farming because many missions spawn specific enemy types repeatedly. Communities have compiled farming guides identifying the best squares for each material type. Consulting these guides saves dozens of hours of inefficient grinding.
Material farming is tedious but necessary. Mitigate the monotony by listening to podcasts or music, farming while watching shows (if playing handheld), setting small goals (farm enough materials for one specific badge), and varying which character you’re farming with to keep combat fresh even if the mission repeats. The payoff—crafting powerful badges that dramatically improve your favorite characters—makes the grind worthwhile.
Character Tier Lists and Recommendations
With 29 characters and 40+ movesets, choosing which characters to invest resources into feels overwhelming. While every character can complete any mission with sufficient investment, some are objectively more efficient, versatile, or powerful than others.
Top Tier Characters: The Powerhouses
These characters excel across most mission types with powerful movesets, excellent crowd control, strong single-target damage, or versatile capabilities making them safe investments for beginners and endgame players alike.
Link (Spinner) offers ludicrous crowd control with attacks covering massive areas, extremely fast movement speed, and relatively safe combos that keep him mobile. His C4 (Y-Y-Y-Y-X) is among the best crowd clearing moves in the game, while his mobility makes time-limited missions trivial. Excellent for enemy-count focused missions and general use.
Ganondorf (Swords) combines excellent range, high damage, and satisfying combos with surprising mobility for his size. His C5 creates massive shockwaves clearing entire keeps, while his strong attack damage makes officer fights quick. Versatile enough for almost any mission type.
Cia’s dual loadout (magic and darkness) provides unmatched versatility—she switches between crowd control and single-target modes mid-combo, adapting to any situation. Her C1 (Y-X) in darkness mode is one of the fastest officer-killers in the game, while her magical summoning clears crowds effectively.
Young Link (Mask) offers ridiculous damage through his transformation masks, particularly Fierce Deity mode which turns him into a screen-clearing demigod. Once you understand the mask switching mechanics, he dominates both crowds and officers with minimal effort.
Linkle’s dual crossbows provide safe, ranged combat with excellent mobility and crowd control. Her C5 bombs create massive explosions, her mobility keeps her safe, and her damage output is competitive with melee specialists without requiring close-range risk.
High Tier Characters: Strong Specialists
These characters excel in specific situations or have excellent capabilities with minor drawbacks preventing top-tier status.
Link (Master Sword) is the ultimate specialist—in missions where the Master Sword is usable (indicated pre-mission), he gains massive stat boosts and unique combo finishers making him potentially the strongest character. Limited to Breath of the Wild map missions but dominates when available.
Impa (Naginata) provides outstanding crowd control with wide, sweeping attacks and easy combo execution. Relatively straightforward to master with strong performance across most mission types.
Zelda (Baton) combines crowd control, mobility, and range effectively with flashy, satisfying combos. Her C3 cyclone attack clears keeps effortlessly while her ranged options provide safety.
Sheik excels at single-target damage with fast combo execution and strong officer-killing capability, but struggles with large crowds due to relatively focused attacks. Ideal for boss-focused missions or officer defeat challenges.
Lana (Summoning Gate) controls the battlefield by spawning Deku Trees and allies who draw aggression while she attacks safely. Unique playstyle that’s highly effective once mastered but requires adaptation.
Mid Tier Characters: Serviceable with Investment
These characters are perfectly viable but require more player skill, specific situations, or significant investment to match higher tiers’ efficiency.
Link (Gauntlets) provides excellent mobility and fun rocket-punch gameplay but requires closer positioning than safer ranged options and offers less crowd control than top specialists.
Midna combines decent crowd control with interesting hair-based attacks, but her combos feel less impactful than top-tier characters and her damage output requires more effort for similar results.
Darunia’s hammer delivers massive single-hit damage but slow animation speeds make him vulnerable in crowded fights and time-limited missions suffer from his sluggish movement.
Agitha’s parasol offers quirky crowd control with beetle summons but inconsistent damage output and strange hitboxes require patience and practice to use effectively.
Fi’s dance-based combat looks beautiful and provides solid crowd control but feels floaty and imprecise compared to more grounded fighters, demanding more effort for comparable results.
Lower Tier Characters: Challenging but Usable
These characters have notable weaknesses or require exceptional player skill to perform adequately, though dedicated players can absolutely succeed with them.
Zelda (Rapier) emphasizes crowd control through light-based attacks but feels slow and imprecise with long animation commitments leaving her vulnerable. Her other weapons (Baton, Dominion Rod) generally outperform the rapier.
Ruto’s water magic provides interesting area denial but inconsistent damage and awkward combo timings make her less efficient than alternatives in most situations.
Tingle’s balloon-based attacks are undeniably unique but suffer from slow buildup, inconsistent hitboxes, and low damage output requiring significant investment to make competitive.
Keep in mind these “tiers” reflect efficiency and ease of use, not absolute capability. Every character can complete every mission with proper investment. Personal preference matters enormously—a character you enjoy playing will outperform a “better” character you find boring because you’ll practice more, learn their nuances, and maintain engagement through grinding sessions.
Character Recommendations by Playstyle
Rather than following tier lists blindly, consider which playstyle appeals to you, then invest in characters matching that preference.
If you love safe, ranged combat: Linkle (crossbows), Zelda (Baton), Lana (Summoning Gate), Link (Spinner for its ranged options).
If you prefer aggressive melee: Ganondorf (Swords), Ghirahim, Impa (Giant Blade), Link (Gauntlets).
If you want crowd-clearing specialists: Young Link (Mask), Link (Spinner), Cia, Impa (Naginata), Ganondorf (Swords).
If you enjoy single-target boss-killers: Sheik, Cia (darkness mode), Ghirahim, Volga.
If you like technical, complex characters: Lana (any weapon, particularly Summoning Gate), Young Link (mask management), Cia (stance switching).
If you want straightforward, easy execution: Link (Sword), Impa (Naginata), Linkle (Crossbows), Ganondorf (Swords).
Personal enjoyment trumps efficiency every time. I’ve seen players demolish Adventure Mode with “low tier” characters simply because they loved the character and invested fully in learning them. Conversely, forcing yourself to play top-tier characters you dislike leads to burnout. Find YOUR champions, invest in them, and they’ll carry you through anything the game offers.
Weapons, Skills, and Optimization
The weapon system in Hyrule Warriors adds a powerful layer of customization and optimization, with well-rolled weapons transforming good characters into unstoppable forces.
Understanding Weapon Stars and Rarity
Weapons range from 1-star (weakest) to 4+-star (strongest), with each star tier dramatically increasing base attack power. A 4+ star weapon typically has 2-3 times the attack power of a 1-star weapon for the same character, making this the single most important weapon stat.
The + on 4+ star weapons indicates they’ve exceeded the normal maximum, often appearing in late-game Adventure Mode missions. These represent the absolute pinnacle of weapon power, though the difference between 4-star and 4+ is smaller than the jump from 3 to 4 stars.
Weapons also vary by number of skill slots, ranging from 0-8 slots. Each slot can hold one weapon skill (passive ability), making 8-slot weapons dramatically more powerful than 0-slot versions even with identical base attack. Late-game optimization requires both high star ratings AND maxed slots.
Drop rates favor lower-tier weapons on easier difficulties. Normal mode Legend Mode missions almost exclusively drop 1-2 star weapons with few slots. Hard mode increases 3-star drop chances modestly. Hero mode and high-level Adventure mode missions are where 4-star and especially 4+ star weapons with good slots become accessible. This creates natural progression—early game uses whatever drops, mid-game actively farms for 3-star weapons with decent slots, late game hunts perfect 4+ weapons with 8 slots and ideal skill combinations.
Weapon Skills Breakdown
Weapon skills provide passive bonuses, ranging from universally useful to highly situational. Understanding which skills to prioritize transforms adequate weapons into optimal ones.
Top-tier universally good skills:
Hasty Attacks increases your attack speed, making combos execute faster and keeping you safer by reducing animation commitment. Works on every character and benefits every playstyle. Always valuable.
Strength increases your damage output directly, simple and effective. More damage means faster clears and quicker officer defeats. Can stack multiple Strength skills for significant boosts.
VS Attack raises damage against officers (named enemies with health bars), making boss fights and officer-heavy missions significantly easier. Since officers are usually the actual threats in missions, this skill’s value is enormous.
Heart Power increases your attack based on current health percentage—full health grants maximum bonus, low health grants minimal bonus. Encourages careful play and rewards not taking damage. Excellent for skilled players who rarely get hit.
Darkness or Light element adds elemental damage to your attacks, building toward elemental explosions that deal massive damage and create crowd control. Elements also exploit certain enemy weaknesses. Darkness and Light cover the most enemy types, making them most universally useful.
Situationally strong skills:
VSククuu raises damage against specific enemy types (Bokoblins, Lizalfos, Moblins, etc.). Incredibly powerful if you know a mission spawns that specific enemy type repeatedly but useless otherwise. Late-game optimization involves having specialized weapons for specific farming missions with the appropriate VS skill for that mission’s enemy type.
Fire/Ice/Lightning elements are powerful but more situational than Darkness/Light. Certain enemies are weak to specific elements, making these skills powerful when matched correctly but neutral otherwise.
Rupee+ increases rupee drops from defeated enemies, useful when farming funds but wastes a slot when rupees aren’t your goal. Keep one Rupee+ weapon for each character for farming purposes, but don’t use them for combat-focused missions.
Material+ increases material drop rates, absolutely essential for farming badges. Keep dedicated Material+ weapons for each character and use them exclusively during material farming sessions to maximize efficiency.
Skills to avoid or use only when nothing better is available:
Special+ increases special attack damage, which sounds good but specials are used relatively infrequently compared to regular attacks, making skills that boost your constant damage output more valuable.
KO Count+ and Evade+ are gimmicky and provide minimal practical benefit compared to damage or safety skills.
Vs. Weak Point Gauge sounds appealing (faster weak point exposure) but properly optimized characters expose weak points so quickly already that this becomes redundant, wasting a slot better used for direct damage increases.
The ideal late-game weapon has: 4+ stars for maximum base attack, 8 skill slots (maximum possible), Hasty Attacks for speed, multiple Strength skills for damage stacking, VS Attack for officer damage, Heart Power for skilled players (or Darkness/Light element for others), and remaining slots filled with situational skills relevant to your common uses (Material+ if this character farms materials, VS specific enemy type for characters you use against that enemy frequently, etc.).
The Smithy and Weapon Forging
The Smithy allows combining weapons to create improved versions, though the system is somewhat convoluted. Understanding the mechanics prevents wasting valuable weapons on failed experiments.
Basic forging involves selecting a base weapon (which will be kept and improved) and up to five sacrifice weapons (which are consumed). The base weapon can inherit skills from the sacrificed weapons if it has empty skill slots. The base weapon’s attack power increases slightly based on the sacrificed weapons’ star ratings.
Skill inheritance follows specific rules: the base weapon must have empty slots to inherit skills, sacrificed weapons must have the skills you want to inherit, skills transfer randomly from the pool of available skills on sacrificed weapons (not guaranteed), and you can lock skills on the base weapon to prevent them from being overwritten during forging.
The randomness creates frustration—you might sacrifice multiple weapons with desirable skills and inherit none of them, instead getting useless skills from the pool. Mitigate this by: sacrificing weapons that ONLY have skills you want (increasing the odds of getting something useful), using weapons with fewer empty slots (fewer chances for random bad skills), and forging multiple times with cheap weapons until you get the desired skills, then using your premium weapons.
Advanced forging strategies involve using lower-star weapons with excellent skill combinations to build your ideal skill set on a base weapon, then once skills are perfected, forging that weapon using high-star weapons to increase its attack power. This two-phase approach (skills first, power second) is more resource-efficient than trying to do both simultaneously.
The smithy also allows removing skills (freeing slots for forging) and selling weapons for rupees. Late game generates so many weapons that regularly selling unwanted drops is necessary just for inventory management, providing the rupees needed for leveling characters.
Farming God Weapons: 4+ Star Perfection
Endgame players eventually hunt for “god weapons”—4+ star, 8 slots, perfect skill combinations for their most-used characters. This represents hundreds of hours of farming specific Adventure Mode missions known for dropping ideal weapons.
Certain Adventure Mode missions are famous for dropping specific weapon types with good star ratings and slot counts. Community guides identify these missions, allowing targeted farming rather than random hoping. For example, specific squares on the Termina map drop certain characters’ 4+ weapons reliably on A-rank completion.
The farming process involves: identifying which mission drops the weapon you want, optimizing a character to clear that mission quickly and consistently achieve A-rank, repeatedly grinding that mission (often 20-100+ times) until the weapon drops with good stars and slots, then forging it with skill optimization if needed.
The randomness is punishing—you might clear a mission 50 times and never see the weapon drop, or get it immediately with terrible slots, or get perfect slots with bad skills. RNG dominates endgame weapon farming, requiring patience and acceptance that you’re playing probability until luck aligns.
Is this grinding necessary? For casual play and even most of Adventure Mode, absolutely not. 4-star weapons with 5-6 slots and decent skills handle almost everything. God weapons are for perfectionists, completionists, and players who want to optimize every character to their theoretical maximum. It’s the difference between clearing missions successfully and clearing them 30 seconds faster—meaningful to some players, irrelevant to others.
My Hero Academy and Character Leveling
The My Fairy and Badge systems provide permanent character upgrades that, combined with weapons, determine your combat effectiveness.
The Badge System and Material Requirements
Each character has a badge grid unlocking various permanent upgrades, visible in the Training Dojo under the Badge Market. Badges require spending materials (earned from defeating enemies) and rupees, with more powerful badges requiring rarer materials and higher costs.
Badges provide diverse upgrades: raw stat increases (Attack, Defense, Health), new combo strings (unlocking Y-Y-Y-Y-X combo, for example, when previously you only had up to Y-Y-Y-X), special effects (adding elemental bursts to combos, healing effects, etc.), enhanced weapon skill effectiveness (making skills on weapons more powerful), Focus Spirit improvements (longer duration, faster meter building), and Special Attack enhancements.
The badge grid has progressive tiers, with later badges requiring earlier badges as prerequisites. This creates natural progression—you can’t immediately craft the most powerful badges but must work through earlier tiers first. Some badge tiers unlock based on character level (reaching level 50 might unlock tier 2, level 100 tier 3, etc.).
Material requirements escalate dramatically in higher tiers. Early badges require common bronze materials in small quantities. Mid-tier badges demand silver and gold materials. Final badges require multiple rare gold materials, giant boss materials, and even special rare drops. Farming these materials becomes the primary endgame grind.
Badge priorities vary by character and your goals, but general guidelines help:
For any character you plan to use seriously, prioritize: combo unlock badges (accessing their full moveset is crucial), moderate stat increase badges (the cheaper early-tier ones), and special effect badges that complement their playstyle (adding elements to characters with elemental attacks, for example).
For main characters you’ll invest heavily in: work toward unlocking and crafting every badge eventually, prioritize weapon skill enhancement badges (making their equipped weapon dramatically more effective), max out stat badges even at the expensive higher tiers, and craft special badges that enable playstyle optimizations.
For characters you’re only using for specific restricted missions: craft only the essential combo unlocks and cheap stat badges, skip expensive materials on characters you won’t use regularly, and save rare materials for your favorites.
The badge system rewards focused investment. Maxing badges on 5-10 characters you love and use regularly is better than partially upgrading 20 characters. The material costs are such that spreading resources too thin leaves everyone underpowered, whereas focused investment creates genuinely strong characters capable of tackling the hardest content.
Fairy System and Food Mechanics
My Fairy adds a companion system where fairies provide stat bonuses, special abilities, and can even attack enemies during battle. Fairies are unlocked through Adventure Mode and can be fed food to level them up and customize their skills.
Fairies come in various types (Fire, Water, Light, etc.) with different stat focuses and skills. Leveling fairies involves feeding them food items earned from missions, with different foods providing different experience amounts and affecting the fairy’s stat growth. Max-level fairies with optimal skills provide significant combat bonuses.
Fairy skills include: elemental magic attacks (the fairy casts spells damaging enemies), stat buffs (increasing your attack, defense, or speed temporarily), healing (restoring your health mid-mission), magic restoration (refilling your magic meter for Focus Spirit), and revival (automatically reviving you once when you die, extremely valuable in no-item difficulty runs).
The fairy system is honestly the most tedious, grindy aspect of Hyrule Warriors. Raising fairies to max level requires enormous amounts of specific food types, and managing fairy builds feels micromanage-heavy compared to the more straightforward character and weapon systems.
My recommendation: Don’t stress the fairy system initially. Complete Legend Mode and early Adventure Mode without worrying about fairies. Once you’re tackling higher-difficulty Adventure missions and want every advantage, invest in 2-3 fairies with different elemental types, focus on fairies with revival skills for survivability, and feed them when you have excess food but don’t farm food specifically. The benefits are real but not mandatory until you’re pushing the absolute hardest content.
Multiplayer and Co-op Strategies
Hyrule Warriors supports both local and online co-op, allowing two players to tackle any mission together. Co-op fundamentally changes the game’s dynamics and strategies.
Local vs. Online Co-op Differences
Local co-op splits the Switch screen, with each player occupying half the screen. This creates obvious visibility drawbacks—you’re working with reduced screen real estate making situational awareness harder, and performance can dip slightly with two active players rendering simultaneously. However, local co-op allows instant communication and coordination without latency.
Online co-op maintains full screen for each player but introduces potential latency issues depending on connection quality. Voice chat requires external solutions (Discord, etc.) as the game doesn’t provide built-in voice. Online co-op is excellent for playing with distant friends but local co-op’s immediacy makes it superior when available.
Both modes maintain separate progression for each player—both players keep experience, weapons, materials, and mission completion credit. This makes co-op highly rewarding for both participants unlike games where only the host benefits. You can absolutely grind Adventure Mode co-op and both players meaningfully progress their accounts.
Co-op Team Composition and Role Division
Smart co-op teams complement each other’s strengths, with players selecting characters and strategies that synergize rather than duplicate.
Consider dividing roles: one player focuses on objective completion (capturing keeps, defeating specific targets, completing mission goals) while the other handles defense (protecting allied commanders, defending keeps, intercepting enemy reinforcements). This division prevents both players from tunnel-visioning on the same objective while enemies overrun your positions elsewhere.
Character selection should cover different niches: pairing a crowd control specialist with a single-target boss killer ensures you’re prepared for any situation. One player as Ganondorf (clearing keeps) and one as Sheik (assassinating officers) covers more ground than two Ganondorfs doing the same thing simultaneously.
Communication elevates co-op from merely easier to strategically deep. Calling out: officer positions (“Strong officer approaching south keep”), mission objective updates (“I’m heading for the north boss, can you defend central?”), item and weapon pickups (“Strong weapon drop north”), and rescue situations (“Surrounded, need help!”) transforms co-op from chaotic to coordinated.
Co-op Difficulty Scaling
The game doesn’t significantly scale difficulty for co-op, making two players objectively easier than solo in most situations. Enemies have the same health and deal the same damage, but two players provide double the damage output, can defend multiple locations simultaneously, resurrect each other when downed, and split enemy attention.
This makes co-op the recommended approach for brutally difficult Adventure Mode missions where solo feels overwhelming. Missions with tight time limits become manageable when two players can complete objectives in parallel. Missions with multiple simultaneous objectives (defend keep A while capturing keep B) are designed with co-op in mind and feel punishing solo.
However, co-op isn’t always optimal—missions with specific character restrictions where you can’t bring your main character might be easier solo with a well-built required character than co-op with your partner forced onto a weak character. Some missions’ A-rank requirements (particularly damage taken thresholds) become harder in co-op because your partner taking damage counts against the ranking.
Balance is important: use co-op for missions where coordination and dual presence provide clear advantages, but don’t feel obligated to co-op everything. Solo play allows complete control and is often faster for simple missions once your characters are strong enough.
Advanced Tips and Hidden Mechanics
Beyond the obvious mechanics explained in tutorials, Hyrule Warriors contains numerous hidden systems, advanced techniques, and optimization tricks that dramatically improve performance once understood.
Animation Canceling and Combo Optimization
Most combo finishers lock you into extended animations, leaving you vulnerable and wasting time. Learning to animation cancel—interrupting the recovery frames of attacks to return to neutral faster—accelerates combat significantly.
The universal cancel is dodging (B button). Immediately after a combo finisher lands, pressing dodge interrupts the recovery animation, allowing you to dodge away from danger or start another combo sooner. This is especially valuable on characters with slow, committal finishers where standing through the full animation invites punishment.
Some characters can cancel into Focus Spirit, activated mid-combo to skip recovery frames while simultaneously entering super mode. This is more resource-intensive than dodging but combines offense (continuing attacks in Focus Spirit) with canceling, making it efficient when your magic meter is full anyway.
Certain combos have shorter recovery than others on the same character, creating “optimal” combos that deal good damage while recovering quickly enough to stay safe. Learning which combos these are for your mains allows you to prioritize them in dangerous situations while saving the slower, harder-hitting combos for when enemies are stunned or you’re safely isolated.
Enemy Officer Patterns and Optimal Engagement
Every officer type has specific patterns and optimal engagement strategies. Generic officers (Bokoblins, Moblins, etc.) follow simple patterns easily exploited. Special officers (Dinolfos, Lizalfos, etc.) have specific tells requiring adapted strategies.
Dinolfos telegraph their jump attack with a crouch—dodge this and they expose their weak point instantly. Lizalfos throw their boomerang then charge—perfect dodge the charge for weak point. Aeralfos fly around annoyingly—hookshot or boomerang pulls them down creating vulnerability. Darknuts block frontal attacks relentlessly—attack from behind or use shield-breaking items/combos.
Giant bosses have more complex patterns requiring specific strategies: Dodongos require bombs in their mouths when preparing fire breath—watch for the inhale animation and bomb immediately. Gohma needs eye shots when exposed—hit the eye with arrows or hookshot for massive damage. Manhandla requires severing all four heads—focus one head at a time with strong attacks rather than dispersing damage. Imprisoned needs toe destruction—target the glowing toes with ground-level attacks until it collapses.
Learning these patterns transforms frustrating 5-minute boss fights into 30-second eliminations. The game rarely explains these mechanics explicitly, expecting you to observe and adapt—the Zelda fan’s natural instinct from mainline games.
The True Power of Elements
Weapon element skills are more powerful than they initially appear once you understand the element system fully. Attacks with elemental properties build an invisible gauge on enemies. Once filled, an elemental explosion triggers dealing massive damage and creating crowd control effects (stunning, launching, etc.).
Different elements suit different situations: Darkness and Light are neutral against most enemies, making them universally safe choices. Fire excels against ice-themed enemies and plant-based foes. Ice dominates fire-themed enemies and slows aggressive opponents. Lightning is excellent against water-themed enemies and metal-armored foes.
Matching elements to enemy weaknesses doubles the elemental gauge buildup, creating explosions far more frequently. In missions heavily featuring specific enemy types, using the correct counter-element drastically increases your damage and crowd control. This is why endgame players maintain multiple weapons for their mains with different elements—you equip the contextually optimal weapon for each mission’s enemy composition.
Element explosions can hit multiple enemies simultaneously if they’re grouped, creating chain reactions of explosions and massive damage spikes. Characters with wide area attacks build elemental gauges on many enemies at once, then one finisher triggers simultaneous explosions across the crowd—incredibly satisfying and extremely effective.
Keep Management and Strategic Positioning
Keeps aren’t just objectives—they’re strategic resources controlling soldier spawns, providing safe havens, and influencing battlefield flow. Advanced players actively manage keeps rather than passively capturing objectives.
Capturing keeps spawns allied soldiers who flow toward enemy keeps, applying pressure. Multiple allied keeps create soldier streams that can actually defeat enemy keeps without your direct intervention given enough time. Strategic keep captures create multiple soldier streams converging on key positions, overwhelming defenses.
Some keeps are more valuable than others strategically—central keeps provide access to multiple battlefield areas, while edge keeps offer less tactical utility. Prioritize central keeps when choosing where to focus energy, leaving edge keeps for cleanup if time permits.
Defending keeps prevents having to recapture them repeatedly. If you’re capturing keeps only for them to be lost immediately, you’re wasting time. Sometimes defending a critical keep against waves of enemies is more valuable than capturing a new one. Read the battlefield—if allied commanders are holding keeps successfully, push forward; if keeps are falling behind you, fall back and stabilize.
Enemy commanders targeting allied commanders or keeps telegraph their intentions through map icons and radio messages. Intercepting these commanders before they reach their targets prevents mission failures and keeps. This requires map awareness—regularly checking the map for red arrows indicating enemy movements rather than tunnel-visioning on combat.
Weapon Compatibility and Element Restrictions
Certain missions restrict not just characters but weapon types—”sword-only,” “magic-users only,” etc. Understanding which characters have which weapon types allows planning for these restrictions.
Some characters have weapons crossing multiple categories: Link has both sword-type weapons and others, allowing him into sword-restricted missions with specific weapons equipped. Zelda’s weapons span different categories (Rapier is sword-type, Baton is magic-type). Knowing these distinctions allows fielding stronger characters in restricted missions than you’d initially think possible.
Element restrictions occasionally appear in specific Adventure Mode missions, requiring using a character with a specific element equipped. These are rarer than character or weapon restrictions but still occur. This is another reason maintaining multiple weapons with different elements for your mains is valuable—you can always meet element requirements.
DLC Content and Breath of the Wild Integration
The Definitive Edition includes all previously released DLC, with the Breath of the Wild content being particularly substantial and mechanically unique.
Breath of the Wild Characters and Mechanics
The four Champions from Breath of the Wild—Mipha, Daruk, Revali, and Urbosa—are playable characters each with unique movesets referencing their abilities from BotW. Mipha uses water-based spear attacks and healing, Daruk wields heavy two-handed weapons with earthquake attacks, Revali flies with aerial bow combat, and Urbosa delivers lightning-fast sword strikes with electrical bursts.
These characters unlock through the Breath of the Wild Adventure Map, a grid featuring challenges themed around BotW’s mechanics and aesthetic. The map includes unique features like Shrines (providing rewards), Divine Beast battles, and references to BotW locations and quests.
The Master Sword mechanic is exclusive to this content, allowing Link to temporarily enter a powered-up state where he wields the fully awakened Master Sword with enhanced stats and unique combo finishers. This state activates when specific conditions are met during BotW-themed missions, creating a super mode separate from Focus Spirit.
Link’s Champion’s Tunic (his BotW outfit) is unlockable through this map, alongside other BotW-themed costumes for various characters. These are primarily cosmetic but allow players to theme their characters after their favorite Zelda game aesthetically.
Wind Waker and Twilight Princess Content
The Wind Waker DLC adds characters from that game—Tetra, King Daphnes, and Toon Link—each with cel-shaded aesthetic movesets referencing Wind Waker’s art style and mechanics. Toon Link’s bombs, King Daphnes’s boat attacks, and Tetra’s pistol and cutlass create unique playstyles unavailable elsewhere.
The Master Wind Waker Adventure Map provides hundreds of additional missions with Wind Waker theming, rewards specific to these characters, and generally higher difficulty than the base Adventure Map. This is endgame content for players who’ve mastered the basics and want fresh challenges.
Twilight Princess DLC adds Twili Midna (Midna in her true form) and Twilight Princess costume variants for various characters. The Twilight Map offers missions themed around TP’s mechanics and aesthetic, including puzzles involving light and shadow.
These DLC maps are substantial—each offers 50-100+ missions, making the Definitive Edition’s content almost overwhelming in its scope. Don’t feel pressured to tackle everything—focus on content that interests you and characters you enjoy rather than forcing completion of content you’re not engaging with.
Linkle and Other Exclusive Characters
Linkle, the female Link-like character wielding dual crossbows, originated in the 3DS version and is included in Definitive Edition. She’s a fan favorite thanks to her energetic personality, unique ranged moveset, and fun alternate costumes.
Skull Kid, Tingle, and Young Link (mask) were also 3DS exclusives now included, each offering unique gameplay. Young Link’s transformation masks let him become Deku, Goron, or Fierce Deity Link mid-combat with different movesets for each form—incredibly versatile once mastered.
These characters aren’t strictly “better” than the base roster but provide variety and fresh options for players who’ve exhausted the original characters. They’re worth trying even if you’ve ignored them initially—you might discover a new favorite.
Conclusion: Your Journey Through Hyrule’s Battlefields
Hyrule Warriors Definitive Edition stands as a monument to what happens when two beloved franchises—The Legend of Zelda’s rich mythology and Dynasty Warriors’ satisfying combat—merge with respect, creativity, and genuine passion. This isn’t a cash-grab crossover but a thoughtfully designed celebration of Zelda’s history that manages to honor both its source material and its musou foundation.
The game rewards investment on multiple levels: mechanically, as you master combat systems and character nuances; strategically, as you understand battlefield management and mission optimization; progressively, as you level characters and forge god-tier weapons; and emotionally, as you experience favorite Zelda characters in entirely new contexts, fighting alongside heroes and villains from across the franchise’s history.
For newcomers, the journey from confused button-masher fumbling through early Legend Mode to confident warrior steamrolling Adventure Mode challenges is genuinely satisfying. The learning curve is generous—early content teaches fundamentals gently while later content demands mastery without holding hands. You’ll die, retry missions, optimize builds, and eventually triumph through genuine skill improvement rather than cheap exploits.
For Zelda fans specifically, this is a dream crossover—fighting King Dodongo as Zelda herself, commanding Ganondorf against armies of Bokoblins, playing as fan-favorites like Midna and Ghirahim in combat-focused scenarios mainline Zelda games can’t provide. The fanservice is abundant yet sincere, referencing deep cuts from across the franchise while making everything accessible to casual fans.
The Definitive Edition specifically is the version to own, consolidating all content into a portable package on hardware that handles it admirably. The portability transforms grinding sessions—farming materials on the couch or during commutes makes the grind far less tedious than being tethered to a TV would.
Is Hyrule Warriors for everyone? Honestly, no. If you despise repetition, the musou formula’s inherent repetition will grate regardless of the Zelda coating. If you hate grinding, the material farming and weapon optimization will frustrate rather than satisfy. If you want traditional Zelda dungeons and puzzles, this won’t scratch that itch.
But if you can appreciate the musou formula’s unique pleasures—the satisfaction of clearing hundreds of enemies with flashy combos, the incremental power progression of building characters from weak to unstoppable, the tactical layer beneath the button-mashing surface, and the joy of seeing beloved characters reimagined as warriors—then Hyrule Warriors offers literally hundreds of hours of quality content.
My final recommendation: Try Legend Mode on Normal difficulty for 3-5 hours. If by then you’re engaged with the combat, curious about characters, and willing to tackle Adventure Mode, you’ve found a game that could occupy you for months or years. If after that time you’re still bored or frustrated, the game probably isn’t for you, and that’s perfectly fine.
For those who click with it, though, Hyrule Warriors Definitive Edition is a masterpiece of crossover design, a love letter to Zelda, and one of the Switch’s deepest, most content-rich offerings. The battlefields of Hyrule await, hero. Pick up your weapon of choice, master your chosen champion, and carve your legend into the annals of Hyrule’s greatest conflicts.
The Triforce doesn’t need protection through wisdom, courage, and power alone—sometimes, it needs warriors willing to fight through thousands of enemies to defend it. Will you answer the call?
External Resources:
- Hyrule Warriors Wiki: https://zelda.fandom.com/wiki/Hyrule_Warriors
- r/HyruleWarriors Community: https://www.reddit.com/r/HyruleWarriors/