If there’s one location in The Legend of Zelda series that makes your heart race with equal parts excitement and dread, it’s Hyrule Castle. This iconic fortress has stood at the center of Hyrule’s greatest triumphs and darkest tragedies across multiple timelines and incarnations. Whether you’re a veteran player preparing for your twentieth assault on Ganon’s stronghold or a newcomer staring up at those imposing towers for the first time, Hyrule Castle represents the ultimate test of courage, skill, and preparation.
I still remember my first glimpse of Hyrule Castle in Breath of the Wild—that massive structure wreathed in Malice, pulsing with corrupted energy, standing as a grim reminder of the kingdom’s fall. It’s simultaneously beautiful and terrifying, a monument to both hope and destruction. But here’s what makes Hyrule Castle so special: it’s not just a final dungeon. It’s a living piece of Hyrule’s history, filled with stories, secrets, and moments that reward exploration just as much as combat prowess.
In this complete guide, we’re going to explore everything Hyrule Castle has to offer. We’ll dive deep into its rich history across the Zelda timeline, uncover hidden secrets that even veteran players might have missed, and give you the strategic knowledge you need to conquer this legendary fortress. Whether you’re hunting for the best weapons, searching for Princess Zelda’s memories, or just trying to survive your journey to face Ganon, this guide has you covered. Let’s venture into the heart of Hyrule’s most dangerous and fascinating location.
The Rich History of Hyrule Castle Across the Zelda Timeline
Hyrule Castle isn’t just a building—it’s the beating heart of an entire kingdom, and its story spans thousands of years across multiple timelines. Understanding the castle’s history helps you appreciate just how significant this location truly is.
The Castle’s Origins and Construction
The foundations of Hyrule Castle were laid in the distant past, shortly after the Kingdom of Hyrule was established by the goddess Hylia’s chosen people. According to the lore scattered throughout the games, the castle was built as both a seat of royal power and a sacred sanctuary. The Royal Family of Hyrule, blessed with the blood of the goddess, needed a stronghold worthy of their divine mandate to protect the kingdom and safeguard the Triforce.
What’s fascinating is that Hyrule Castle has been destroyed and rebuilt multiple times throughout history. Each reconstruction added new layers, both literally and figuratively, to the structure. In Breath of the Wild, you can actually see evidence of this—ancient stonework sits alongside more modern construction, and beneath the castle lie forgotten chambers and passages that date back centuries. The castle you explore is actually built upon the ruins of previous incarnations, creating a complex archaeological layer cake of Hyrulean history.
The castle’s strategic location wasn’t chosen randomly either. It sits at the geographical center of Hyrule in most incarnations, positioned to project royal authority across the entire kingdom. In Breath of the Wild specifically, the castle occupies a small island connected to the mainland, providing natural defensive advantages while remaining accessible to the kingdom’s subjects. The Hyrule Castle Town that traditionally surrounds the fortress served as the kingdom’s commercial and cultural hub, though by the time of Breath of the Wild, only ruins remain.
Hyrule Castle in Ocarina of Time: A Castle of Light and Shadow
In Ocarina of Time, we see Hyrule Castle during what many consider the kingdom’s golden age. The castle grounds are vibrant, filled with guards patrolling manicured gardens, and the castle town bustles with life and commerce. Young Link’s infiltration of the castle to meet Princess Zelda shows us a fortress that’s well-defended but not yet under siege. The castle represents order, prosperity, and peace.
But when Link pulls the Master Sword and sleeps for seven years, everything changes. Ganondorf’s conquest transforms the once-beautiful castle into a dark fortress surrounded by flames and barriers. The Castle Town is destroyed, its survivors fleeing to Kakariko Village. The castle itself becomes Ganon’s Castle, a twisted reflection of what it once was, filled with powerful magical barriers and corrupted architecture. This transformation perfectly symbolizes how quickly peace can turn to chaos when evil gains the upper hand.
What makes Ocarina of Time’s depiction so memorable is the contrast. The same location serves as both a symbol of hope (when you first sneak in as a child) and ultimate despair (when you return as an adult to find it transformed). This duality would become a recurring theme for Hyrule Castle throughout the series.
Twilight Princess and the Castle Under Siege
Twilight Princess presents perhaps the most militaristic version of Hyrule Castle we’ve seen. The castle in this game is a massive medieval fortress with multiple defensive walls, guard towers, and a highly organized military presence. When Zant and his Twilight forces attack, the castle’s defenders put up a fierce fight, though they’re ultimately overwhelmed by the surprise assault and supernatural enemies.
The castle’s fall in Twilight Princess is particularly tragic because we see it happen through flashbacks. Princess Zelda surrenders the castle to prevent further bloodshed among her people, a decision that weighs heavily on her throughout the game. When you finally return to liberate the castle near the game’s conclusion, you’re fighting through halls where loyal soldiers made their last stand. The environmental storytelling here is powerful—you can see evidence of the battle everywhere, from damaged walls to abandoned defensive positions.
The throne room in Twilight Princess deserves special mention. It’s one of the most beautifully designed chambers in any Zelda game, with soaring ceilings, stained glass windows, and an atmosphere of faded grandeur. When you face Ganondorf in this very room for the final battle, it feels like the culmination of everything the kingdom has suffered, and your victory represents the restoration of that stolen glory.
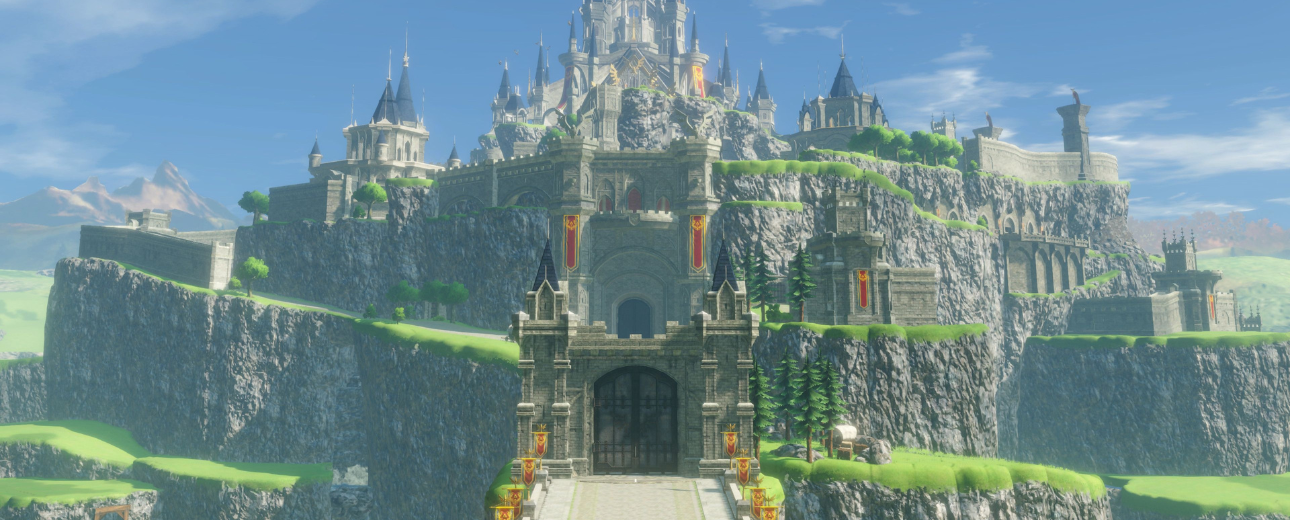
Breath of the Wild: A Castle Consumed by Calamity
The Hyrule Castle in Breath of the Wild might be the most tragic incarnation we’ve ever seen. One hundred years before Link awakens, Calamity Ganon erupted from beneath the castle during Zelda’s desperate attempt to awaken her sealing power. The destruction was catastrophic and immediate. The castle became ground zero for the Calamity, transformed into a twisted monument to Hyrule’s greatest failure.
What makes this version so haunting is that you can explore the castle at any point in the game and see exactly what was lost. The dining hall still has place settings from a royal banquet that will never be finished. Princess Zelda’s study contains her research notes, frozen in time from the day disaster struck. The Royal Guard armory holds weapons that were never drawn to defend the kingdom. Every room tells a story of lives interrupted, duties left unfulfilled, and a kingdom frozen at the moment of its fall.
The Malice that covers the castle isn’t just visually striking—it’s a physical manifestation of Ganon’s corrupting influence. It pulses with evil energy, spawns monsters, and creates environmental hazards throughout the castle. In many ways, the castle itself has become a living entity, corrupted and twisted by a century of Ganon’s presence. Yet beneath all that corruption, the bones of the original structure remain, waiting for someone brave enough to reclaim it.
The castle’s design in Breath of the Wild also reflects layers of history. You can find evidence of the ancient Sheikah technology that was integrated into the castle’s defenses, the more recent construction from one hundred years ago, and the ancient foundations that date back even further. This makes exploring the castle feel like an archaeological expedition as much as a combat challenge.
Tears of the Kingdom: Secrets Beneath and Above
Tears of the Kingdom takes our understanding of Hyrule Castle to entirely new depths—literally. We discover that beneath the castle lie ancient chambers that predate even the earliest known history of Hyrule. These depths contain secrets about the kingdom’s founding, the imprisonment of Ganondorf, and the true nature of the castle’s construction.
The revelation that Hyrule Castle was deliberately built over Ganondorf’s sealed body recontextualizes everything we knew about the fortress. It wasn’t just a seat of royal power—it was a prison, designed to keep an ancient evil contained. The Royal Family’s presence in the castle took on a sacred duty: maintaining the seal through their very proximity and the goddess blood in their veins. This explains why the castle has been rebuilt so many times in the same location despite repeated destructions. The site itself is sacred, and abandoning it would risk releasing the sealed evil below.
When Ganondorf finally breaks free in Tears of the Kingdom, the castle itself rises into the sky, creating one of the most visually spectacular moments in the entire series. The Upheaval doesn’t destroy the castle but transforms it yet again, suspending it between earth and sky. Exploring this airborne fortress reveals new secrets and challenges while also allowing you to see familiar locations from entirely new perspectives.
Understanding Hyrule Castle’s Layout and Structure
Before you charge into Hyrule Castle, you need to understand what you’re getting into. This isn’t a linear dungeon—it’s a massive, interconnected fortress with multiple entry points, vertical layers, and countless rooms to explore. Let’s break down the castle’s structure so you can navigate it like a pro.
The Exterior: Walls, Towers, and Entry Points
The first thing that strikes you about Hyrule Castle in Breath of the Wild is its sheer size. The fortress is surrounded by high walls, defensive towers, and a moat that’s more like a small lake. In its current corrupted state, the castle is also covered in Malice, with Guardians patrolling the grounds and Gloom Spawn lurking in shadows (in Tears of the Kingdom).
There are actually multiple ways to enter the castle, and choosing the right entry point for your goals is crucial. The main gate on the north side is the most obvious approach, but it’s also heavily guarded and puts you in the path of multiple Guardians. Many players prefer alternative routes that let them bypass the heaviest defenses or access specific areas of the castle more directly.
The Lockup entrance on the west side provides access to the castle’s dungeon areas and eventually connects to the interior. This route is popular because it avoids many of the Guardians outside while still giving you access to valuable loot. The Docks on the south side offer another water-based approach that can be surprisingly effective, especially if you have climbing stamina to scale the walls from there.
For players with upgraded stamina or Revali’s Gale, the vertical approach can’t be beat. Simply climbing or flying to the upper sections of the castle lets you skip most of the dangerous ground-level areas entirely. You can land directly on the Sanctum where Ganon waits, though you’ll miss out on all the amazing loot and exploration opportunities inside.
The castle’s towers serve as excellent vantage points and many contain treasure chests with valuable items. The First Gatehouse and Second Gatehouse control access to different sections of the castle and are worth clearing if you want to explore thoroughly. Each tower and gate tells part of the story of how the castle was defended during the Calamity, with evidence of the Royal Guard’s last stand visible throughout.
Interior Areas: From Dining Hall to Sanctum
Once inside, Hyrule Castle reveals itself as a labyrinth of interconnected rooms, hallways, and chambers spread across multiple floors. Understanding the major interior areas helps you plan efficient routes to your objectives.
The Dining Hall is one of the most emotionally impactful rooms in the castle. Long tables are still set for a meal that was never eaten, and the grandeur of the chamber speaks to the royal lifestyle before the Calamity. This room connects to several other areas and contains valuable items, making it a useful landmark for navigation. You can almost imagine the royal banquets that once took place here, the laughter and conversation that filled these halls before everything fell silent.
Princess Zelda’s Study and her Room are must-visit locations for any lore enthusiast. Her study contains research notes, journals, and evidence of her desperate attempts to awaken her sealing power before the Calamity struck. The room provides crucial insight into Zelda’s character and the pressure she was under. Her private chambers are similarly poignant, showing the personal space of a princess who carried the weight of the kingdom on her shoulders. Finding these rooms makes you realize you’re not just exploring a dungeon—you’re walking through someone’s life.
The Library is another treasure trove of lore and items. Shelves of books (sadly unreadable) line the walls, and you can find some excellent weapons and shields here. The library represents Hyrule’s accumulated knowledge and wisdom, now gathering dust while the kingdom remains in ruins. It’s a powerful reminder of everything that was lost to the Calamity.
The Guards’ Chamber and various barracks areas show where the Royal Guard lived and trained. These soldiers were the kingdom’s elite defenders, and their armory contains some of the best weapons available in the castle. The Royal Guard equipment you find here represents the pinnacle of Hyrulean military craftsmanship, each piece a reminder of the brave warriors who fell defending their kingdom.
As you ascend through the castle, you’ll pass through various observation rooms, storage areas, and defensive positions. Each room serves a purpose in the castle’s design, and taking time to understand the layout reveals how the fortress was meant to function. The castle wasn’t just a pretty palace—it was a sophisticated military installation designed to withstand sieges and protect the royal family.
The Sanctum sits at the very top of the castle, a massive chamber that once served as the throne room and most sacred space in the kingdom. Now it’s where Calamity Ganon has made his lair, suspended in the center of the room in a cocoon of Malice. The path to the Sanctum takes you through increasingly corrupted areas, as if the castle itself is trying to prevent you from reaching its heart. When you finally arrive, the contrast between the room’s original grandeur and its current state of corruption is striking.
The Depths Below: Lockup, Underground Passages, and Ancient Secrets
Beneath the visible castle lie layers of dungeons, tunnels, and ancient chambers that most visitors never see. These underground areas are darker, more dangerous, and filled with secrets that reward brave explorers.
The Lockup area served as the castle’s prison and dungeon. Dark, damp cells line narrow corridors, and you can still find the skeletal remains of prisoners who died during the Calamity. The lockup connects to a network of underground passages that were likely used for prisoner transport, secret movements of the royal family, or emergency escape routes. Exploring these areas requires navigating tight spaces, defeating monsters in confined quarters, and often solving environmental puzzles involving water levels or locked gates.
In Breath of the Wild, these underground areas are relatively limited, but they contain some excellent loot including Royal Guard weapons and shields. The atmosphere down here is oppressive, with Malice seeping through cracks and corrupted monsters lurking in the shadows. It feels genuinely dangerous, like you’re venturing into places that should remain sealed.
Tears of the Kingdom dramatically expands our understanding of what lies beneath the castle. The discovery of ancient chambers deep below the foundation reveals Rauru’s original seal on Ganondorf and the true age of Hyrule’s history. These depths connect to the larger underground world explored in the game, showing that the castle sits atop a network of ancient tunnels and chambers that stretch across all of Hyrule.
The architecture in these deepest chambers is distinctly different from the castle above—older, more primitive, yet somehow more powerful. You can see Zonai influence in the construction, and the presence of ancient sealing magic is palpable. These areas tell a story that predates Hyrule itself, revealing secrets about the land’s original inhabitants and the eternal cycle of conflict with Ganondorf.
Navigating the underground areas requires different skills than exploring the castle proper. Light sources become crucial, as many chambers are pitch black. Stamina management matters more when you’re climbing through vertical shafts or swimming through flooded passages. The monsters down here tend to be different varieties too, adapted to the darkness and often more dangerous than their surface counterparts.
Towers, Spires, and Rooftop Areas
Don’t neglect the upper reaches of Hyrule Castle. The towers and rooftop areas offer some of the best views in the game, valuable treasure, and strategic advantages for planning your approach.
The castle features several prominent towers, each serving different defensive and observational purposes. The Princess’s Tower is particularly notable—this is where you’ll find memory locations and items connected to Zelda herself. Climbing to the top requires careful navigation and often combat with flying enemies, but the rewards include both loot and lore.
The various spires and parapets that crown the castle’s walls served as watchtowers and defensive positions. In the current corrupted state, many have been taken over by monsters or blocked by Malice, but clearing them reveals treasure chests and provides excellent vantage points for scouting the surrounding area. From these heights, you can see all of central Hyrule spread out before you, a constant reminder of what you’re fighting to save.
The rooftop areas in Tears of the Kingdom gain additional significance when the castle rises into the sky. What were once the highest points of the fortress become mid-level areas relative to the floating islands above. Exploring these zones with the new abilities from Tears of the Kingdom opens up entirely new navigation routes and reveals secrets that were previously inaccessible.
One of the most spectacular experiences in either game is watching the sunset from the castle’s highest points. Despite all the corruption and danger, there’s a haunting beauty to these moments. The light catches on the ancient stonework, and for just a moment, you can imagine what the castle must have looked like in its glory days, before the Calamity cast its shadow over everything.
Preparing for Your Castle Assault: What You Need
Charging into Hyrule Castle unprepared is a recipe for disaster. Even experienced players can get overwhelmed by the fortress’s challenges if they don’t bring the right equipment and mindset. Let’s talk about how to prepare yourself for success.
Recommended Gear and Weapons
The weapons and armor you bring to Hyrule Castle can make the difference between triumph and humiliation. While it’s technically possible to conquer the castle with minimal equipment, having the right loadout makes the experience much more manageable and enjoyable.
For armor, the Ancient Armor set is arguably the best choice for a castle assault. The complete set provides excellent defense and offers a massive damage boost against Guardians, which you’ll encounter frequently both outside and inside the castle. If you’ve upgraded it at Great Fairy Fountains, even better—level 4 Ancient Armor makes you nearly invincible against Guardian attacks. The set bonus also includes Guardian resistance, which reduces damage from Guardian lasers, giving you more breathing room when facing these mechanical menaces.
Alternatively, the Soldier’s Armor or Royal Guard Armor sets provide solid defense without specializing against any particular enemy type. The Champion’s Tunic remains popular for its raw defense value and the ability to see enemy health bars, which helps you assess threats quickly. Many players also like keeping the Barbarian Armor handy for its attack boost, which can be useful when fighting the tougher enemies inside the castle.
For weapons, variety is your friend. Bring a mix of one-handed weapons, two-handed weapons, and spears to handle different combat situations. The castle itself contains numerous Royal Guard weapons—the most powerful standard weapons in the game—but they have low durability. If you’re going in to farm these weapons, bring disposable equipment you’re willing to lose and plan to leave with a full inventory of high-tier gear.
Ancient weapons are excellent choices because they deal bonus damage to Guardians and mechanical enemies. The Ancient Short Sword, Ancient Bladesaw, and Ancient Spear are all worth bringing. Ancient Arrows trivialize Guardian encounters completely—a single shot to the eye destroys any Guardian instantly—though they’re expensive to craft or purchase. Save them for emergencies or when you absolutely need to eliminate a Guardian quickly.
Don’t neglect shields. The Ancient Shield perfectly parries Guardian lasers automatically without requiring a perfectly timed input, making it ideal for players who struggle with manual parries. The Hylian Shield, obtainable from a mini-boss beneath the castle, is the most durable shield in the game and should be in every player’s inventory for the assault. Royal Guard Shields found in the castle have high stats but poor durability, so consider them temporary upgrades rather than permanent equipment.
Bows deserve careful consideration too. The Twilight Bow (if you have the Zelda amiibo) is unmatched for its infinite durability and perfect straight-shot arrows. Otherwise, Ancient Bows, Royal Guard Bows, or any multi-shot bows work excellently. Bring a variety of arrows, including Ancient Arrows for Guardians, Bomb Arrows for groups of enemies, and plenty of standard arrows for general combat.
Consumables: Food, Elixirs, and Fairies
Even the best equipment won’t save you if you run out of healing items mid-assault. Proper preparation means cooking a full inventory of powerful consumables before you enter the castle.
Hearty foods are the gold standard for healing because they completely restore your health and add temporary yellow hearts on top. Cooking any Hearty ingredient by itself yields a dish that full-heals you, making items like Hearty Durians incredibly valuable. I recommend bringing at least ten full-heal meals to the castle. It sounds like overkill, but you’ll be surprised how quickly you can burn through them during intense fights.
Stamina recovery foods are crucial if you plan to climb extensively or use charged attacks frequently. Dishes made with Endura Carrots or Endura Shrooms restore and overfill your stamina wheel, giving you green bonus stamina for extended climbing or combat maneuvers. Bring at least five of these.
Attack-boosting and defense-boosting meals can turn tough fights into manageable encounters. A level 3 attack boost (achieved by cooking with three attack-boosting ingredients or one mighty ingredient plus a dragon horn shard) makes you hit significantly harder, shortening fights and reducing the damage you take simply because enemies die faster. Similarly, level 3 defense boosts make you remarkably tanky, able to withstand hits that would otherwise destroy you.
Status resistance foods protect you from specific threats. Heat resistance for the castle’s burning areas, cold resistance for icy sections, and fireproof protection all have situational value. Shock resistance can be useful against electric enemies, though you’ll encounter fewer of these in the castle compared to other locations.
Don’t forget about fairies. These magical creatures automatically revive you when you die, giving you a second chance in critical moments. You can hold up to eleven fairies (one being a special quest-related one), and I recommend maxing out your fairy collection before the castle assault. Catch them near Great Fairy Fountains or in specific locations like the Akkala Citadel Ruins. The auto-revival they provide has saved countless runs from disaster.
Elixirs serve as alternatives to food for many effects, often being more accessible if you have the right monster parts and critters. Hearty Lizards cooked with monster parts create hearty elixirs that full-heal you. Energetic Rhino Beetles make stamina-restoring elixirs. Keep several defensive and attack elixirs in your inventory as backups to your food supplies.
Abilities and Champion Powers You Should Have
Before tackling Hyrule Castle seriously, you should have completed at least some of the Divine Beasts to unlock Champion abilities. These powers provide massive advantages that can turn impossible situations into manageable ones.
Mipha’s Grace is perhaps the most valuable ability for castle exploration. This power automatically revives you when you die, fully restoring your hearts. It’s like having an extra fairy that recharges over time. Knowing you have this safety net encourages bolder play and protects you from unexpected deaths. In long castle exploration sessions, Mipha’s Grace can trigger multiple times, potentially saving your entire run.
Revali’s Gale revolutionizes how you navigate the castle’s vertical spaces. Instead of climbing towers or navigating complex interior routes, you can simply glide to where you need to go. This ability is especially valuable for reaching rooftop areas, accessing high windows, or making quick escapes when overwhelmed. The ability to create instant updrafts three times before recharge gives you tremendous mobility options.
Daruk’s Protection provides a defensive bubble that negates attacks and can parry Guardian lasers automatically. This is incredibly valuable when facing multiple Guardians or when you’re surrounded by melee enemies. The protection absorbs three hits before disappearing, and knowing you have this emergency shield encourages more aggressive play. It’s particularly useful in situations where you’ve made a mistake and need time to recover.
Urbosa’s Fury deals massive area-of-effect damage and can instantly destroy weaker enemies. While less universally useful than the other powers, it shines in situations where you’re surrounded or facing groups of enemies in confined spaces. The ability to clear a room with a single activation can be a lifesaver when things get chaotic.
If you’re playing Tears of the Kingdom, you’ll have an entirely different set of abilities that change how you approach the castle. Ultrahand allows you to manipulate objects and create solutions to environmental challenges. Fuse lets you create powerful weapons on the fly, combining materials to enhance your arsenal. Ascend provides insane vertical mobility, letting you rise through ceilings to reach upper floors instantly. Recall can reverse the movement of objects, creating unique puzzle solutions and combat opportunities.
The Sages in Tears of the Kingdom function similarly to Champion abilities, providing companion assistance during exploration and combat. Each Sage brings unique powers—Tulin’s wind gusts for mobility, Yunobo’s charging attacks for breaking obstacles, Sidon’s water shields for defense, and Riju’s lightning attacks for offense. Learning to use these powers in combination creates powerful synergies that make castle exploration much smoother.
Optional But Helpful: Master Sword and Hylian Shield
While you can absolutely conquer Hyrule Castle without these legendary items, having them makes the experience significantly smoother and more enjoyable.
The Master Sword is the legendary blade that’s forever linked to the hero’s destiny. In Breath of the Wild, you obtain it from the Korok Forest by pulling it from its pedestal, but only if you have 13 hearts (or use the trick of trading stamina for hearts temporarily). The Master Sword has 30 base attack power, which jumps to 60 inside Hyrule Castle and against corrupted enemies. This power boost makes it the strongest weapon available in the castle, and unlike other weapons, it never breaks permanently—it just needs time to recharge after extended use.
Having the Master Sword means you always have a reliable, powerful weapon no matter what happens. You can experiment with other weapons, use them until they break, and know you’ll still have the Master Sword as a fallback. The psychological comfort of this is tremendous. You can take risks, try different combat approaches, and generally play more aggressively because you’re not worried about weapon conservation.
In Tears of the Kingdom, the Master Sword gains additional significance and power. After reforging it with light from the Light Dragon, the blade becomes even stronger and gains extended durability. The weapon maintains its power boost against corrupted enemies and becomes even more crucial given the Gloom-corrupted threats you’ll face.
The Hylian Shield is the most durable shield in the entire game, with a base defense of 90 and durability of 800. For comparison, most shields have durability between 15-60, making the Hylian Shield dramatically more reliable. You can find it in a lockup area beneath Hyrule Castle by defeating a Stalnox mini-boss, meaning it’s technically accessible before your main assault on the castle proper.
This shield can withstand incredible punishment, from Guardian lasers to direct hits from Lynel attacks. The peace of mind it provides during combat is invaluable. You can block freely without worrying about your shield shattering at a critical moment. The shield’s high defense also reduces the damage you take from blocked attacks, providing extra survivability in tough fights.
One important note: while the Hylian Shield has incredible durability, it’s not indestructible. Shield-surfing on rough terrain rapidly degrades any shield, including this one. Save your shield-surfing for when you have disposable shields equipped. If your Hylian Shield does eventually break (after extensive use), you can purchase a replacement from Granté in Tarrey Town, though it costs a hefty 3,000 rupees.
Step-by-Step Walkthrough: Entering and Navigating the Castle
Now that you’re properly prepared, let’s talk about actually getting into the castle and navigating its maze-like interior. There are multiple approaches depending on your goals, skill level, and preferred playstyle.
The Main Gate Approach: Direct and Dangerous
The main gate on the north side of the castle is the most straightforward entrance, but also one of the most heavily defended. This approach works if you want to test your combat skills against multiple Guardians and clear the castle’s primary defenses.
As you approach from the north, you’ll immediately draw the attention of Guardian Stalkers patrolling the bridge and courtyard. These mechanical monsters are dangerous opponents that can kill you in one or two laser blasts if you’re not careful. Your options for dealing with them include: perfect shield parries (reflecting their lasers back at them), using Ancient Arrows for instant kills, taking cover behind pillars and debris, or simply running past them if your goal is to get inside quickly rather than fight.
If you choose to fight, remember that Guardian Stalkers have a tell before firing—their eye glows blue and they play a distinctive musical cue. This is your signal to either raise your shield for a parry or take cover. Parrying requires precise timing: wait until you hear the beep and see the laser fire, then parry immediately. Too early and you’ll miss; too late and you’ll take damage. Practice makes perfect, and successfully parrying a Guardian laser is one of the most satisfying skills in the game.
Once past the initial Guardian patrols, you’ll reach the main gate itself. The gate area contains more enemies, treasure chests, and evidence of the Royal Guard’s last stand. The bodies of fallen Guardians and broken weapons litter the courtyard, telling a silent story of the desperate battle fought here a century ago.
Proceeding through the main gate brings you into the First Gatehouse area. This structure served as a defensive checkpoint designed to slow invaders. You’ll find more enemies here, including Lizalfos and sometimes a Moblin or two. The gatehouse contains treasure chests with valuable items and connects to various interior routes through the castle.
The main gate approach is the most “heroic” route—it’s you directly challenging the castle’s defenses and fighting your way through. It’s also arguably the most dangerous for less experienced players because you face heavy opposition immediately. However, it provides good combat practice and familiarizes you with the castle’s exterior defenses, which is valuable knowledge for future visits.
The Western Route: Through the Lockup
The western approach via the Lockup entrance is my personal favorite for first-time explorers because it balances accessibility with meaningful exploration. This route takes you through the castle’s prison and dungeon areas before connecting to the main interior.
To reach the Lockup entrance, approach the castle from the west side, staying low and using the terrain for cover from Guardian sightlines. You can actually swim to a dock area on the west side, which puts you right near the entrance with minimal enemy encounters. Look for a water-filled passage that leads into the castle’s lower levels—this is your way in.
Once inside the Lockup, you’ll navigate through narrow corridors lined with prison cells. The atmosphere here is oppressive and creepy, with skeletal remains and signs of the chaos that erupted during the Calamity. Watch for enemies in cells and around corners, as the tight quarters make combat more dangerous. Stal enemies (skeletal monsters) frequently spawn in these dark areas, emerging from pools of Malice on the ground.
The Lockup route is excellent for finding Royal Guard weapons, which spawn in several locations throughout the prison area. These weapons have the highest base attack values in the game, making them worth collecting even if you have to fight through enemies to get them. I particularly recommend grabbing the Royal Guard’s Claymore and Royal Guard’s Shield found down here.
One of the cool things about the Lockup route is discovering hidden passages and cells that contain environmental storytelling. You’ll find notes, remains, and items that hint at the stories of prisoners who were here when the Calamity struck. Some died instantly, others transformed into monsters. It’s dark stuff, but it adds depth to the world.
The Lockup eventually connects to staircases and passages that lead upward into the castle proper. Following these routes brings you to various interior areas including storage rooms, guard quarters, and eventually the main halls. You have multiple options for where to go from here, allowing you to customize your path based on what you want to see or obtain.
This route is excellent for players who want to explore thoroughly without facing overwhelming external defenses first. You get inside quickly, enjoy interesting environmental exploration, collect valuable loot, and then have the freedom to navigate the interior at your own pace.
The Southern Approach: Docks and Water Route
The southern approach via the Docks is one of the least-used routes, which makes it perfect for players who want to avoid the heavy Guardian patrols on the north and west sides. This path requires some swimming and climbing but rewards you with a relatively peaceful entrance.
Approach the castle from the south, staying in the water to avoid Guardian detection. The moat completely surrounds the castle, and swimming around to the south side takes you to dock areas that were once used for boat traffic to Castle Town. These docks are now ruined and abandoned, but they provide access points to scale the castle walls.
The key to this approach is having enough stamina (or stamina-restoring food) to both swim the distance and climb the walls. Two stamina wheels make this route comfortable, though you can manage with one if you use stamina food strategically. Swimming also keeps you safe from most threats—Guardians can’t target you effectively in the water, and most ground enemies can’t reach you.
Once you reach the southern docks, look for climbing routes up the castle walls. The stonework provides plenty of handholds, and the southern side has fewer enemies watching for intruders. You can climb directly to mid-level or even upper-level areas, bypassing much of the castle’s ground defenses entirely.
One advantage of the southern approach is that it lets you enter the castle at different heights depending on where you climb. Want to access the Library directly? Climb to the appropriate height and look for windows or balconies to enter. Trying to reach Princess Zelda’s room? Climb higher and navigate the upper corridors. This flexibility makes the route great for targeted loot runs when you know exactly what you want and where it is.
The southern approach is also romantic in a way—you’re entering the castle the way a stealthy hero might, avoiding the front door and slipping in through an unexpected route. There’s something appealing about the image of Link swimming through moonlit water, scaling ancient walls, and infiltrating the corrupted fortress like a phantom.
The Sky Approach: Paragliding From Above
If you have the stamina, climbing gear, or abilities to reach high ground around the castle, the sky approach offers the fastest and potentially safest route directly to the Sanctum. This method involves climbing to a high elevation (like a nearby tower or mountain), paragliding over the castle, and landing wherever you choose.
The beauty of the sky approach is that it completely bypasses ground-level defenses. Those Guardian Stalkers patrolling below? Not your problem. The enemies in the Lockup and gatehouses? You’ll never see them. This route takes you directly to your destination, making it ideal for speedruns or when you simply want to face Ganon without all the preliminary exploration.
Revali’s Gale makes this approach trivial. Activate the ability from anywhere with sight lines to the castle, ride the updraft into the sky, and glide directly to the Sanctum. You can land on the roof, drop through the top entrance, and be facing Ganon within minutes of deciding to assault the castle. This is as efficient as it gets.
Even without Revali’s Gale, you can use climbing to reach high points. The towers and hills surrounding the castle provide excellent launch points. The ridge to the east of the castle, for example, offers elevation and clear sight lines. Climb to the peak, jump off, and glide toward your target. With enough stamina or stamina food, you can make it easily.
The main downside of the sky approach is that you miss all the incredible exploration opportunities inside the castle. You won’t find the Royal Guard weapons, you won’t discover the environmental storytelling, you won’t experience the memory locations or read Zelda’s diary. You get efficiency at the cost of experience. For first-time players, I actually recommend against this route because it robs you of the full Hyrule Castle adventure.
However, for subsequent playthroughs, challenge runs, or when you’re simply ready to finish the game, the sky approach is perfect. You’ve seen the castle, you’ve explored its secrets, and now you just want to get to the final battle. That’s exactly what this route provides.
In Tears of the Kingdom, the sky approach becomes even more relevant because the castle literally floats in the air during parts of the game. Reaching it requires using sky islands, Zonai devices, or creative applications of your abilities. The verticality of Tears of the Kingdom makes aerial approaches not just viable but often necessary.
Navigating Interior Spaces: Room-by-Room Tips
Once you’re inside the castle, regardless of entry point, you’ll need to navigate a complex web of interconnected rooms, hallways, and chambers. Here are specific tips for major interior areas you’re likely to encounter:
The Guards’ Chamber and Barracks: These areas contain Royal Guard equipment and multiple enemies. The Guards’ Chamber specifically has a Royal Guard’s Claymore, Royal Guard’s Spear, and Royal Guard’s Shield. Watch for Moblins and Lizalfos who guard these valuable items. Use the environment—pillars, doorways, furniture—for cover and tactical advantage. Don’t rush into rooms; peek around corners and assess enemy positions first.
The Dining Hall: This massive chamber contains multiple levels connected by staircases. Enemies patrol the upper and lower areas. The room has several treasure chests containing valuable items, including gems and weapons. The Dining Hall connects to many other areas, making it a central hub for navigation. Use the tables and pillars as cover, and be aware of sightlines—enemies on upper levels can shoot down at you.
Princess Zelda’s Room: Located in the upper sections of the castle, Zelda’s room contains her diary, which provides lore and context for her relationship with Link and her struggles before the Calamity. There’s usually a Royal Broadsword or similar weapon here. The room is generally safe from enemies, making it a good place to catch your breath and read the environmental storytelling.
Princess Zelda’s Study: Adjacent to her room, the study contains research notes and materials related to Zelda’s attempts to unlock her sealing power. You’ll find various ingredients, weapons, and items here. Like her bedroom, it’s relatively safe and filled with lore. Take time to examine everything—the notes on the walls, the materials on the tables. It all paints a picture of a desperate princess racing against time.
The Library: Books line the walls of this grand room, though sadly you can’t read most of them. The Library typically contains strong enemies guarding valuable loot. There are usually Royal Bows or Royal Shields to be found. The multi-level design provides tactical opportunities—archers on upper levels have advantages, but you can also use the height for plunging attacks or to rain arrows down on enemies below.
Observation Rooms: Scattered throughout the castle are observation rooms and lookout posts where guards would have watched for threats. These rooms offer windows with excellent views of the surrounding area and usually contain treasure chests. They’re good places to pause, get your bearings, and plan your next move.
The Sanctum Approach: As you climb higher in the castle, approaching the Sanctum, the corruption becomes more intense. Malice covers more surfaces, enemies get stronger, and the atmosphere grows more oppressive. The hallways and rooms leading to the Sanctum are the castle’s final test before you face Ganon. Expect Guardian Scouts and tough combat encounters. Make sure your health, weapons, and mental preparation are all ready before taking those last steps.
Throughout your interior navigation, pay attention to the environmental design. Torches still burn in some rooms despite a century of neglect (video game logic, but atmospheric). Malice pulses through cracks in walls and seeps up from below. The juxtaposition of beautiful architecture and corrupting evil creates a unique atmosphere that makes every room feel significant.
Secret Locations and Hidden Treasures
Hyrule Castle rewards thorough exploration with some of the best loot in the game and fascinating secrets that most players never discover. Let’s uncover these hidden gems.
Memory Locations Within the Castle
For players pursuing the Captured Memories quest, Hyrule Castle contains some of the most important memory locations in the game. These aren’t just collectibles—they’re crucial story moments that fill in the narrative gaps about what happened before and during the Calamity.
Memory #1 – Subdued Ceremony is found in the area between the castle and the eastern path leading to Lanayru. While not technically inside the castle walls, it’s close enough that many players discover it during their castle exploration. This memory shows Zelda’s coronation ceremony where she accepts her role and responsibilities. The contrast between this formal, hopeful ceremony and the ruined kingdom you’re exploring makes the memory particularly poignant.
Memory #6 – Blades of the Yiga is also near the castle area, though closer to the south. Again, while not inside the castle proper, it’s thematically connected to the castle assault. This memory shows the Yiga Clan’s assassination attempt on Zelda and provides context for the ongoing threat they represent.
Memory #15 – Return of Calamity Ganon is inside Zelda’s Room in the castle itself. This is the most emotionally devastating memory, showing the moment everything fell apart. Zelda desperately tries to awaken her power while the Guardians turn against Hyrule and the Champions fall one by one. Watching this memory in the very room where Zelda prepared for these events adds incredible emotional weight. You’re literally standing in the space where this tragedy unfolded.
Finding and watching these memories transforms Hyrule Castle from just a dungeon into a memorial. Every room you explore, every ruined section you climb through, connects to those memories. You’re not just fighting monsters—you’re walking through the preserved moment of Hyrule’s greatest tragedy, and that knowledge changes how the whole experience feels.
The memories also provide crucial context for why you’re doing all this. Zelda has held Ganon in check for one hundred years, waiting for you. The castle isn’t just a location; it’s her prison and her battleground. Understanding her sacrifice and determination makes the final push to the Sanctum feel like fulfilling a promise rather than just completing a quest.
Royal Guard Arsenal Locations
The Royal Guard equipment represents the pinnacle of pre-Calamity military craftsmanship. These weapons, shields, and bows have the highest base attack and defense values of any standard equipment in the game. While they suffer from relatively low durability, their power makes them worth collecting for tough fights.
Royal Guard’s Claymore can be found in multiple locations within the castle: one in the Guards’ Chamber, one in the Lockup area, and others scattered in armory rooms. This massive two-handed sword has a base attack of 72, making it one of the strongest weapons in the game. The overhead charged attack with this weapon can devastate enemies, and while it won’t last forever, it’s perfect for tough miniboss fights or when you need maximum damage output.
Royal Guard’s Sword (one-handed) appears in various guard quarters and armories throughout the castle. With a base attack of 48, it’s powerful without sacrificing the defensive options and faster attack speed of one-handed weapons. I particularly like using these for Lynel fights or Guardian combat where you need to attack quickly between enemy moves.
Royal Guard’s Spear can be found in the Guards’ Chamber and other locations. Base attack of 32 might seem low, but spears attack so quickly that the DPS is actually excellent. Plus, the range advantage lets you poke enemies safely from a distance. These are fantastic for fighting groups of enemies or for any situation where you want to maintain distance.
Royal Guard’s Shield spawns in multiple locations including the Lockup and various guard areas. With a defense of 55, it’s the second-best shield in the game after the Hylian Shield. While the durability isn’t great, having one as a backup shield for your Hylian Shield is smart planning.
Royal Guard’s Bow appears in guard towers and armory locations. This bow has a base attack of 50 and exceptional range. The durability is unfortunately quite low, so save it for important shots. I like keeping one for sniping distant enemies or for perfect headshots when I really need the damage.
The interesting thing about Royal Guard equipment is that it tells a story through its stats. These were the weapons of Hyrule’s elite defenders, forged for maximum effectiveness in combat. The relatively low durability suggests they were meant for decisive battles rather than prolonged campaigns—weapons designed to end fights quickly. That these incredibly powerful weapons failed to stop the Calamity speaks to just how overwhelming Ganon’s assault was.
When farming Royal Guard equipment, bring disposable weapons you don’t mind discarding. Pick up the Royal Guard gear, fill your inventory, then drop the weapons you want to replace. You can easily leave the castle with a full inventory of powerful equipment if you know where to look.
Hylian Shield Location and Mini-Boss Fight
The Hylian Shield is technically located beneath the castle rather than inside it, accessed through the Lockup area. This legendary shield is worth going out of your way to obtain before your main castle assault.
To reach the Hylian Shield, enter the Lockup area from the west side of the castle. Navigate through the prison corridors until you find a passage leading deeper underground. You’ll eventually reach a large chamber with cells and a distinctive iron-barred area. Look for a bombed or breakable floor section that leads down to an even deeper level.
Down in these deep dungeons, you’ll find yourself in a dark chamber with a spooky atmosphere. As you explore, a Stalnox will emerge—this is a skeleton version of a Hinox, a cyclops-like mini-boss. The Stalnox is an undead creature that reassembles itself if you don’t defeat it quickly, making for an interesting fight.
Fighting the Stalnox requires a specific strategy. Focus on attacking its eye, which glows even in the darkness. Arrows are perfect for this—aim for the eye when it’s visible and shoot. When the Stalnox takes enough damage, it will collapse and its eye will pop out, rolling around the ground. This is your chance to deal massive damage—rush in and attack the vulnerable eye with your strongest weapons. The Stalnox will eventually reassemble, and you’ll repeat this process.
The fight becomes more manageable if you use bomb arrows or Ancient Arrows. Bomb arrows deal significant damage and have a chance of destroying bones before they can reassemble. Ancient Arrows can destroy the Stalnox outright if you hit the eye directly, though this feels like overkill given how valuable Ancient Arrows are.
Once you defeat the Stalnox, it drops various weapons and a treasure chest appears. Open that chest to claim the Hylian Shield—the most durable shield in the game with defense of 90 and durability of 800. This shield is iconic, having appeared in numerous Zelda games, and obtaining it feels like a rite of passage for any serious player.
One cool detail: if you examine the Hylian Shield closely, you’ll see it bears the Hylian Royal Family crest and shows signs of age and use. This isn’t some freshly forged replica—this is presumably an ancient shield that’s been waiting in the castle dungeons for a hero worthy of wielding it. Given its incredible durability, you have to wonder how many previous owners it’s had and what battles it’s seen.
Hidden Rooms, Breakable Walls, and Secret Passages
Hyrule Castle contains numerous hidden spaces that casual players often miss. These secrets reward players who carefully examine their surroundings and experiment with the environment.
Throughout the castle, watch for cracked walls that can be destroyed with bombs. These walls often conceal treasure rooms or alternate passages. They’re usually slightly discolored compared to surrounding stonework, and if you use Magnesis, you can sometimes detect metal treasure chests on the other side, confirming there’s something worth reaching. Common locations include dungeon areas, storage rooms, and any location with obvious dead-end corridors that seem like they should lead somewhere.
Fake walls also appear in several locations—these are walls that look solid but can actually be walked through. They’re rare in Hyrule Castle, but the castle’s complex architecture means some passages that appear blocked are actually accessible. If you see a corridor that ends abruptly but seems like it should connect to another area, try walking into the wall. You might pass right through.
Hidden rooms behind bookshelves exist in the Library and study areas. While most bookshelves are static decorations, some can be moved or hide passages behind them. Look for bookshelves that seem out of place or positioned strangely, and try bombing nearby walls or examining the area carefully.
The rafters and ceiling spaces in many large rooms contain treasure chests or hidden items. In rooms with high ceilings, look up—you might spot treasure hanging from chains, resting on beams, or tucked into architectural features. These items require creative approaches to reach: climbing, using Revali’s Gale, or shooting down hanging treasures with arrows.
Underground water passages connect different sections of the Lockup and dungeon areas. Some of these passages are obvious, while others are hidden behind destructible obstacles or require swimming through tight spaces. Treasure chests often rest at the bottom of flooded chambers, waterproof armor or elixirs make exploring these areas much easier.
One of my favorite secret areas is a small room in the castle’s mid-level that contains a Royal Recipe for a stew dish. It’s easy to miss, tucked away in what looks like a former kitchen or servant’s area. Finding these small environmental details makes the castle feel real—these were working spaces where people lived and cooked and went about daily life before everything ended.
The Sanctum’s surrounding areas contain several hidden treasure caches placed in seemingly inaccessible locations. These were likely emergency supplies for the Royal Guard or escape resources for the royal family. Finding them requires careful observation and often creative use of abilities or climbing.
Exploration in Hyrule Castle should never feel rushed. Yes, you can speedrun straight to Ganon, but you’d miss so much. Take time to examine rooms carefully, bomb suspicious walls, climb to high places, and dive into dark water. The castle rewards curiosity with treasure, lore, and a deeper understanding of what this place was before the Calamity.
Combat Strategies for Castle Enemies
Hyrule Castle throws some of the toughest enemies in the game at you, often in combinations designed to overwhelm. Let’s break down how to handle each threat effectively.
Guardian Stalkers: Parrying and Alternative Strategies
Guardian Stalkers are the mechanical nightmares patrolling the castle exterior and occasionally the interior. Their laser attacks can kill you instantly if you’re not prepared, but they’re actually quite manageable once you understand the mechanics.
The parry strategy is the most stylish and resource-efficient way to destroy Guardians. When a Guardian locks onto you, its eye will glow blue and you’ll hear a distinctive targeting sound. The Guardian will then charge up and fire a laser. Your job is to raise your shield and parry at exactly the right moment—just as the Guardian fires. Timing is everything: too early and you’ll drop your guard before the laser arrives; too late and you’ll take massive damage.
The audio cue is your best friend for parrying. When you hear the high-pitched beep indicating the Guardian is firing, immediately press the parry button (A with shield raised on Switch). The laser will reflect back at the Guardian, dealing significant damage. Three perfect parries destroy most Guardian Stalkers completely. Practice makes perfect, and once you master this timing, Guardians go from terrifying to trivial.
If you can’t parry reliably, Ancient Arrows provide an instant kill alternative. A single Ancient Arrow to a Guardian’s eye destroys it completely, no fight required. The downside is that Ancient Arrows are expensive—either 90 rupees each from the Akkala Ancient Tech Lab or requiring Ancient materials to craft. Save these for emergencies or situations where you’re surrounded by multiple Guardians.
Taking cover works surprisingly well against Guardians. Their lasers can’t penetrate solid obstacles, so ducking behind pillars, walls, or large debris makes you invulnerable to their primary attack. You can peek out, shoot the Guardian with arrows (aiming for the eye for maximum damage), then duck back into cover before it fires. This methodical approach is slower but much safer than direct confrontation.
Cutting the legs is another viable strategy. Guardian Stalkers have six legs, and each can be destroyed with sufficient damage. Ancient weapons work best for this, but any strong weapon can do the job. Destroying all six legs immobilizes the Guardian, turning it into a stationary turret that can still shoot lasers but can’t chase you. From there, you can circle around behind it (where it can’t aim) and attack the eye directly for massive damage.
The eye is always a Guardian’s weak point. Arrows to the eye deal extra damage and briefly stun the Guardian, interrupting its attack cycle. If you’re good with a bow, you can potentially stunlock a Guardian by repeatedly shooting its eye, though this requires many arrows and excellent aim.
Remember that Guardian Stalkers have a detection range. If you stay far enough away and move quietly, you can sometimes avoid triggering them entirely. This is useful when you want to navigate past Guardians without fighting. Stealth armor helps significantly with this approach.
One interesting detail: Guardian Stalkers that have been sitting inactive for a century sometimes have rust or damage that makes them weaker or slower. The ones inside the castle are generally in better condition than those scattered across the overworld, suggesting they’ve been more active or better maintained by Ganon’s corruption.
Lizalfos, Moblins, and Other Standard Enemies
The castle’s interior is filled with standard enemies like Lizalfos, Moblins, Bokoblins, and occasionally Wizzrobes or other threats. These are typically higher-tier versions (Blue, Black, or Silver variants) with more health and damage than their weaker cousins.
Lizalfos are fast, aggressive enemies that dodge attacks and counterattack quickly. They’re particularly dangerous in the castle’s narrow corridors where you have limited room to maneuver. The best approach is to use your shield to block their attacks, then immediately counterattack during their recovery animation. Alternatively, wait for them to attack, perform a perfect dodge to trigger flurry rush, and unleash a combo while they’re vulnerable.
Blue and Black Lizalfos have elemental variants that can breathe fire, ice, or electricity. Maintain distance from elemental Lizalfos, use arrows to interrupt their breath attacks, and equip appropriate resistance food or armor if needed. The castle’s cramped spaces make getting hit by elemental attacks more likely, so extra caution pays off.
Moblins are the castle’s heavy hitters, with massive health pools and devastating attacks. They wield huge weapons and can kill you in one or two hits if you’re not careful. The key to fighting Moblins is patience—don’t get greedy with attacks. Hit them a few times, then back off before they can retaliate. Perfect dodges work wonderfully against Moblins because their attacks are slower and more telegraphed. When they wind up for a big swing, dodge to the side and punish them with a flurry rush.
Bokoblins are the weakest common enemies in the castle but can still be dangerous in groups or when supporting stronger enemies. Prioritize them when they’re archers on ledges or when they’re mixed with stronger foes. A few quick sword strikes or a well-placed bomb arrow eliminates Bokoblins efficiently.
Wizzrobes appear occasionally in tower areas or observation rooms. These magical enemies teleport around and attack with elemental magic. The trick to fighting Wizzrobes is to hit them with arrows while they’re visible and materializing. Each successful hit interrupts their attack and deals good damage. Ancient Arrows or bomb arrows work particularly well. Once you knock them out of the air, rush in with melee attacks before they can teleport away.
Enemy groups are common in the castle, with multiple enemy types supporting each other. When facing groups, assess the threats and prioritize targets. Archers first (they punish you while you’re fighting in melee), then fast enemies like Lizalfos (they interrupt your attacks), then heavy hitters like Moblins. Use the environment—doorways, pillars, elevation changes—to separate enemies and fight them one or two at a time rather than all at once.
Stealth can actually help in some castle areas. Wearing stealth armor or using stealth elixirs lets you sneak up on enemies for stealth strikes, which deal massive damage and can one-shot weaker foes. This is particularly useful in rooms where you’re outnumbered—take out one or two enemies silently before the alarm sounds, evening the odds for the actual fight.
Dealing With Malice and Environmental Hazards
Malice is the corrupted substance that covers much of Hyrule Castle, and it’s more than just decoration—it’s an active hazard that damages you on contact and spawns enemies.
Walking directly on Malice deals damage over time, similar to standing in fire. The damage isn’t instant-kill levels, but prolonged contact will drain your health quickly. Whenever possible, avoid walking on Malice by using alternative paths: climbing around it, jumping across gaps, or finding solid ground nearby.
Malice eyeballs are the weak points of Malice clusters. If you see an eyeball embedded in a Malice mass, shoot it with an arrow. Destroying the eye eliminates that entire Malice cluster, clearing the path and making the area safer. This is always worth doing when you spot eyes—it takes one arrow and significantly improves your navigation options.
Malice spawners look like larger eyeballs surrounded by Malice tendrils. These continuously spawn cursed enemies like Cursed Bokoblins, Cursed Moblins, or Cursed Lizalfos. These enemies are more dangerous than their standard versions and will keep respawning unless you destroy the spawner. Always prioritize destroying Malice spawners in any room—shoot the eye with arrows until it’s destroyed. Once the spawner is gone, any cursed enemies it created will dissolve.
In Tears of the Kingdom, you’ll also encounter Gloom, a similar but distinct corrupting substance. Gloom deals damage that temporarily reduces your maximum hearts, represented by cracked red heart containers. This damage can’t be healed with normal food—you need specific Gloom-healing items or to rest at a stable/inn. Gloom is significantly more dangerous than Malice because it doesn’t just drain health; it reduces your maximum survivability. Avoid Gloom contact whenever possible.
Fire hazards exist in several castle areas, particularly around the Sanctum and in areas affected by Fire Wizzrobes or flaming enemies. Fireproof elixirs or armor prevent fire damage and prevent you from dropping weapons when caught on fire. Having fire resistance for these areas makes exploration much smoother.
Falling hazards are everywhere in the castle due to its vertical design and many damaged sections. Always be aware of ledges, holes in floors, and unstable structures. The last thing you want is to defeat a tough enemy group only to accidentally walk off a ledge and take fatal fall damage. When in doubt, drop items or use bombs to test if a floor section is solid.
Guardians in confined spaces create their own environmental hazard. A Guardian Stalker in an open courtyard is manageable; a Guardian Scout in a narrow hallway is terrifying. When fighting in tight quarters, use the space to your advantage—make the Guardian’s laser reflect off walls, use corners to break line of sight, and be ready to dodge sideways since you can’t dodge backward effectively in narrow spaces.
Boss Rush: Facing Multiple Threats Simultaneously
Some areas of Hyrule Castle throw multiple serious threats at you at once—combinations like a Guardian Scout plus several Moblins, or multiple Lizalfos supported by archers. These “boss rush” scenarios are the castle’s most challenging combat encounters.
The key to surviving multi-threat scenarios is target prioritization. Identify the most dangerous enemy first. Usually this is either the enemy that can kill you fastest (Guardian Scouts, sniper Bokoblins with elemental arrows) or the enemy that will interrupt your attacks on other targets (fast-moving Lizalfos). Eliminate the highest priority threat first, even if it means taking some chip damage from lesser enemies.
Movement is survival in these fights. Never stand still. Keep moving to avoid ranged attacks, reposition to prevent being surrounded, and use terrain features like pillars or elevation changes to split enemy groups. If you can force a situation where enemies block each other’s attacks or you can fight them one at a time due to terrain, you’ve dramatically improved your odds.
Champion abilities shine in multi-threat scenarios. Urbosa’s Fury can instantly clear weaker enemies or heavily damage all foes in range. Daruk’s Protection provides breathing room when you’re being pressured from multiple directions. Revali’s Gale lets you reset the fight by gaining altitude and raining arrows down on enemies below.
Crowd control items are your friends. Bomb arrows damage multiple enemies caught in the blast. Ancient Arrows instantly kill most standard enemies (though you lose their drops). Ice arrows freeze enemies in place, removing them from the fight temporarily. Use these tools to even the odds when overwhelmed.
Know when to retreat. There’s no shame in falling back to a safer position, healing, and reassessing. Some room configurations let you retreat to a doorway or narrow passage where enemies can only approach one at a time, turning a chaotic multi-threat fight into a series of manageable 1v1 encounters.
Healing mid-combat becomes riskier in multi-threat scenarios because enemies don’t stop attacking while you’re in the menu. Try to create separation—get behind cover, use Daruk’s Protection, or stun enemies—before opening the menu to heal. Better yet, have food assigned to your quick menu through the + menu so you can eat without fully pausing.
One advanced technique: use enemies against each other. If a Moblin swings its huge weapon and you dodge, its attack might hit other nearby enemies, damaging them for you. Some elemental attacks from Wizzrobes can affect all creatures in their area, friend or foe. Positioning yourself so enemy attacks damage each other is expert-level play but incredibly effective.
The Final Confrontation: Fighting Calamity Ganon
After everything—the exploration, the combat, the emotional weight of the castle’s history—you finally reach the Sanctum. Calamity Ganon awaits, the final boss and the source of Hyrule’s century of suffering. This fight is the culmination of your entire journey.
Phase One: Calamity Ganon’s Arsenal
The first phase of the fight showcases Ganon’s incredible power and versatility. He attacks with weapons, magic, and abilities stolen from the defeated Champions, making him a dynamic and challenging opponent.
Ganon will cycle through different weapon types during the fight: a massive spear for long-range pokes, a sword for close combat, and Guardian weapons including axes and blades. Each weapon has different attack patterns and range, requiring you to adjust your strategy on the fly.
When Ganon uses his spear, he’ll perform long-range thrusts and sweeping attacks. These are actually great opportunities for perfect dodges because the attacks have obvious wind-up animations and clear attack trajectories. Dodge to the side when he thrusts, trigger flurry rush, and unleash your strongest combos while he’s vulnerable.
The sword phase makes Ganon more aggressive with faster attacks and less recovery time between strikes. This is when defensive play becomes crucial—block with your shield, look for openings, and don’t get greedy with attacks. Wait for him to finish a combo, hit him a few times, then back off before his next attack begins.
Guardian weapon attacks are some of Ganon’s most dangerous because they often include laser attacks alongside melee strikes. When you see Ganon charging a laser, either take cover behind a pillar, parry with your shield (if you’re confident), or sprint sideways to dodge. The laser deals massive damage but has a tell before firing.
Ganon will also use elemental attacks and abilities mimicking the fallen Champions. He might create ice blocks like Mipha’s ability, spin in place with a fire attack reminiscent of Daruk, or summon wind gusts. Each of these attacks has specific counters: destroy ice blocks with attacks, stay at range during fire spins, and dodge sideways for wind attacks.
One of Ganon’s most dangerous moves is his charge attack where he bulls forward with weapon extended. This has huge range and deals devastating damage. The counter is to dodge to the side at the last moment, avoiding the charge completely. If you dodge backward, you risk not creating enough distance and getting hit anyway.
Throughout phase one, Malice pools may appear on the ground, damaging you if you stand in them. Keep moving, stay aware of your footing, and don’t let your positioning put you in a corner with no escape route.
The fight takes place in the Sanctum, a large circular room with pillars around the edges. Use these pillars as cover when you need to heal, break line of sight for Guardian lasers, or create separation when overwhelmed. The pillars are destructible, so don’t rely on any single one as permanent cover, but they’re useful tactical tools.
Weapon durability matters in this fight. Ganon has substantial health, and wearing through multiple weapons is normal. This is why I recommend bringing your best gear—Royal Guard weapons, the Master Sword (which has increased power here), and strong bows with plenty of arrows. Don’t save your best weapons for later; this is later. Use everything you’ve got.
Phase Two: Half-Health Triggers and Beast Transformations
When you reduce Ganon’s health by approximately 50%, the fight transitions to phase two. Ganon becomes more aggressive, gains new attacks, and increases the pressure substantially.
In this phase, Ganon will occasionally enter a protective state where he summons a shield of Malice or energy around himself. During this state, you can’t damage him directly with melee attacks. Your options are to either wait for the shield to drop (wasting time) or use Ancient Arrows or arrows to his eye to break through the defense. Shooting Ganon’s glowing eye weakens him and can force him out of the protective state.
Ganon’s attack speed increases in phase two, chaining combos together more quickly and giving you less time to counterattack. Your defensive game needs to tighten up—perfect guards and perfect dodges become more important because you’ll have fewer safe openings for attacks.
One particularly dangerous new attack involves Ganon teleporting around the arena. He’ll disappear in a puff of Malice, then reappear elsewhere and immediately attack. When he teleports, immediately start looking around to locate where he reappeared, then prepare to dodge or block. These teleport attacks can catch you off guard if you don’t react quickly.
Ganon may also summon Guardian turrets or other mechanical adds to support him. These floating devices will shoot lasers at you while Ganon attacks from another angle, creating crossfire situations. Prioritize destroying these turrets quickly—a few arrows to each will destroy them, removing secondary threats and letting you focus on Ganon.
The environment becomes more hazardous in phase two. More Malice pools appear, sometimes covering significant portions of the floor. The pillars may be mostly destroyed by this point, reducing your cover options. You need to fight more aggressively because playing too defensively becomes increasingly difficult as safe space diminishes.
Urbosa’s Fury is incredibly valuable in phase two. The massive damage output can chunk Ganon’s remaining health significantly, and the area-of-effect nature means you’ll hit him regardless of his positioning. If you have multiple charges available, don’t hesitate to use them.
Healing becomes more challenging because Ganon’s increased aggression gives you fewer safe moments. You might need to use Daruk’s Protection to create a brief safe window, or retreat to the arena’s edges where you have more space to maneuver. Having food in your quick menu is essential—fumbling through your inventory while Ganon is teleporting around can get you killed.
Some players report that attacking Ganon’s legs can cause him to stumble or interrupt certain attacks. While this isn’t a guaranteed mechanic, it’s worth trying if you’re struggling—landing several hits on his lower body might create an opening.
Final Phase: Defeating the Dark Beast
Once you deplete Calamity Ganon’s health bar completely, the Sanctum begins to collapse. But the fight isn’t over—not yet. Princess Zelda, who has held Ganon in check for a century, uses the last of her power to prevent him from regenerating. But Ganon, refusing to accept defeat, transforms into his most primal form: Dark Beast Ganon.
This phase is dramatically different from the previous fight. You’re transported to the Hyrule Field outside the castle, with Zelda’s power providing you with the Bow of Light, a legendary weapon with infinite light arrows. Dark Beast Ganon is massive—a titanic boar-like creature wreathed in Malice, lumbering across the field.
This phase is actually quite cinematic and, compared to the intense phase two, relatively forgiving. Dark Beast Ganon has glowing weak points on his body—areas covered in Malice with glowing centers. Your job is to shoot these weak points with your Light Arrows. Each successful hit damages that section and eventually destroys it.
Start by shooting the weak points on Ganon’s legs and sides. You’ll need to maneuver around the beast using your horse (provided automatically if you don’t have one) or on foot. Zelda will call out and highlight the weak points, making them easy to identify. The Light Arrows shoot perfectly straight and have infinite range, so you just need to aim accurately.
After destroying enough weak points, Zelda creates an updraft and tells you to attack the weak point on Ganon’s back. Use the updraft to gain altitude (or use Revali’s Gale if available), enter slow-motion aim while paragliding, and shoot the back weak point. This is the money shot—landing this hit drives Ganon to his knees and exposes his final weak point.
The final weak point appears on Ganon’s forehead, glowing intensely. One Light Arrow to this spot ends the fight. Ganon crumbles, Zelda’s power seals him away completely, and peace returns to Hyrule after a century of darkness.
This final phase is designed to feel epic and triumphant rather than frustratingly difficult. You’ve already proven yourself by defeating Calamity Ganon’s earlier phases. This is your victory lap, your chance to experience the climactic moment where evil is finally vanquished. The soaring music, Zelda’s voice guiding you, and the visual spectacle of Light arrows destroying darkness all combine to create one of the most memorable final boss experiences in gaming.
Tips for Success and What Happens After Victory
Bring your absolute best equipment to the Ganon fight. This isn’t the time to conserve resources—use your strongest weapons, best food, and most powerful abilities. The Master Sword with its doubled attack power in the castle is obviously ideal. Have multiple powerful weapons as backups in case some break during the prolonged fight.
Fully upgraded armor makes a tremendous difference. Ancient Armor upgraded to level 4 provides the highest defense in the game and massive bonuses against Ganon’s Guardian-type attacks. If you haven’t upgraded your armor, the fight becomes significantly harder.
Cook hearty foods before the fight and keep them in your quick menu. Being able to quickly full-heal without navigating menus can save your life when Ganon is pressuring you. Bring at least 10-15 full-heal meals and several stamina-restoring dishes.
Learn the attack patterns rather than trying to brute force the fight. Ganon telegraphs most of his attacks with distinct animations and sounds. Once you recognize these tells, you can respond appropriately instead of panic-dodging. The fight becomes much more manageable when you’re reacting to what you know is coming rather than being surprised repeatedly.
Don’t panic. Ganon is designed to be intimidating with his size, roars, and dramatic attacks. But he’s not actually unfair—every attack can be dodged or blocked, and he has clear vulnerable phases. Stay calm, focus on fundamentals (dodge, attack, heal when needed), and trust in your preparation.
After defeating Dark Beast Ganon, you’ll see the ending cinematic. Zelda is finally free, peace returns to Hyrule, and you’ll see the credits roll. The game will place you back just before entering the Sanctum, allowing you to continue exploring, finding shrines, or completing side quests. Your save file will have a star next to it, indicating you’ve beaten Ganon, and the Map completion percentage will appear, showing what percentage of the game you’ve completed.
Defeating Ganon doesn’t end your journey—it opens up new gameplay options like Master Mode (if you have the DLC), hunting for Koroks, shrine completion, or simply exploring areas you missed. But you’ll always have the satisfaction of knowing you conquered Hyrule Castle and saved the kingdom.

Exploring Hyrule Castle in Tears of the Kingdom: What’s Different?
For players coming from Breath of the Wild, Hyrule Castle in Tears of the Kingdom offers familiar locations transformed by new events and expanded with deeper secrets. The castle experience evolves significantly while maintaining the core atmosphere that made it memorable.
Changes to the Castle Structure and New Areas
The most immediately obvious change in Tears of the Kingdom is what happens to the castle itself during the Upheaval. The earthquakes and Ganondorf’s resurrection cause dramatic changes to the castle’s structure and the surrounding landscape.
Parts of the castle literally rise into the air, suspended by unknown forces. This creates a multi-layered experience where you have the ground-level castle ruins, floating sections above, and depths below all connected to the same location. Navigating between these layers requires creative use of your new abilities—Ascend to rise through ceilings, Ultrahand to create bridges or platforms, and careful paragliding to reach floating sections.
The depths beneath the castle become far more significant and accessible in Tears of the Kingdom. While Breath of the Wild hinted at ancient foundations and sealed chambers, Tears of the Kingdom lets you fully explore these underground areas. You’ll discover the chamber where Ganondorf was sealed by Rauru thousands of years ago, ancient Zonai architecture, and connections to the broader depths network that spans all of Hyrule.
New areas include expanded underground passages, chambers containing ancient murals and inscriptions that tell the story of the Imprisoning War, and rooms that show evidence of the Zonai civilization’s presence. These areas are darker and more atmospheric than even Breath of the Wild’s Lockup, requiring light sources and careful navigation.
The Sanctum and upper castle areas take on new significance as you learn about Rauru and Sonia’s original kingdom. You can find remnants of the ancient Hyrule Castle that predated the structure you explored in Breath of the Wild, revealing layers of history that recontextualize everything you thought you knew about the castle.
Environmental hazards shift from Malice to Gloom, which is mechanically different and more dangerous. Gloom reduces your maximum hearts rather than just dealing damage, making it a more severe threat that requires different resources to counter. Gloom hands—terrifying enemies that emerge from Gloom pools—add a new horror element to castle exploration.
New Enemies and Challenges
Tears of the Kingdom introduces several new enemy types to Hyrule Castle while maintaining some familiar threats from the first game.
Gloom Spawn and Gloom Hands are among the most terrifying new enemies. These corrupted entities rise from pools of Gloom and chase you relentlessly. They deal Gloom damage that reduces your maximum hearts, and they’re surprisingly difficult to kill. Encountering them in the castle’s tight corridors is genuinely horrifying. The best strategy is often to run rather than fight, though bomb arrows and powerful area-of-effect attacks can destroy them if you’re prepared.
Constructs are Zonai automatons that guard ancient areas. These mechanical enemies come in various types—Soldier Constructs, Captain Constructs, and more. They’re intelligent opponents that block, dodge, and counterattack effectively. Fighting Constructs in the castle’s ancient sections feels thematically appropriate, as if you’re facing security systems that have reactivated after millennia.
Horriblins appear in darker areas of the castle, including caves and underground sections. These bat-like enemies attack from walls and ceilings, throwing rocks and diving at you. They add a vertical threat that makes you constantly check your surroundings rather than just watching ground level.
The Phantom Ganon encounters represent a new mid-boss challenge. These spectral warriors wielding Gloom-infected weapons appear in certain areas and test your combat skills before you face the real Ganondorf. They’re fast, aggressive, and require solid fundamentals to defeat.
Boss Bokoblins and other high-tier enemy variants appear more frequently in Tears of the Kingdom’s castle. These upgraded enemies have more health, better weapons (often fused with powerful materials), and advanced tactics. Fighting a Silver Boss Bokoblin in a narrow castle corridor is significantly harder than the enemy encounters in Breath of the Wild.
Utilizing New Abilities for Castle Exploration
The four new abilities in Tears of the Kingdom—Ultrahand, Fuse, Ascend, and Recall—dramatically change how you approach castle exploration and create new puzzle-solving opportunities.
Ascend is perhaps the most revolutionary ability for castle navigation. Whenever you’re beneath a ceiling or platform, you can use Ascend to rise through it and emerge on top. This trivializes much of the vertical navigation that required careful climbing in Breath of the Wild. You can Ascend through multiple floors of the castle in seconds, accessing upper areas without dealing with enemies or obstacles on the levels between.
However, Ascend has limitations—you need a solid ceiling above you, and some ceilings are too thick or magically protected to pass through. Still, the ability to bypass entire sections of the castle vertically creates routing options that simply didn’t exist before.
Ultrahand lets you manipulate objects in the environment, creating bridges, platforms, or solutions to environmental puzzles. In the castle, you can move stone blocks to create staircases, position wooden planks as bridges across gaps, or even use Ultrahand to remove obstacles blocking passages. Some treasure areas require Ultrahand to access, with chests placed on platforms that you need to pull toward you or lower from the ceiling.
Fuse transforms your combat options by letting you attach materials to weapons, shields, and arrows. In the castle, you can fuse powerful monster parts or even Zonai devices to your equipment. Want a sword that shoots lasers? Fuse a Beam Emitter to your weapon. Need more defense? Fuse a powerful monster horn to your shield. This ability lets you customize your loadout on the fly, adapting to challenges as you encounter them.
Fusing materials to arrows creates specialized ammunition types. Fuse Keese Eyes for homing arrows, Bomb Flowers for explosive arrows, Ice Fruit for freezing arrows—the options are extensive. This is particularly useful in the castle where you might need specific arrow types for different enemy encounters.
Recall lets you reverse the motion of objects and some enemy attacks. In the castle, this can be used to ride falling platforms back upward, reverse enemy projectiles back at them, or solve environmental puzzles involving moving objects. It’s less universally useful than the other abilities for castle exploration, but in specific situations, it provides unique solutions.
The combination of abilities creates emergent gameplay opportunities. You might use Ultrahand to position a stone block beneath a ledge, then Ascend through both the block and ledge to reach a higher area. Or fuse a rocket to your shield, use it to launch yourself upward, then paraglide to a floating castle section. The game rewards creative thinking and experimentation.
Story Connections and Lore Revelations
Tears of the Kingdom uses Hyrule Castle to deliver some of its most significant lore revelations, connecting past and present in ways that recontextualize the entire Zelda timeline.
The discovery of Rauru’s seal chamber beneath the castle reveals that Ganondorf has been imprisoned here for approximately 10,000 years, held in place by Rauru’s sacred arm. The castle was built over this prison, making the royal family’s presence a crucial component of maintaining the seal. This explains so much about why the castle has always been rebuilt in the same location despite repeated destructions—it’s not just tradition; it’s necessity.
Geoglyphs and memories connected to the castle areas show you visions of the past, specifically the Imprisoning War when Rauru and Sonia fought Ganondorf. These memories explain how Ganondorf was sealed, why he harbored such hatred for Hyrule, and the sacrifice Rauru made to stop him. The emotional weight of watching these ancient events while standing in the castle where they occurred creates powerful narrative resonance.
The castle’s architectural layers tell a story when you know what to look for. The deepest, oldest sections show Zonai influence—the smooth stone, the advanced technology, the aesthetic that predates Hyrulean building styles. The middle layers reflect the kingdom’s medieval period, the time of knights and traditional warfare. The upper, more recent sections show the pre-Calamity kingdom, the Hyrule that Link remembers. It’s archaeology made interactive, with each layer revealing a different chapter of history.
Zelda’s presence throughout the castle takes on new meaning in Tears of the Kingdom. Evidence of her research, her notes, and her items appear in various locations. But knowing what you learn about her fate—her transformation into the Light Dragon and eventual return—makes finding these remnants of her life more poignant. She spent a century holding back Calamity Ganon, then an indeterminate amount of time as a dragon before finally being restored. The castle is a monument to her sacrifice.
The connection between Hyrule Castle and the Master Sword also becomes clearer. The sword’s resting place in the Korok Forest and its connection to the castle via the Light Dragon’s flight path creates a symbolic link between the three key elements of the kingdom’s defense: the castle (seat of royal power), the Master Sword (hero’s blade), and the Light Dragon (Zelda’s transformed state, protecting the sword).
Finding murals and inscriptions that reference the Triforce and ancient conflicts adds depth to the lore. While Tears of the Kingdom downplays the Triforce compared to earlier games, references exist for attentive players. The castle, as Hyrule’s symbolic and literal center, naturally contains evidence of the kingdom’s sacred history.
Tips for Speedrunning and Challenge Runs
For players who’ve already experienced Hyrule Castle normally and want to test their skills, the fortress offers excellent opportunities for speedruns and self-imposed challenges.
Minimum Preparation Runs
Can you conquer Hyrule Castle and defeat Ganon with minimal preparation? This challenge is actually more feasible than you might think, and it’s a popular category for speedrunners.
The minimum hearts challenge involves fighting Ganon with only the three hearts you start the game with (or even fewer using glitches). This turns every enemy attack into a potential one-hit kill, requiring perfect dodges, perfect parries, and flawless execution. It’s extremely difficult but rewarding for players who want to prove their mastery of the game’s combat mechanics.
No armor runs remove your defense entirely, making you take maximum damage from all attacks. Combined with low hearts, this creates a brutal difficulty level where any mistake ends your run. The upside is that armor doesn’t matter for speedrunning anyway since you skip most fights, but for combat-focused challenge runs, no armor fundamentally changes risk assessment.
No healing or limited healing runs restrict your ability to recover health during the Ganon fight. You might allow yourself one full heal, or no healing at all, requiring you to perfect the fight without safety nets. This forces mastery of attack patterns and defensive techniques since you can’t brute force through mistakes by eating 20 meals.
Starting plateau only challenges restrict you to items obtainable on the Great Plateau before ever leaving. This means basic weapons, no armor upgrades, minimal hearts and stamina, and no Champion abilities. It’s remarkable how doable this is once you understand the game’s mechanics—skilled players regularly defeat Ganon with these restrictions, demonstrating that preparation matters less than skill.
The route for minimum preparation runs usually involves getting the paraglider from the Great Plateau, then immediately heading to Hyrule Castle. Skip all shrines, all Divine Beasts, all side content. Climb or paraglide to the Sanctum, fight Ganon with whatever basic weapons you have, and rely on perfect dodges and flurry rushes to deal damage while avoiding hits. It’s pure skill expression, and watching top players execute these runs is genuinely impressive.
Speedrun Routes and Strategies
Speedrunning Hyrule Castle has become an art form, with dedicated players optimizing every movement and decision. While world record strategies get incredibly technical, the basic speedrun route is accessible to intermediate players.
The any% category allows any glitches or exploits and aims simply to defeat Ganon as fast as possible. Current world record strategies use various glitches to skip most of the game, teleport directly into the Sanctum, and defeat Ganon in under an hour from a new game (and much faster for New Game+ or specific categories).
The no major glitches category is more accessible and represents “intended” fast play. The route usually involves:
- Complete Great Plateau (necessary for paraglider)
- Head directly to Hyrule Castle
- Use stamina food to climb or glide to the Sanctum
- Fight Ganon with basic weapons using optimal strategies
Time saves come from optimized movement (knowing exactly where to climb, when to jump vs. run, stamina management), menu efficiency (pre-sorting items, using quick menu), and combat optimization (specific attack patterns that maximize DPS while minimizing risk).
For the Ganon fight itself, speedrunners use specific strategies:
- Master the flurry rush timing on all of Ganon’s attacks to maximize damage windows
- Use Ancient Arrows strategically to skip certain phases or quickly destroy Guardian turrets
- Optimize healing by using quick menu instead of full pause menu
- Learn which attacks to parry vs. dodge based on which gives better counterattack opportunities
Divine Beast categories require defeating all Divine Beasts before Ganon. This adds time but makes the final fight much easier since you have all Champion abilities. The route becomes more complex as you need to optimize Divine Beast order and minimize travel time between regions.
Advanced speedrun techniques include:
- Shield surfing for faster movement on downward slopes
- Whistle sprinting (an exploit where whistling while sprinting reduces stamina consumption)
- Cooking optimizations to prepare all necessary food quickly
- Menu storage and other technical glitches that save frames
You don’t need to master all these techniques to enjoy speedrunning. Even casual speedruns where you just try to beat your personal best time can be incredibly fun and teach you to appreciate the game’s design in new ways.
Three-Heart, No-Armor, and Other Challenge Variants
Beyond speedrunning, challenge runs let you experience Hyrule Castle with self-imposed restrictions that dramatically change the experience.
Three-heart runs never increase your heart containers beyond the starting three. This can be combined with never getting the Master Sword (which requires 13 hearts) for added difficulty. Every enemy becomes deadly, and exploration requires extreme caution. The psychological difference is significant—you can’t afford to take hits, so you play much more carefully and deliberately.
No-upgrade runs forbid Great Fairy upgrades to armor, meaning your defense stays at base values. This makes you much squishier and turns late-game enemies into serious threats even with defensive armor equipped.
No-Divine Beast runs attempt Ganon without freeing any Champions, meaning no Champion abilities to save you. Mipha’s Grace is a huge safety net, and losing it makes the run significantly harder. You also face a beefed-up Ganon with more health and the Blight Ganons integrated into the fight, adding mechanics and difficulty.
Weapon-specific runs restrict you to a single weapon type. Spear-only, sword-only, or two-handed-only runs force you to master that weapon class completely and adapt to situations where it’s not ideal. Fighting Ganon with only a spear, for example, requires perfect spacing since you can’t rely on the quick hits of a sword or the massive damage of a claymore.
No-damage runs are the ultimate test of skill. You cannot take any damage from when you enter the castle until Ganon is defeated. A single hit from a Bokoblin in the dining hall? Run over. Touched some Malice? Run over. Ganon clips you during the fight? Run over. This requires not just mechanical skill but incredible consistency and mental fortitude to execute a perfect run.
Naked Link challenges forbid wearing any armor at all, leaving you with base defense. Combined with three hearts and no healing, this creates one of the hardest possible experiences—essentially a no-hit run since most attacks will one-shot you.
The beauty of these challenges is that they’re entirely self-imposed. The game doesn’t force them on you, which means attempting them is purely for personal satisfaction and skill development. There’s a robust community of challenge runners who share strategies, routes, and accomplishments, making it easy to find inspiration and tips for any challenge you want to attempt.
Recording your challenge runs and comparing them to previous attempts creates a visible record of improvement. You’ll notice yourself getting better at dodges, learning enemy patterns more thoroughly, and developing the consistency that separates casual players from masters.
Frequently Asked Questions About Hyrule Castle
After years of helping players tackle Hyrule Castle, I’ve noticed certain questions come up repeatedly. Let’s address the most common ones.
Q: Can I leave Hyrule Castle once I enter and come back later? A: Absolutely! Despite the dramatic buildup, entering Hyrule Castle doesn’t lock you into anything. You can freely explore, leave whenever you want (fast travel works from inside the castle), and return at your leisure. The castle isn’t a point-of-no-return—it’s just another location in the open world. This makes it perfect for multiple visits to collect specific items or explore different areas without pressure.
Q: What’s the minimum level/preparation needed to survive the castle? A: Technically, you can enter the castle immediately after leaving the Great Plateau with just three hearts, basic weapons, and the paraglider. Skilled players defeat Ganon with exactly that. However, for a comfortable experience, I recommend: 10+ hearts, upgraded armor (level 2 at minimum), several strong weapons (30+ attack), Champion abilities from at least one Divine Beast, and a good supply of hearty food. More preparation makes the experience more enjoyable, but the game never actually gates you from attempting the castle.
Q: Does the castle respawn items after Blood Moons? A: Yes! Blood Moons reset enemy positions and respawn most items, including the valuable Royal Guard weapons scattered throughout the castle. This means you can farm the castle for high-tier equipment repeatedly. Many players make regular trips to collect Royal Guard Claymores, Shields, and other premium gear after each Blood Moon.
Q: Should I complete all Divine Beasts before fighting Ganon? A: It’s entirely up to you. Completing Divine Beasts makes the final fight significantly easier by giving you Champion abilities and reducing Ganon’s health pool slightly. Each Divine Beast also removes one Blight Ganon phase from the final battle. However, fighting Ganon without Divine Beast completion is a valid and popular challenge. If this is your first playthrough, I recommend completing at least a few Divine Beasts for the Champion abilities—they provide valuable safety nets during exploration and combat.
Q: Can I get the Hylian Shield before fighting Ganon? A: Yes, and I highly recommend it! The Hylian Shield is located in the Lockup area beneath the castle, accessible without ever entering the main castle or fighting Ganon. You just need to navigate to the Lockup, find the chamber with the Stalnox mini-boss, defeat it, and claim the shield from the treasure chest. This can be done at any point in the game once you’re prepared to handle the dungeon enemies and Stalnox fight.
Q: What happens if I die fighting Ganon? A: If you die during the Ganon fight, you respawn just outside the Sanctum with all your items intact. You can immediately try again without having to re-explore the castle. The game is generous with the final boss—it understands you might need multiple attempts and doesn’t punish you harshly for failure. Just make sure you have enough weapons and food for another attempt.
Q: Is there a recommended order for exploring castle areas? A: Not really—the castle is designed for open exploration and you can tackle areas in almost any order. That said, a logical progression might be: enter through Lockup (west entrance) → explore lower/mid levels for Royal Guard equipment → visit Princess Zelda’s Room and Study for lore → clear the Dining Hall → ascend through upper areas → reach the Sanctum. But feel free to explore however you want; the beauty of the castle is its non-linearity.
Q: Do I need the Master Sword to damage Ganon? A: No, any weapon can damage Ganon. The Master Sword is excellent for the fight because it has increased power in the castle and never breaks permanently, but it’s not required. Players regularly defeat Ganon with standard weapons, Royal Guard equipment, or even basic gear in challenge runs. Use whatever weapons you’re comfortable with.
Q: Will I miss anything if I skip straight to Ganon? A: Yes—you’ll miss a lot! The castle contains valuable lore (Zelda’s diary, research notes), multiple memory locations for the Captured Memories quest, tons of high-tier equipment, environmental storytelling that enriches the world, and the satisfaction of thoroughly exploring this incredible location. If this is your first playthrough, I strongly encourage exploring the castle rather than rushing to Ganon. You can always speedrun it in subsequent playthroughs.
Q: Can I use Amiibo items or equipment in the castle? A: Yes, any equipment you’ve obtained from Amiibo can be used in the castle. This includes powerful items like the Twilight Bow (infinite durability), Fierce Deity Sword, or Biggoron’s Sword. Amiibo can be scanned once per day even while inside the castle, potentially providing extra weapons, food, or rare items during your exploration.
Q: How do I deal with the Guardians outside without Ancient Arrows? A: Master the shield parry timing—it’s the most resource-efficient method. When a Guardian locks on and fires, wait for the audio/visual cue, then parry. The reflected laser damages the Guardian significantly. Three perfect parries destroy most Guardian Stalkers. Alternatively, use cover extensively (pillars, walls, debris) to break line of sight, shoot them with arrows targeting the eye for bonus damage, or simply run past them if your goal is to get inside rather than fight.

Conclusion: The Castle That Defines Hyrule
After thousands of words exploring every aspect of Hyrule Castle, I hope you understand why this location is so special. It’s not just the final dungeon or the place where Ganon waits—it’s the symbolic and literal heart of The Legend of Zelda: Breath of the Wild and Tears of the Kingdom.
Every corridor tells a story. Every ruined room represents a life interrupted. Every weapon you find belonged to a Royal Guard who fell defending the kingdom. The Malice and corruption aren’t just visual effects—they’re physical manifestations of a century of failure, suffering, and Zelda’s desperate imprisonment of evil. Walking through Hyrule Castle isn’t just exploration; it’s experiencing the emotional weight of tragedy and the hope of restoration.
What makes Hyrule Castle brilliant from a game design perspective is how it accommodates different playstyles. Want to speedrun straight to Ganon? The sky approach lets you do it in minutes. Prefer thorough exploration and lore discovery? The castle rewards that with rich environmental storytelling and valuable items. Looking for a serious combat challenge? The castle provides intense fights with some of the toughest enemies in the game. Need a farming location for premium equipment? The castle respawns Royal Guard gear after every Blood Moon.
The verticality of the castle design creates constant strategic choices. Do you climb to upper levels and work your way down? Enter at ground level and ascend through interior staircases? Approach from the water and scale walls? Each path reveals different aspects of the castle and creates unique experiences. If you’re interested in learning more about the game’s advanced mechanics, IGN’s Breath of the Wild wiki offers comprehensive guides on everything from combat to exploration strategies.
The environmental storytelling is some of the best in any game I’ve played. You can piece together the final hours of Hyrule’s Golden Age just by observing what’s around you. The dining hall with its unfinished meal. Zelda’s study with research notes dated to the day of the Calamity. Guard barracks with weapons still racked, waiting for soldiers who will never return. It’s powerful, subtle, and emotionally resonant without a single word of dialogue.
For players who engage deeply with the castle, it becomes more than just a location—it becomes a character in its own right. You develop a relationship with this place. Your first nervous approach, heart racing as Guardians spot you. Your first successful exploration, finding treasure and surviving battles. Your eventual mastery, where you know every room and can navigate the castle blindfolded. The castle witnesses your growth from uncertain beginner to confident hero.
The music deserves special mention too. The haunting piano melody that plays in the castle, with its melancholic notes and underlying tension, perfectly captures the atmosphere. It’s beautiful yet sad, epic yet intimate. The way the music shifts during combat, then returns to the exploration theme after battle, creates an emotional rhythm that makes the entire experience feel cinematic. For those interested in the musical composition of the Zelda series, Nintendo’s official Zelda website features behind-the-scenes content and insights into the game’s development.
And ultimately, the castle represents hope. Yes, it’s corrupted and ruined. Yes, it’s filled with danger and evidence of failure. But it’s still standing. The walls haven’t completely crumbled. The architecture endures. Zelda holds Ganon in check within its walls, preventing his escape. The castle, for all its damage, remains a fortress—battered but not broken, defeated but defiant. Your presence there, fighting to reclaim it, represents the possibility of restoration.
When you finally defeat Ganon and watch peace return to Hyrule, the castle takes on new meaning. In that moment, it’s no longer just a dungeon you conquered. It’s a monument to perseverance, sacrifice, and the enduring strength of hope against impossible odds. It’s a reminder that even after a century of darkness, even after catastrophic failure, redemption remains possible. If you want to dive deeper into the lore and timeline of the entire Zelda franchise, Zelda Dungeon provides extensive resources on every game in the series.
Whether you’re preparing for your first assault on Hyrule Castle or your fiftieth, I hope this guide helps you appreciate the depth, challenge, and beauty of this incredible location. Take your time exploring. Pay attention to the details. Let yourself feel the weight of the history you’re walking through. And when you finally stand in the Sanctum, facing Calamity Ganon with the entire castle at your back and a century of suffering demanding justice, remember: you’re not just fighting for yourself. You’re fighting for Zelda, who held darkness at bay for a hundred years. For the Champions who fell. For the Royal Guard who made their last stand. For every citizen of Hyrule who lost their home.
For additional tips on defeating Calamity Ganon and mastering the final battle, Polygon’s Breath of the Wild guides offer detailed strategies and combat breakdowns. And if you’re planning to tackle Tears of the Kingdom’s version of the castle, GameSpot’s Tears of the Kingdom coverage provides up-to-date walkthroughs and discoveries.
You’re fighting to restore the kingdom’s heart. And with preparation, skill, and courage, you’ll succeed.
The castle awaits, hero. Make Hyrule proud.