If you’re a Breath of the Wild veteran, you probably remember the hilarious and surprisingly memorable boss fight against Master Kohga, the eccentric leader of the Yiga Clan. His dramatic entrances, over-the-top personality, and comedic defeat made him one of the most entertaining villains in that game. So when Tears of the Kingdom was announced, one of the burning questions on many players’ minds was: does Master Kohga return? I’m thrilled to tell you that yes, Master Kohga is absolutely in Tears of the Kingdom, and he’s better than ever! Not only does he return, but he plays a much bigger role this time around, with multiple epic boss encounters that are spread throughout the game’s vast world.
In this complete guide, I’ll walk you through everything you need to know about Master Kohga in TOTK. We’ll cover where to find him, how to defeat him in all his various boss battles, what rewards you get for beating him, and why his presence in this game is actually one of the most entertaining storylines you’ll experience. Whether you’re trying to track him down for the first time or you’re stuck on one of his challenging encounters, this guide has got you covered. Master Kohga isn’t just back – he’s funnier, more dramatic, and more persistent than ever, chasing you through the Depths in what becomes one of the game’s most enjoyable side quests. Let’s dive into the complete Master Kohga experience in Tears of the Kingdom!
Yes, Master Kohga Returns in TOTK!
Let me start by answering the main question definitively: Master Kohga is absolutely in Tears of the Kingdom, and his role is significantly expanded compared to Breath of the Wild. In BOTW, he was essentially a one-time boss encounter in the Yiga Clan Hideout, memorable but brief. In TOTK, Master Kohga becomes a recurring antagonist who you’ll face multiple times throughout your adventure, each encounter more elaborate and entertaining than the last.
Master Kohga’s Expanded Role
What makes Master Kohga’s return so special is that Nintendo clearly understood how much players loved this character. Instead of just bringing him back for a quick cameo or a single boss fight, they gave him an entire quest line that spans multiple regions and showcases his personality in new and hilarious ways. You’ll encounter him in the Depths, that massive underground area beneath Hyrule, where he’s been conducting his own experiments with Zonai technology.
The developers took everything that made Master Kohga entertaining in the first game and amplified it. His theatrical personality is cranked up to eleven, with even more dramatic speeches, more ridiculous poses, and more comedic failures. Each time you encounter him, he’s piloted or constructed some new vehicle or contraption using Zonai devices, clearly trying to one-up his previous attempts at defeating Link. The progression of his boss fights tells a story of increasing desperation and creativity as he refuses to give up.
What’s particularly clever about his implementation is that Master Kohga’s encounters are entirely optional. You can complete the main story of Tears of the Kingdom without ever fighting him once. But if you’re exploring the Depths thoroughly, hunting for treasures and completing side content, you’ll naturally stumble upon his various hideouts. This makes discovering him feel rewarding rather than mandatory, and it gives completionists a great reason to explore every corner of the underground.
How Master Kohga Survived BOTW
If you played Breath of the Wild, you might be wondering how Master Kohga is even alive to appear in TOTK. After all, his defeat in BOTW was pretty definitive – he literally fell into a bottomless pit after his own attack backfired. Well, here’s the thing: that bottomless pit apparently led to the Depths, the massive underground cavern system that exists beneath all of Hyrule. Instead of dying, Master Kohga survived the fall and has been living in the Depths ever since.
This is actually a brilliant piece of retroactive continuity that makes perfect sense. The Depths exist directly below the Yiga Clan Hideout area in the Gerudo region, so Master Kohga falling through the floor and ending up underground tracks logically with TOTK’s geography. He’s had years between the two games to explore this underground realm, discover Zonai technology, and plot his revenge against Link. His survival is both believable within the game’s world and perfectly in character – of course this dramatic, over-confident villain would survive what seemed like certain death.
During your encounters with him, Master Kohga makes references to his previous defeat and his time spent in the Depths. He’s clearly been stewing over his loss to Link, building up resentment and determination to prove himself. The Depths have become his new base of operations, and he’s taken to Zonai technology like a kid with new toys, constantly building vehicles and contraptions to test against you. His survival story adds depth to his character while maintaining the comedic tone that makes him so enjoyable.
The Yiga Clan’s Continued Presence
Master Kohga’s return also means the Yiga Clan is still active and causing trouble throughout Hyrule. In Tears of the Kingdom, the Yiga are even more aggressive and creative than they were in BOTW. They’ve adapted to the new landscape, using Zonai technology themselves and setting up ambush points in both the surface world and the Depths. You’ll encounter Yiga assassins disguised as travelers, Yiga camps with treasure, and various Yiga schemes throughout your adventure.
The clan’s loyalty to Master Kohga despite his repeated failures is actually quite touching in a weird way. They continue to follow his orders, support his increasingly elaborate schemes, and genuinely believe in his eventual triumph over Link. There’s something endearing about their unwavering dedication to a leader who is objectively terrible at his job. The Yiga Clan members you encounter often speak about Master Kohga with reverence, treating him like a brilliant mastermind even though players know he’s more of a lovable buffoon.
What’s interesting is that the Yiga Clan has also learned from their experiences in BOTW. They no longer rely solely on surprise attacks and stealth. Instead, they’ve embraced Zonai technology, building vehicles, using devices in combat, and generally becoming more mechanically sophisticated. Master Kohga leads by example in this regard, constantly demonstrating new Zonai-powered vehicles during his boss fights. The evolution of the Yiga Clan’s tactics mirrors the evolution of the game’s mechanics, showing how this antagonist faction has adapted to the new world.

Finding Master Kohga: The “Master Kohga of the Yiga Clan” Quest
To encounter Master Kohga in Tears of the Kingdom, you’ll need to engage with the “Master Kohga of the Yiga Clan” side quest, which becomes one of the most extensive and entertaining side adventures in the game. This quest isn’t handed to you directly through traditional quest-giving NPCs. Instead, it begins organically as you explore the Depths, making it feel like a genuine discovery rather than a checklist item.
How the Quest Begins
The quest technically starts when you encounter any Yiga Clan members in the Depths who mention that Master Kohga is conducting experiments down there. You might overhear conversations between Yiga soldiers, read notes left in their camps, or simply stumble upon one of Master Kohga’s testing facilities while exploring. The game doesn’t explicitly tell you “go find Master Kohga” – instead, it drops breadcrumbs that curious players will naturally follow.
I discovered my first clue at a Yiga Clan camp in the southwestern Depths, near the area below the Gerudo region. There were Yiga soldiers standing around some Zonai devices, and when I got close enough to eavesdrop, they mentioned that Master Kohga was working on something incredible that would finally defeat Link. This dialogue immediately got my attention because I loved the character in BOTW, and I was excited to learn he was back and active in this game.
Another way players commonly discover the quest is by finding abandoned Yiga research facilities scattered throughout the Depths. These locations have distinctive architecture and are usually marked by Yiga Clan banners and stockpiles of Zonai devices. When you approach these facilities, you’ll often find notes or environmental storytelling that hints at Master Kohga’s presence. The game is excellent at making you feel like a detective piecing together information rather than just following waypoints.
Once you’ve gathered enough clues or stumbled upon the right location, the quest “Master Kohga of the Yiga Clan” will officially appear in your adventure log. The quest description is appropriately vague and dramatic, mentioning that Master Kohga is plotting something in the Depths and that you should investigate his activities. From that point forward, the quest becomes a series of boss encounters spread across different regions of the underground.
Prerequisites and Recommended Preparation
Before you start hunting for Master Kohga, there are some things you should know about preparation and recommended power level. While the quest is technically accessible fairly early in the game (once you’ve reached the Depths), I’d strongly recommend having decent gear and abilities before you start challenging him. Each of Master Kohga’s encounters is a full boss fight with unique mechanics, and they can be quite challenging if you’re underprepared.
First, you’ll need to have access to the Depths, which means you need to have progressed far enough in the main story to discover one of the chasms that lead underground. The Depths are dark and dangerous, so make sure you have plenty of Brightbloom Seeds to light your way, and ideally you’ve activated several Lightroots to create fast travel points. Getting lost in the Depths while searching for Master Kohga can be frustrating, so having some of the map revealed helps immensely.
In terms of combat readiness, I’d recommend having at least six to eight hearts before taking on the first Master Kohga fight. His attacks can deal significant damage, especially if you’re not familiar with the patterns yet. Having some strong weapons is also important – aim for weapons in the 25-35 damage range at minimum. Each boss fight involves destroying Zonai constructs that Master Kohga pilots, so having weapons with good durability or materials that provide bonus damage helps.
Arrows are extremely valuable in these fights, so stock up before you start the quest. I’d recommend having at least 50 arrows, and more if possible. Many of Master Kohga’s weak points are easier to hit with arrows, and some of his vehicles move in ways that make melee combat impractical. Bomb Flowers fused to arrows are particularly effective, as they deal area damage and can hit multiple weak points if positioned correctly.
Don’t forget about food and elixirs! Bringing hearty meals that fully restore health and provide extra hearts is essential for these boss fights. I also recommend having some defensive buffs available – food that increases your defense or attack power can make the encounters significantly more manageable. Master Kohga’s boss fights don’t have cooking pots nearby, so you need to prepare all your food and elixirs before the battle begins.
Understanding the Quest Structure
The “Master Kohga of the Yiga Clan” quest is structured as a sequential series of five boss encounters, each taking place in a different region of the Depths. After you defeat Master Kohga in one location, he’ll flee and set up a new base elsewhere, forcing you to track him down again. This creates a fun cat-and-mouse dynamic where you’re literally chasing this villain across the entire underground map.
What makes this structure work so well is that each encounter is meaningfully different from the others. Master Kohga doesn’t just repeat the same boss fight five times. Instead, each battle features him piloting a completely different Zonai vehicle or construct with unique attack patterns and weaknesses. The progression shows his increasing desperation and creativity – he starts with relatively simple constructs and eventually builds elaborate multi-part machines.
The quest doesn’t hold your hand in terms of finding each subsequent encounter. After defeating Master Kohga in one location, the game doesn’t immediately mark his next hideout on your map. Instead, you need to explore the Depths and follow clues to discover where he’s gone. Sometimes you’ll find Yiga scouts who mention seeing their master heading in a particular direction. Other times, you’ll stumble upon his next facility while exploring a different region’s underground area.
This open-ended structure means you can complete the Master Kohga encounters in a fairly flexible timeframe. You might fight him twice in quick succession if you’re focused on the quest, or you might space out the encounters over dozens of hours as you naturally explore different parts of the Depths. The game accommodates both approaches, making the quest feel organic rather than rigid.
Master Kohga Boss Fight #1: The Gerudo Canyon Mine
The first encounter with Master Kohga in Tears of the Kingdom takes place in the Gerudo Canyon Mine, located in the Depths beneath the Gerudo region. This fight serves as your reintroduction to the character and establishes the pattern for future encounters – Master Kohga will pilot Zonai constructs, and you’ll need to destroy these vehicles while avoiding his attacks.
Location and How to Find It
The Gerudo Canyon Mine is located in the southwestern section of the Depths, roughly below where the Gerudo Canyon area is on the surface. If you’ve been exploring the Depths from the Gerudo region, you’ll eventually come across Yiga Clan banners and structures that indicate you’re getting close. The facility itself is built into a large cavern with distinctive Yiga architecture mixed with Zonai technology.
To get there from the surface, I recommend using the chasm near the Gerudo Canyon Stable. This chasm drops you relatively close to where you need to go, and from there you can follow the natural terrain and look for the telltale signs of Yiga presence. Alternatively, if you’ve activated Lightroots in the area, you can fast travel to one and navigate from there. The Depths below Gerudo are less densely packed with enemies compared to some other regions, making travel relatively safe.
As you approach the mine, you’ll notice Yiga Clan banners and torches marking the entrance. There are usually a few Yiga soldiers standing guard, though they’re not particularly strong if you’ve been playing for a while. You can fight them or sneak past – either way, entering the facility will trigger a cutscene where Master Kohga makes his dramatic entrance.
The Boss Fight Mechanics
When you enter the mine’s main chamber, Master Kohga appears with his characteristic flair, dramatically announcing his return and declaring that he’s been waiting for this moment since his defeat in BOTW. He makes several references to his fall into the pit and how it only made him stronger, which is both funny and somewhat true given that he’s now armed with Zonai technology. After his speech, he summons his first combat vehicle.
Master Kohga’s first vehicle is a relatively simple wheeled platform equipped with spike balls. The construct rolls around the arena, with Master Kohga standing on top directing the attack. The spike balls hang from the sides of the vehicle and swing as it moves, creating a dangerous zone around the construct. Master Kohga will also throw projectiles at you from his elevated position, forcing you to deal with multiple threats simultaneously.
The strategy for this fight is straightforward once you understand the mechanics. The vehicle has weak points on its wheels and structure that glow with a distinctive color. You need to attack these weak points to damage the construct. The easiest approach is to use arrows to target the weak points from a distance, as getting too close risks taking damage from the swinging spike balls. Each time you destroy a wheel or damage a critical component, the vehicle becomes less stable.
Master Kohga himself is vulnerable while standing on the vehicle. If you can hit him directly with arrows or other ranged attacks, you’ll deal additional damage and potentially stagger the construct. However, he’s pretty good at dodging, often performing exaggerated movements that are both comically over-the-top and mechanically effective at avoiding your shots. Timing your attacks when he’s in mid-gesture or distracted by his own gloating works well.
As you damage the vehicle, Master Kohga becomes increasingly frantic, shouting about how this shouldn’t be possible and accusing you of cheating. The dialogue during the fight is genuinely entertaining, with Master Kohga making excuses and threats in equal measure. Eventually, when you’ve dealt enough damage, the construct explodes in spectacular fashion, launching Master Kohga into the air. He crashes down, admits defeat (sort of), and teleports away, vowing that this isn’t over.
Rewards and What Happens Next
After defeating Master Kohga in the Gerudo Canyon Mine, you’ll receive your first set of rewards. The primary reward is a large Zonai Charge, which is extremely valuable for using Zonai devices and construct factories throughout the game. You’ll also get some rupees and occasionally a piece of Yiga Clan equipment, though the specific drops can vary.
More importantly, this victory advances the quest to its next stage. Master Kohga flees to another location in the Depths, and you’ll need to track him down to continue the questline. The game doesn’t immediately tell you where he’s gone, but if you talk to Yiga Clan members you encounter afterward, they’ll sometimes mention their master heading to different regions. This gives you a general direction to search.
The first encounter establishes the pattern for all subsequent battles: Master Kohga builds a Zonai vehicle, you destroy it while he provides comedic commentary, he flees, and you eventually track him down again. Each fight builds on this foundation while introducing new mechanics and increasingly elaborate constructs.
Master Kohga Boss Fight #2: The Abandoned Lanayru Mine
After defeating Master Kohga in the Gerudo region, his next appearance is in the Abandoned Lanayru Mine, located in the eastern section of the Depths beneath the Lanayru region. This second encounter ups the ante with a more complex vehicle and more challenging attack patterns.
Finding the Lanayru Mine
The Abandoned Lanayru Mine is located in the Depths below the Lanayru region, roughly beneath where you’d find the East Akkala Plains on the surface. Getting there requires traveling quite a distance across the Depths, so make sure you have adequate supplies and Brightbloom Seeds for lighting. If you’ve activated Lightroots in the eastern Depths, use them as waypoints to navigate efficiently.
The mine itself is larger than the previous facility, with more elaborate architecture suggesting that Master Kohga has invested serious resources into this new base. The Yiga presence here is also stronger, with more guards and better equipment. As you approach, you might want to clear out the guards first to avoid dealing with them during the boss fight, though they won’t follow you into the main chamber where Master Kohga waits.
The Hovercraft Battle
When you enter the main arena, Master Kohga greets you with another dramatic speech, this time expressing surprise and frustration that you found him again. He claims that his new creation is far superior to his previous attempt and that there’s no way you’ll defeat him this time. He then reveals his second vehicle: a hovering platform with multiple weapon attachments.
This hovercraft construct floats above the ground, making it harder to hit with melee weapons. It’s equipped with cannons that fire projectiles in patterns, forcing you to constantly move and dodge. Master Kohga controls the craft from a central position, occasionally raising barriers to protect himself when you get close to landing hits. The vertical mobility of this vehicle makes it a significant step up in difficulty from the first encounter.
The key to this fight is understanding the attack patterns and timing. The hovercraft will position itself at different heights and angles, firing barrages of projectiles that you need to dodge. Between attack volleys, there are brief windows where the vehicle is vulnerable and the weak points are exposed. These are your opportunities to strike with arrows or thrown weapons. I found that using Bomb Flower arrows worked particularly well here, as the explosive radius can hit multiple weak points if aimed correctly.
Master Kohga is more aggressive in this fight, actively trying to keep distance between you and his vehicle. He’ll move the hovercraft to the far side of the arena, forcing you to chase while dodging attacks. When you do significant damage, he sometimes deploys a temporary shield around the weak points, requiring you to wait for the shield to drop before continuing your assault. This adds a rhythm to the fight where you’re alternating between offense and evasion.
As his vehicle takes damage, the hovercraft becomes unstable, tilting and losing altitude. Master Kohga’s commentary becomes more desperate and angry, with him shouting about how unfair it is that his brilliant engineering keeps failing. The final phase of the fight has him attempting kamikaze attacks, trying to crash the damaged hovercraft directly into you. Once you destroy the vehicle completely, Master Kohga is once again launched into the air, crashes dramatically, and teleports away while promising even greater vengeance.
Advanced Strategies
For players looking to make this fight easier, there are several advanced strategies worth considering. First, Ultrahand can actually be used to grab and manipulate debris from destroyed parts of the arena, creating cover or platforms. While this isn’t necessary to win, it demonstrates the flexibility the game allows in approaching combat.
Using elemental arrows can also provide advantages. Ice arrows can sometimes slow the hovercraft’s movement, making weak points easier to hit. Fire arrows deal good damage to the Zonai devices, potentially destroying components faster. Shock arrows can temporarily disable certain systems, giving you free shots at vulnerable areas.
If you’re really struggling, consider preparing specific food buffs before the fight. Attack-up meals will help you destroy the vehicle faster, while defense-up food reduces the damage you take from the barrage attacks. Having speed-increasing food can also help with dodging the projectile patterns, though good reflexes and pattern recognition ultimately matter more than raw speed.

Master Kohga Boss Fight #3: The Akkala Citadel Ruins Mine
The third encounter with Master Kohga takes place in the Akkala Citadel Ruins Mine, deep in the northeastern section of the Depths. This battle introduces a completely new vehicle type and represents the midpoint of the quest chain, with Master Kohga becoming increasingly creative and desperate in his attempts to defeat Link.
Journey to Akkala’s Depths
The Akkala region’s Depths are located in the far northeastern corner of the underground map, making this potentially the longest journey yet in tracking down Master Kohga. The terrain in this area can be treacherous, with large chasms, gloom-filled areas, and plenty of hostile enemies. Make sure you’re well-prepared before undertaking this expedition, as it can take significant time to reach the mine if you haven’t activated nearby Lightroots.
The Akkala Citadel Ruins Mine is appropriately named because it sits directly below where the Akkala Citadel ruins exist on the surface. The facility here is even larger than the previous two, suggesting that Master Kohga has had more time to prepare or that he’s committing more Yiga Clan resources to this attempt. The architecture incorporates more Zonai elements, showing how Master Kohga has become increasingly proficient with this ancient technology.
As you approach the mine, you’ll notice enhanced Yiga security measures. There are watchtowers with Yiga scouts, trap mechanisms using Zonai devices, and patrol routes that are more sophisticated than before. Master Kohga has clearly learned from his previous defeats and is trying to prevent you from even reaching him. You can fight through the security or use stealth to bypass it, though clearing the area first makes the boss fight less hectic.
The Spider Tank Construct
Upon entering the main chamber, you’re greeted by an even more elaborate theatrical entrance from Master Kohga. This time he’s genuinely angry about your persistence, ranting about how you should have given up by now and how unfair it is that you keep finding him. His frustration is both amusing and somewhat relatable – imagine working hard on three different projects only to have the same person show up and wreck each one. Of course, his “projects” are all designed to kill you, so the sympathy only goes so far.
Master Kohga unveils his third creation: a spider-like construct with multiple legs and mounted weapons on a rotating turret. This vehicle can climb walls and ceilings, drastically changing the battlefield dynamics. The arena itself is more vertical than previous fights, with platforms at different heights that the spider construct can easily traverse. This forces you to think three-dimensionally about positioning and attack angles.
The spider construct attacks with a combination of direct projectiles and area-denial weapons. The turret on top fires charged shots that deal heavy damage if they connect, while the legs can stomp the ground creating shockwaves that damage nearby areas. Master Kohga has also equipped this vehicle with deployable mines that drop from the underside, creating hazards on the ground that you need to avoid. Managing all these different threats while trying to land hits on weak points makes this the most complex fight yet.
The weak points on the spider construct are located on the joints of the legs and on the turret assembly. However, these weak points are often facing away from you or positioned in ways that make hitting them challenging. You’ll need to move around the arena constantly, repositioning to get clear shots at vulnerable areas. When the spider is climbing walls or hanging from the ceiling, some weak points become more exposed, creating strategic windows for attack.
Master Kohga’s tactics in this fight are notably more sophisticated. He actively tries to keep you in bad positions, maneuvering the spider to trap you against walls or on precarious platforms. He’ll also deliberately position the construct so that its legs block your shots, using them as shields to protect the more vulnerable core components. This shows that he’s actually learning and adapting, even if he’s still ultimately destined to fail.
As you destroy the legs one by one, the spider construct loses mobility, eventually collapsing when enough damage has been dealt. Master Kohga’s dialogue throughout this process becomes increasingly panicked and desperate, with him shouting about how this was supposed to be his masterpiece. The final destruction of the vehicle is particularly spectacular, with the turret exploding and sending debris everywhere. Master Kohga survives the blast, naturally, and teleports away after delivering a speech about how you haven’t won because he has even better plans waiting.
Why This Fight Stands Out
The Akkala encounter is often cited by players as their favorite of the Master Kohga battles because it perfectly balances challenge and entertainment. The spider construct is genuinely intimidating when you first see it, and the fight requires more strategic thinking than the previous two encounters. Yet Master Kohga’s increasingly frantic commentary keeps the tone from becoming too serious or frustrating.
This battle also rewards player creativity. The vertical arena and mobile boss create opportunities to use the environment in clever ways. You can use Ascend to reach high platforms that give you better vantage points for hitting weak points. Ultrahand can manipulate arena debris to create barriers against the spider’s attacks. The flexibility in approach makes each player’s experience of this fight somewhat unique.

Master Kohga Boss Fight #4: The Eldin Canyon Mine
The fourth encounter with Master Kohga occurs in the Eldin Canyon Mine, located in the Depths beneath the volcanic Eldin region. By this point in the quest chain, Master Kohga is becoming truly desperate, and his vehicle designs are reaching peak absurdity and creativity.
Navigating to Eldin’s Underground
The Eldin region’s Depths are located beneath the volcanic and mountainous terrain in the northeastern part of Hyrule. This area of the Depths has environmental hazards that other regions don’t feature as prominently, including areas with intense heat and occasional volcanic activity. Make sure you have heat-resistant gear or elixirs if you’re planning to explore this region thoroughly, though the immediate area around Master Kohga’s mine is usually temperature-neutral.
Finding the Eldin Canyon Mine requires traveling through some of the more dangerous sections of the Depths. The paths are often narrow with sheer drops on either side, and there are numerous strong enemies patrolling the area. I recommend activating any Lightroots you encounter along the way to make future travel easier and to provide safe respawn points if you die during the journey or the boss fight.
The mine facility in Eldin is built into a massive cavern with lava flows visible in the background, creating an appropriately dramatic setting for what’s essentially the penultimate showdown with Master Kohga. The Yiga Clan presence here is substantial, with the most guards and the best equipment you’ve seen yet. They’re clearly protecting something important, which of course is Master Kohga’s latest creation.
The Flying Platform Battle
Master Kohga’s entrance for the fourth fight is his most dramatic yet. He appears on a massive flying platform that dominates the arena, complete with multiple weapon systems and defense mechanisms. His speech this time includes genuine admiration for your persistence mixed with frustrated anger that you keep ruining his plans. There’s almost a begrudging respect in his tone, as if he’s starting to understand why the Yiga Clan has failed repeatedly against Link.
The flying platform is equipped with four independent weapon systems: cannons, beam emitters, missile launchers, and a shield generator. Each system operates semi-independently, meaning you’ll be dodging attacks from multiple sources while trying to identify and target weak points. The platform also moves in three dimensions, flying high above the arena, swooping down for attack runs, and hovering at various altitudes. This makes it the most mobile boss vehicle yet.
Master Kohga himself is positioned in a protected cockpit at the center of the platform, only vulnerable when certain defensive systems have been destroyed. The intended strategy is to disable the weapon systems first, which exposes the shield generator, which then leaves Master Kohga’s cockpit vulnerable. However, skilled players can sometimes skip steps by hitting weak points from unusual angles or by using powerful explosive attacks to damage multiple systems simultaneously.
The environmental design of this arena plays a significant role in the fight. There are updrafts from the lava flows below that you can use with your paraglider to gain altitude, putting you at the same level as the flying platform. This creates opportunities for aerial combat where you can glide alongside the platform while shooting arrows at weak points. The verticality makes this fight feel epic in scale, like a true aerial dogfight.
As you destroy each weapon system, Master Kohga’s dialogue shifts from confident boasting to increasingly desperate excuses. He accuses you of using cheap tactics, of not fighting fair, of getting lucky. His commentary is hilarious because it perfectly captures the mindset of someone who refuses to admit that maybe, just maybe, their plans aren’t as brilliant as they think. When you finally destroy the shield generator and expose his cockpit, he screams about how this is impossible and unfair.
The final phase of the fight involves destroying the platform’s main power core while Master Kohga frantically tries to kamikaze crash the entire construct into you. The platform becomes unstable, losing altitude and spinning erratically. You need to land several final hits on the glowing core while avoiding the increasingly chaotic movements. When the core finally explodes, the entire platform disintegrates in a massive fireball, and Master Kohga is launched higher into the air than ever before. His scream of frustration echoes through the cavern as he disappears, teleporting away to lick his wounds and plot one more attempt.
Tactical Recommendations
For this fight, aerial combat skills are essential. Make sure you’re comfortable with aiming arrows while paragliding, as you’ll need to land shots on moving targets from awkward angles. Practicing on Aerocudas or other flying enemies before this fight helps develop the necessary skills. Bullet-time mechanics from diving and drawing your bow mid-air are particularly valuable here.
Bringing elemental Keese Eyeballs fused to arrows is highly recommended. These create elemental explosions on impact, dealing area damage that can hit multiple weak points. Ice Keese Eyeballs can slow down the platform’s movement, Fire Keese Eyeballs deal extra damage to the Zonai systems, and Electric Keese Eyeballs can temporarily disable weapon systems. Having a variety of these gives you tactical flexibility during the fight.
Resource management becomes crucial in this extended battle. The fight can take a while if you’re not dealing damage efficiently, and you’ll burn through arrows quickly. Make sure you enter with a full complement of arrows and have backup weapons ready. Breaking your best weapon mid-fight is frustrating, so bring multiple strong options and rotate between them to manage durability.
Master Kohga Boss Fight #5: The Great Abandoned Central Mine
The fifth and final encounter with Master Kohga takes place in the Great Abandoned Central Mine, located in the Depths directly beneath Hyrule Castle. This climactic battle represents Master Kohga’s last stand, featuring his most elaborate creation and serving as a fitting conclusion to your long pursuit of the Yiga Clan leader.
Reaching the Central Mine
The Great Abandoned Central Mine is positioned in the heart of the Depths, beneath Hyrule Castle and the surrounding Central Hyrule region. This is significant both symbolically and practically – Master Kohga has retreated to the very center of the underground world for his final showdown. The location suggests desperation but also a kind of poetic full-circle moment, as the area below Hyrule Castle is where Ganondorf’s seal is located, making this region extremely dangerous.
Getting to this mine is more challenging than reaching previous locations because the central Depths are heavily populated with strong enemies, gloom-covered terrain, and environmental hazards. You’ll likely need to navigate through or around multiple enemy encampments, and the Yiga Clan security around the mine itself is at its peak. They know you’re coming, and they’re prepared to throw everything they have at stopping you.
The facility is by far the largest and most elaborate of all Master Kohga’s bases. It’s a massive complex that clearly represents a significant investment of resources and time. The architecture incorporates advanced Zonai technology in ways that the previous bases didn’t, suggesting that Master Kohga has finally mastered the ancient devices and is ready to deploy his ultimate weapon. The atmosphere is tense as you approach, with the knowledge that this is the final confrontation giving the location added weight.
The Ultimate Multi-Stage Battle
Master Kohga’s final entrance is appropriately over-the-top. He appears surrounded by Zonai energy effects, standing atop his greatest creation with his arms raised dramatically. His speech is longer than ever, recounting all his previous defeats and declaring that he’s learned from each failure. He claims this vehicle incorporates everything that worked from his previous designs while eliminating all the weaknesses. For once, he’s not entirely wrong – this final construct is legitimately impressive.
The ultimate vehicle is a hybrid design combining elements from all previous encounters: wheels for ground mobility, hovering capability for aerial movement, articulated limbs for climbing and grappling, and a flying mode for ultimate maneuverability. It’s like Master Kohga took notes from every defeat and built something that addresses every limitation. The construct is massive, bristling with weapons, and protected by multiple layers of defenses.
This fight unfolds in multiple distinct phases, each requiring different strategies. Phase one involves the construct in its ground mode, rolling around the arena with devastating melee attacks from its articulated limbs. You need to target the wheels and leg joints while dodging its charges. Once you’ve destroyed enough ground-based components, Master Kohga transitions to phase two.
Phase two activates the hover systems, lifting the construct into the air. Now you’re essentially replaying elements of the second and fourth fights, using updrafts to gain altitude and engaging in aerial combat. The weak points shift to the hover mechanisms and the weapon turrets. Master Kohga becomes more aggressive, trying to overwhelm you with sustained fire from multiple weapon systems. Destroying the hover systems causes the construct to crash back to the ground.
Phase three is the most intense: the construct enters a desperate final mode where all remaining systems activate simultaneously. It combines ground charges, aerial swoops, projectile barrages, and area-denial attacks all at once. Master Kohga is screaming throughout this phase, no longer making coherent threats but just expressing pure frustrated rage. The construct is visibly damaged and unstable, sparking and smoking, but it’s fighting with everything it has left.
The final weak point is Master Kohga’s cockpit, which only becomes vulnerable after you’ve destroyed most of the construct’s systems. When you finally expose the cockpit and land the finishing blows, there’s a massive chain reaction explosion as all the Zonai devices overload simultaneously. The blast is spectacular, lighting up the entire arena. Master Kohga is launched one final time, his scream echoing as he disappears into the darkness.
The Aftermath and Final Rewards
Unlike the previous encounters where Master Kohga simply teleported away, this time when the smoke clears, he’s actually still there, lying on the ground defeated. He doesn’t immediately run away. Instead, you get a final conversation where he admits, begrudgingly, that you’re stronger than he gave you credit for. He still won’t call it a permanent defeat – he insists it’s merely a “strategic retreat” and that the Yiga Clan will return stronger than ever. But there’s a sense of finality to this encounter that the others lacked.
The rewards for completing the entire Master Kohga quest chain are substantial. You receive a massive amount of rupees, multiple large Zonai Charges, and various rare materials. More importantly, you get the satisfaction of having completed one of the most entertaining side quests in the entire game. The quest log updates to show the “Master Kohga of the Yiga Clan” quest as complete, acknowledging your total victory over the Yiga leader.
After this final encounter, Master Kohga disappears from the game world, but the Yiga Clan remains active. You’ll still encounter Yiga assassins and camps throughout Hyrule, but there are no more boss encounters with their leader. Some players report that Yiga Clan members they encounter after completing the quest have unique dialogue acknowledging Master Kohga’s defeat, adding a nice touch of continuity to the world.
Why This Final Battle Matters
The fifth and final Master Kohga fight represents excellent game design in several ways. First, it provides a legitimate challenge that tests everything you’ve learned throughout the quest chain. Players who struggled with the earlier encounters but persevered have developed the skills needed to handle this complex multi-phase battle. It’s a satisfying demonstration of player growth.
Second, the fight maintains the perfect balance of serious challenge and comedic tone. Master Kohga is genuinely trying to kill you with an impressively deadly construct, making the fight mechanically engaging and tense. But his over-the-top reactions and ridiculous dialogue prevent it from ever feeling frustrating or unfair. Even when you’re struggling, his commentary is entertaining enough to keep the experience fun.
Finally, the battle provides narrative closure to a storyline that’s been building throughout your time in the Depths. You’ve been chasing Master Kohga across the entire underground map, watching his increasing desperation and creativity. This final confrontation gives both you and the character a sense of completion. Master Kohga has thrown everything he has at you and come up short. There’s nowhere left to run, no more excuses to make, and he finally has to acknowledge defeat.

Master Kohga’s Character Development
One of the most delightful aspects of the Master Kohga quest chain is how it actually provides meaningful character development for this comedic villain. He’s not just a one-note joke character – across the five encounters, we see a surprisingly nuanced arc that makes him more endearing and three-dimensional.
From Confident Villain to Desperate Antagonist
In the first encounter, Master Kohga is supremely confident, almost dismissive of Link’s threat. He clearly believes that his new Zonai vehicle will easily defeat the hero who got lucky in their previous encounter. His dialogue is full of boasts and theatrical declarations about his inevitable victory. This confidence is both funny and somewhat charming – he genuinely believes in himself and his creations.
By the second and third encounters, we start to see cracks in his confidence. He’s surprised each time you find him, frustrated that his plans keep failing. His dialogue shifts from confident boasting to making excuses about why his previous vehicles didn’t work. He blames design flaws, bad luck, you cheating, anything except his own limitations. This denial is relatable in a weird way – we’ve all failed at something and looked for external reasons to explain the failure.
The fourth encounter shows Master Kohga reaching a point of genuine desperation. His dialogue becomes more frantic, his excuses more elaborate. He’s not just fighting to defeat Link anymore – he’s fighting to prove to himself that he’s not a failure, that all this effort and all these defeats mean something. There’s almost a tragic quality to his persistence, watching someone pour more and more resources into a losing proposition because admitting failure would be too painful.
By the fifth and final encounter, Master Kohga has come full circle to a kind of desperate determination. He’s no longer making grandiose boasts – he knows how this is likely to end. But he’s going to give it everything he has anyway, because what else can he do? His final creation is legitimately his masterpiece, representing everything he’s learned. When it fails, when you defeat him one last time, his final admission of your strength feels earned rather than forced.
The Humor in Failure
What makes Master Kohga such an endearing character is that his failures are never portrayed as pathetic or mean-spirited. The game laughs with him, not at him. His over-the-top reactions, his ridiculous excuses, his theatrical dramatics – these are all played for comedy, but there’s genuine creativity and effort behind each of his constructs. He’s not incompetent; he’s just facing an opponent who’s better than him.
His relationship with his Yiga Clan followers also adds depth to his character. They genuinely respect and admire him despite his repeated failures. When you encounter Yiga soldiers between boss fights, they often speak about Master Kohga’s brilliance and how his next plan will surely succeed. This unwavering loyalty suggests that Master Kohga must have some genuinely good leadership qualities that we don’t see directly. He inspires devotion in his followers, which is more than many villains can claim.
The comedy also comes from Master Kohga’s completely undeserved self-confidence. He never seems to learn from his mistakes in terms of moderating his ego. Each new vehicle is proclaimed as his greatest creation yet, certain to defeat Link. When it fails, he’s genuinely shocked and outraged, as if the outcome was anything other than predictable. This combination of grandiosity and repeated failure creates a comedic pattern that never gets old.
Surprising Competence
Despite being played for laughs, Master Kohga actually demonstrates surprising competence in several areas. His mastery of Zonai technology is genuinely impressive – he’s taken ancient devices that most people barely understand and built complex vehicles from them. Each of his constructs is actually well-designed for its intended purpose; they just happen to be facing a legendary hero who’s even more skilled.
His strategic thinking also shows growth across the encounters. After each defeat, he clearly analyzes what went wrong and tries to address those weaknesses in his next design. The progression from simple wheeled platform to complex multi-stage flying fortress shows real engineering skill and adaptive thinking. If he were facing any opponent other than Link, his creations would probably be devastatingly effective.
Master Kohga also shows genuine caring for his Yiga Clan followers. While he’s pompous and ridiculous, he’s not cruel or abusive toward his subordinates. The Yiga Clan chooses to follow him, and their loyalty seems to be genuine rather than based on fear. This makes him a more interesting antagonist – he’s not evil in the way Ganondorf is evil. He’s just a rival who believes he’s doing the right thing for his people, even if his methods are misguided and his personality is absurd.

Strategies for Defeating All Master Kohga Encounters
Having covered each individual fight, let’s discuss some universal strategies and tips that apply to all Master Kohga encounters. These approaches will help you tackle the quest chain more efficiently and with less frustration.
Universal Combat Tips
The most important universal tip is to always bring plenty of arrows. Every single Master Kohga fight is significantly easier if you can consistently hit weak points with ranged attacks. While it’s possible to complete these fights with melee weapons alone, it’s much more difficult and time-consuming. Stock up on arrows before starting each encounter, aiming for at least 30-50 arrows per fight.
Bomb Flowers fused to arrows are particularly effective against Zonai constructs. The explosive area damage can hit multiple weak points simultaneously, and the stagger effect from explosions can interrupt Master Kohga’s attack patterns. I recommend having at least 10-15 Bomb Flowers prepared for each encounter, more if you have them available.
Learning to use bullet-time effectively is crucial, especially in the aerial encounters. When you jump or dive from high places and draw your bow mid-air, time slows down, allowing you to aim precisely at weak points on moving targets. This mechanic trivializes some of the more difficult encounters where Master Kohga’s vehicles are highly mobile. Practice this skill on regular enemies before attempting the harder Master Kohga fights.
Food buffs are incredibly valuable, especially attack-up and defense-up meals. An attack-up meal can reduce the length of each fight by 30% or more, as you’ll destroy weak points faster. Defense-up food makes mistakes more forgivable, allowing you to tank hits that might otherwise kill you. Don’t try to save these meals for harder content – Master Kohga IS harder content, and using your best food is entirely justified.
Weapon Recommendations
For melee combat, two-handed weapons with high damage are excellent for destroying construct components quickly when you get openings. The slower attack speed is offset by the massive damage per hit, making them ideal for focused strikes on weak points. Fusing materials like Royal Claymores or Knight’s Halberds with powerful monster parts creates weapons that can tear through Zonai constructs efficiently.
One-handed weapons with good durability are better for sustained combat when you need to be more defensive and mobile. They allow you to keep your shield up more easily and react quickly to incoming attacks. Fusing Soldier’s Broadswords or Royal Broadswords with durable materials creates reliable weapons that won’t break mid-fight.
For bows, multi-shot bows are extremely powerful in these fights. A three-shot or five-shot bow turns one arrow into multiple projectiles, all of which can potentially hit weak points. When you fuse Bomb Flowers to arrows from multi-shot bows, you create devastating area attacks that can destroy multiple components in a single shot. The Lynel Bows and some Yiga Clan bows have this multi-shot property.
Don’t neglect Zonai devices as weapons. Devices like Cannons, Beam Emitters, and even simple Fans can be used creatively during these boss fights. Some players have built temporary vehicles or platforms using Ultrahand mid-combat to gain tactical advantages. While not necessary, creative use of the environment and Zonai devices can make fights easier and more interesting.
Environmental Awareness
Each Master Kohga arena has environmental features you can exploit. Updrafts allow you to gain altitude for aerial attacks. Columns and walls can provide cover from projectiles. Height differences create opportunities for plunging attacks. Take a moment at the start of each fight to survey the arena and identify features you can use to your advantage.
Positioning matters significantly in these encounters. Being cornered or trapped against a wall makes dodging much harder and leaves you vulnerable to sustained attack. Try to fight in open areas where you have multiple escape routes. Keep moving, use the entire arena, and don’t let Master Kohga control the battlefield positioning.
Some arenas have hazards like lava or chasms that can actually work to your advantage. If you can maneuver Master Kohga’s constructs near these hazards, sometimes their own attacks or movements will cause damage from the environment. It’s a small thing, but every bit of damage helps, especially in the longer fights.
Learning Attack Patterns
Every Master Kohga vehicle has predictable attack patterns once you’ve observed them for a while. The fights become much easier when you can anticipate what’s coming and position yourself accordingly. During your first attempt at each encounter, focus more on learning the patterns than on dealing maximum damage. Understanding when attacks are coming lets you dodge efficiently and identify the safe windows for counterattacks.
Audio cues are particularly helpful. Master Kohga often shouts before launching major attacks, and the Zonai constructs make distinctive sounds when charging up powerful abilities. Learning to recognize these audio cues allows you to react even when your visual attention is elsewhere, such as when you’re focused on aiming arrows.
Don’t be discouraged if you die during your first attempt at a fight. Each death is a learning opportunity where you gain more knowledge about the encounter. Maybe you discover a new weak point location, or you figure out a better positioning strategy, or you realize which attacks are most dangerous. This knowledge makes subsequent attempts progressively easier.
The Rewards for Completing the Master Kohga Quest
Beyond the satisfaction of defeating this entertaining villain, completing the entire Master Kohga quest chain provides substantial tangible rewards that benefit your overall Tears of the Kingdom playthrough.
Zonai Charges and Resources
The primary reward from each Master Kohga encounter is a large Zonai Charge, which is one of the most valuable resources in the game. Zonai Charges are used to power Zonai Device Dispensers, allowing you to get specific devices you need for construction projects. Getting five large Zonai Charges from the complete quest chain gives you significant resources for experimentation with Zonai technology.
Beyond the Zonai Charges, you’ll also receive substantial rupee rewards from each encounter. The amounts increase with each successive fight, with the final battle providing several thousand rupees. For players who struggle with money management in TOTK, this quest chain is an excellent source of income. The total rupees from all five fights can easily exceed 10,000, which is enough to buy significant upgrades or equipment.
Various rare materials also drop from defeating Master Kohga’s constructs. These include Zonai components, monster parts from high-level enemies, and occasionally gems. While not the most efficient farming method for any specific material, the variety of drops means you’re likely to get at least some things you need.
Combat Experience and Skill Development
Perhaps the most valuable reward is the combat skill development you gain from these challenging encounters. The Master Kohga fights require you to master several important combat mechanics: precise arrow aiming, timing-based dodging, aerial combat, environmental awareness, and resource management. Players who complete the entire quest chain become significantly better at combat than they were when they started.
These skills transfer to other challenging content in Tears of the Kingdom. The same techniques you develop fighting Master Kohga’s constructs work against Lynels, Gleeoks, and other tough bosses. The quest chain serves as an excellent training ground that prepares you for the game’s hardest challenges while remaining entertaining rather than frustrating.
Narrative Satisfaction
Beyond mechanical rewards, there’s genuine narrative satisfaction in completing this quest chain. You’ve followed Master Kohga’s journey from confident villain to desperate rival to finally defeated antagonist. You’ve witnessed his creativity, his persistence, and his ultimate acceptance of defeat. This narrative arc provides emotional closure that pure gameplay rewards cannot match.
The humor throughout the quest also makes it one of the most memorable experiences in Tears of the Kingdom. Years after finishing the game, players remember Master Kohga’s ridiculous dialogue, his dramatic entrances, and his over-the-top reactions. The quest creates memories that persist long after you’ve forgotten exactly how many rupees you earned or what materials you collected.
Master Kohga’s Role in TOTK’s Broader Narrative
While the Master Kohga quest is technically optional side content, it actually connects meaningfully to Tears of the Kingdom’s broader themes and narrative in ways that enrich the overall experience.
The Depths Exploration Incentive
Master Kohga’s quest chain provides a strong motivation to explore the Depths thoroughly. The Depths can feel overwhelming at first – they’re dark, dangerous, and disorienting. Having the concrete goal of tracking down Master Kohga gives you a reason to push into different regions of the underground, and along the way you’ll discover Lightroots, resources, and other secrets.
Each Master Kohga fight is positioned in a different region of the Depths, effectively encouraging you to explore the entire underground map. If you’re the type of player who needs specific goals to drive exploration, this quest chain provides those goals while also leading you to naturally discover other content in the Depths. It’s excellent game design that makes optional content feel purposeful rather than arbitrary.
Zonai Technology Showcase
The quest chain also serves as a showcase for what’s possible with Zonai technology. Each of Master Kohga’s constructs demonstrates different device combinations and building techniques. While you fight against these creations, you’re also seeing examples of what you could build yourself. Some players report getting inspiration for their own vehicle designs from Master Kohga’s constructs.
This educational aspect is subtle but valuable. The game teaches you about Zonai devices through normal gameplay, but seeing them used in creative combinations during boss fights reinforces those lessons. You might not have considered combining hover devices with spike balls until you saw Master Kohga do it, and then you realize that could work for a vehicle you’re designing.
Comic Relief
In a game that deals with heavy themes like ancient evil, sacrifice, and the end of civilization, Master Kohga provides essential comic relief. His ridiculous personality and slapstick failures create moments of levity that prevent the game from becoming too dark or serious. This tonal balance is important for maintaining player engagement over a 100+ hour playthrough.
The contrast between Master Kohga and Ganondorf is particularly notable. Both are antagonists who want to defeat Link, but their presentations couldn’t be more different. Ganondorf is menacing, powerful, and genuinely frightening. Master Kohga is pompous, incompetent, and hilarious. This range of antagonist types keeps the game’s narrative fresh and prevents villain fatigue.
Yiga Clan Worldbuilding
Through the Master Kohga quest, we learn more about the Yiga Clan’s culture and organization. We see that they have the resources to build elaborate facilities throughout the Depths. We learn they’ve adapted to Zonai technology quickly and creatively. We understand that their loyalty to Master Kohga is genuine despite his flaws. This worldbuilding makes the Yiga Clan feel like a real faction with history and culture rather than just generic enemies.
The quest also explains what the Yiga Clan has been doing since Breath of the Wild. They’ve been exploring the Depths, researching Zonai technology, and building infrastructure underground. This gives them a logical reason to be involved in TOTK’s story beyond just “they’re still evil and still hate Link.” Their activities tie into the game’s broader themes of ancient technology and underground mysteries.

Tips for Players Stuck on Master Kohga Fights
Despite being side content, some players find the Master Kohga encounters genuinely challenging. If you’re stuck on any of these fights, here are some specific tips to help you overcome the difficulty.
If You’re Taking Too Much Damage
The most common problem is getting overwhelmed by Master Kohga’s attacks and dying before you can deal significant damage. If this is happening to you, the solution is better preparation rather than better execution. Cook meals that provide temporary hearts – Hearty ingredients like Hearty Radishes, Hearty Durians, or Hearty Bass create dishes that fully restore health and add temporary hearts on top.
Defense-up food is also invaluable. Meals made with Armored Carp, Ironshrooms, or Armoranth provide defense bonuses that reduce incoming damage significantly. A level 3 defense boost can be the difference between dying in three hits versus surviving six or seven, giving you much more room for error.
Don’t forget about armor upgrades. If you’ve been neglecting the Great Fairy fountains, consider upgrading your best armor set before attempting harder Master Kohga fights. Even upgrading from level 0 to level 1 or 2 provides noticeable defensive benefits. The investment in materials is worth it if it allows you to survive attacks that would otherwise kill you.
If You’re Running Out of Resources
Running out of arrows, weapons, or food mid-fight is frustrating and common. The solution is better inventory management and preparation. Before starting any Master Kohga encounter, make sure you have at least 50 arrows, multiple strong weapons, and a full inventory of cooked food. If you’re regularly running out, you need to spend more time gathering resources between attempts.
For arrows specifically, visit shops regularly to buy out their stock. Shops in major towns like Tarrey Town, Hateno Village, and Gerudo Town sell arrows. The amounts might seem small, but visiting multiple shops and buying from them consistently builds up a healthy arrow supply over time. Also collect arrows from defeated enemies and chests as you explore.
Weapon durability management matters in these long fights. Don’t use your absolute best weapons right from the start – save them for the later phases when you need maximum damage output. Use decent mid-tier weapons for the early phases, then switch to your strongest options when the boss is low on health. This ensures you always have good weapons available when you need them most.
If You Can’t Hit the Weak Points
Some players struggle with the aiming and accuracy required to consistently hit weak points, especially on mobile bosses. The solution is practice combined with smart use of game mechanics. First, make use of bullet-time by jumping from high places and drawing your bow mid-air. Time slows down dramatically, making aiming much easier.
Second, get closer to the boss than you think you need to be. Many players try to fight from maximum range, thinking it’s safer. But this makes hitting small weak points much harder due to distance and arrow drop. Medium range (about 15-20 meters) is often optimal – close enough for accurate shots but far enough to see attacks coming and dodge them.
Third, consider using auto-aim more effectively. When you’re just holding the bow drawn, the reticle will subtly pull toward targets, including weak points. Let this assistance help you – don’t fight against it by making constant manual adjustments. Draw the bow, let the reticle settle on or near the weak point, make a small final adjustment if needed, then release.
If The Fight Takes Too Long
Some players find themselves in lengthy wars of attrition where they’re surviving fine but barely dealing damage. This usually indicates a damage output problem rather than a skill problem. The solution is better weapons and attack buffs. Make sure you’re using weapons in the 30+ damage range at minimum, ideally 40+ for the later fights.
Attack-up food dramatically shortens fight length. A level 3 attack boost effectively multiplies your damage output by 1.5x, meaning fights that would take 10 minutes instead take about 6-7 minutes. This is a massive time save and reduces the opportunities for mistakes. Cook meals with Mighty Bananas, Razorshrooms, or Mighty Thistles to get attack boosts.
Also make sure you’re targeting weak points consistently. Hitting armored parts or random body sections does minimal damage. Focus your attacks on the glowing weak points – this is where the damage multipliers are highest. Every shot should be aimed at a weak point unless you’re just trying to stagger the boss or interrupt an attack.

Comparing Master Kohga: BOTW vs TOTK
For players who experienced both games, it’s interesting to compare how Master Kohga’s role and presentation differ between Breath of the Wild and Tears of the Kingdom.
Expanded Presence
The most obvious difference is the sheer amount of content featuring Master Kohga. In BOTW, he appeared in one location (Yiga Clan Hideout) for one boss fight. That fight was memorable, but it was also brief – you could complete the entire Yiga Clan questline including the Master Kohga fight in under an hour if you knew what you were doing.
In TOTK, Master Kohga appears in five different locations for five separate boss fights, each with unique mechanics. The total content featuring him is probably 5-10 times greater than in BOTW. This expansion shows that the developers recognized how much players enjoyed the character and decided to give him a much larger role in the sequel.
Character Development
BOTW’s Master Kohga was essentially a one-dimensional comedic villain. He was funny and memorable, but we didn’t really learn anything about him beyond the surface level. He was the Yiga Clan leader who was dramatic and incompetent, and that was about it.
TOTK gives Master Kohga an actual character arc across the five encounters. We see his confidence erode, his desperation grow, and his determination persist despite repeated failures. By the end, he’s a more complex character – still comedic, but with layers of personality that make him more interesting than just “the funny villain guy.”
Mechanical Complexity
The BOTW fight with Master Kohga was mechanically simple. He attacked by dropping spiked balls, you used magnesis to throw them back at him, repeat three times, fight over. It was creative and fun, but not particularly challenging or complex.
The TOTK encounters are mechanically sophisticated by comparison. Each fight has unique vehicle mechanics, multiple phases, environmental considerations, and various attack patterns to learn. The fights require genuine skill and strategy, not just understanding one gimmick. This evolution makes Master Kohga feel like a legitimate boss encounter rather than just a comedic interlude.
Integration With Game Systems
In BOTW, the Master Kohga fight was isolated from the game’s core mechanics. It used the Magnesis rune in a specific scripted way, but didn’t really integrate with the broader gameplay systems. It felt like a set piece designed specifically for that moment.
TOTK’s Master Kohga encounters are deeply integrated with the game’s core systems. His vehicles are built from the same Zonai devices you use. The fights require mastery of arrow combat, Ultrahand manipulation, and aerial mobility – all core TOTK skills. Defeating him feels like an organic application of abilities you’ve been developing throughout the game rather than a scripted sequence.
The Cultural Impact of Master Kohga
Beyond just his role in the game, Master Kohga has become a beloved figure in the Zelda community, spawning memes, fan art, and discussions that extend well beyond his mechanical importance to the game.
Memes and Community Content
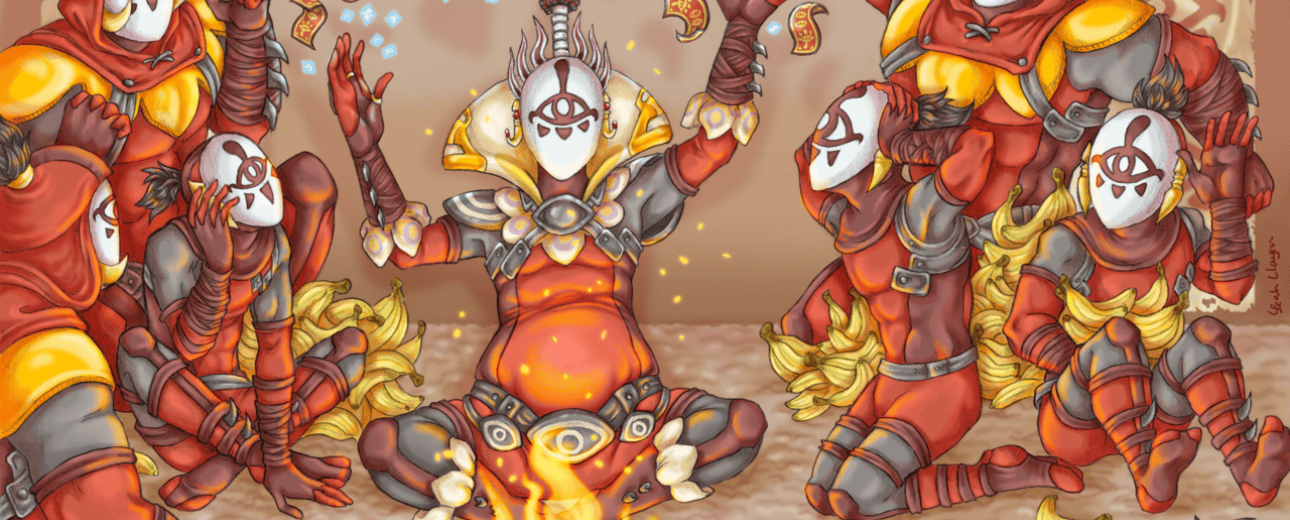
The “Mighty Bananas” obsession that the Yiga Clan has becomes a running joke in both games, and Master Kohga embodies this absurdity perfectly. The community has created countless memes about Yiga Clan members and their banana obsession, with Master Kohga often featured as the ultimate banana enthusiast. This silly lore detail has become a defining characteristic that players remember and celebrate.
Master Kohga’s dramatic dialogue and poses have also become meme material. His over-the-top declarations, his ridiculous excuses when defeated, and his theatrical presentations are endlessly quotable. Players share screenshots and videos of his best moments, and “Master Kohga energy” has become a shorthand for overconfident failure in gaming communities.
Why Players Love This Character
There’s something genuinely endearing about Master Kohga’s persistence. He keeps trying despite repeated failures, keeps building new vehicles despite knowing Link will probably destroy them, keeps delivering dramatic speeches even though they never intimidate anyone. This determination in the face of inevitable defeat is both funny and oddly inspirational.
He’s also a villain you can laugh with rather than hate. Ganondorf is terrifying and evil, inspiring genuine dread and dislike. Master Kohga is incompetent and pompous, inspiring laughter and affection. Players don’t really want to see him succeed (since that would mean Link’s death), but they don’t actively hate him either. He occupies a unique space as an antagonist who feels more like a rival or a comedic foil than a true villain.
The quality of his voice acting and writing also deserves mention. Whoever wrote Master Kohga’s dialogue and whoever performed his voice both understood the assignment perfectly. Every line delivery is perfectly timed, every exaggerated reaction feels natural to the character. The craftsmanship in making this character entertaining shows through in every encounter.

Conclusion: Master Kohga’s Legacy in TOTK
So, is Master Kohga in Tears of the Kingdom? Absolutely yes, and his presence is one of the game’s most delightful surprises. What could have been a simple cameo or a single nostalgia-driven boss fight instead becomes a extensive quest chain that spans the entire Depths and provides some of the most entertaining moments in the game.
The five Master Kohga encounters represent excellent optional content – challenging enough to feel rewarding when completed, funny enough to never feel frustrating, and meaningful enough to justify the time investment. The progression from confident villain to desperate rival to finally defeated antagonist creates a satisfying narrative arc that gives structure to your exploration of the Depths.
From a game design perspective, Master Kohga’s quest demonstrates how optional content should be implemented. It rewards exploration, provides worthwhile mechanical and narrative payoffs, integrates smoothly with the game’s core systems, and stands alone as entertaining content without requiring completion for the main story. Players who skip this quest entirely can finish TOTK just fine, but those who engage with it get a richer, more complete experience.
Master Kohga also serves as a reminder that not everything in games needs to be serious and dark. Yes, Tears of the Kingdom deals with heavy themes about sacrifice, duty, and the cyclical nature of evil. But it also has room for a ridiculous villain who pilots increasingly absurd vehicles while screaming about how unfair it is that a legendary hero keeps defeating him. This tonal variety keeps the game feeling fresh across its lengthy playtime.
For completionists and explorers, tracking down all five Master Kohga encounters provides a concrete goal that motivates thorough exploration of the Depths. For players who enjoy combat challenges, the boss fights offer legitimate difficulty without crossing into frustration. For those who appreciate good writing and character work, Master Kohga’s arc across the five encounters delivers satisfying character development for a comedic antagonist.
Looking forward, Master Kohga has secured his place as one of Zelda’s most memorable minor villains. His expanded role in TOTK compared to BOTW shows that Nintendo understands which characters resonate with players. If there are future Zelda games set in this version of Hyrule, I wouldn’t be surprised to see Master Kohga return again, perhaps with even more elaborate schemes and vehicles.
Whether you’re a returning BOTW player wondering if your favorite comedic villain made it into the sequel, or a new player who just encountered this ridiculous character for the first time, Master Kohga adds something special to Tears of the Kingdom. He’s proof that games can be epic and silly, challenging and funny, serious and absurd all at once.
If you haven’t started the Master Kohga quest chain yet, I highly encourage you to seek it out. Explore the Depths, follow the clues, and prepare yourself for some of the most entertaining boss fights in the game. And when you finally defeat Master Kohga for the fifth and final time, take a moment to appreciate the journey – from his dramatic first entrance to his begrudging final admission of defeat, it’s been quite a ride.
For more information about Master Kohga’s appearances across Zelda games, check out the Zelda Wiki’s Master Kohga page. For detailed strategies on defeating each encounter with video guides, IGN’s TOTK walkthrough has comprehensive coverage. The TOTK subreddit is also full of players sharing their favorite Master Kohga moments and creative strategies. And for official information about the game’s development and character design choices, Nintendo occasionally releases content through their official Zelda portal.
Now get out there, explore those Depths, and show Master Kohga why messing with the Hero of Hyrule is always a bad idea – no matter how many Zonai vehicles you build!