There are games that are good, games that are great, and then there are games that achieve something transcendent—a level of design excellence so complete that they become the measuring stick for everything that follows. The Legend of Zelda: A Link to the Past is undeniably in this rarefied category. Released in 1991 for the Super Nintendo Entertainment System, this masterpiece didn’t just continue the Zelda legacy established by the original NES games—it fundamentally perfected the formula, creating a blueprint that the series and countless other games would follow for decades to come.
Introduction: The Game That Defined Perfection
As someone who first played A Link to the Past on a borrowed SNES cartridge in the early 90s, I can still remember the sense of wonder that washed over me during the opening moments. The rain falling on Link’s house, the mysterious message from Princess Zelda echoing in his dreams, the urgent midnight journey to rescue her from Hyrule Castle’s dungeon—all of it felt cinematic and epic in ways that games simply hadn’t before. This wasn’t just a video game; it was an adventure that pulled you into its world completely, demanding your attention and rewarding your curiosity at every turn.
What makes A Link to the Past truly special is how it takes the experimental foundation laid by the original Legend of Zelda and the ambitious but flawed Zelda II: The Adventure of Link, and creates something that feels inevitable in its rightness. The top-down perspective returns from the first game, but enhanced with the SNES’s superior graphics and processing power. The RPG elements are present but streamlined for accessibility. The world is massive but never overwhelming. The difficulty is challenging but fair. Every single aspect of the game feels perfectly calibrated, as if the developers had discovered some hidden formula for creating the ideal action-adventure experience.
The game’s structure—alternating between the Light World and Dark World versions of Hyrule—was revolutionary at the time and remains brilliant today. This dual-world mechanic essentially gives players two complete game worlds to explore, each with its own dungeons, secrets, and challenges. The way these worlds mirror and complement each other creates endless opportunities for creative puzzles and satisfying discoveries. Finding a blocked path in the Light World and realizing you can bypass it by traveling through the corresponding Dark World location delivers a thrill that never gets old, no matter how many times you’ve played through the game.
In this comprehensive guide, we’re going to explore absolutely everything that makes A Link to the Past a masterpiece. We’ll walk through the complete story from Link’s fateful night journey to the final confrontation with Ganon. We’ll break down each of the game’s twelve dungeons with detailed strategies and tips. We’ll discuss the innovations that A Link to the Past introduced to the series and to gaming in general. We’ll explore the game’s timeless art design and unforgettable music. We’ll uncover secrets, share strategies, and analyze why this particular Zelda game continues to top “greatest games of all time” lists over thirty years after its release.
Whether you’re a newcomer curious about what makes this SNES classic so legendary, a returning player ready to experience the magic once more, or a dedicated fan who speedruns the game and knows every pixel, this guide will offer valuable insights and deepen your appreciation for one of gaming’s genuine masterpieces. The adventure awaits in both Light and Dark Worlds, and this guide will be your companion through every moment of Link’s greatest quest. So grab your Master Sword, make sure you’ve got some fairies in bottles for emergencies, and let’s explore why A Link to the Past isn’t just a great Zelda game—it’s the definitive one.
The Perfect Foundation: How A Link to the Past Built on Zelda’s Legacy
A Link to the Past arrived at a crucial moment in the Zelda series’ history, tasked with establishing what a home console Zelda game should be after the original’s groundbreaking success and the sequel’s divisive experimental design. Nintendo had taken a risk with Zelda II: The Adventure of Link, introducing side-scrolling platforming, RPG stat progression, and a drastically different structure. While that game had its merits and loyal fans, many players felt it strayed too far from what made the first Zelda magical. A Link to the Past needed to honor the series’ roots while pushing forward into the 16-bit era with new ideas and enhanced capabilities.
Learning from the Past, Building for the Future
The original Legend of Zelda on the NES established a template that was revolutionary for 1986: a large overworld to explore freely, dungeons hidden in that world requiring specific items to complete, gradual character progression through heart containers and equipment upgrades, and a focus on discovery and player-driven exploration. It was non-linear in ways that felt liberating, allowing players to tackle many dungeons in various orders and find their own path through Hyrule. This freedom was exhilarating but also occasionally frustrating—the game could be opaque about where to go or what to do next, leading to aimless wandering or consulting the Nintendo Power hotline.
Zelda II took a completely different approach, creating a side-scrolling action-RPG hybrid with towns, NPCs, experience points, and platforming challenges. While innovative, it felt disconnected from what players expected from Zelda. The difficulty was punishing, the game structure was more linear despite the overworld, and the focus on combat over exploration shifted the series’ identity. Many fans appreciated Zelda II’s ambition, but there was a hunger for a game that recaptured the original’s magic.
A Link to the Past brilliantly synthesized the best elements from both games while introducing its own innovations. From the original, it took the top-down perspective, the focus on exploration and dungeon crawling, the satisfying loop of finding new items that open new areas, and the emphasis on spatial puzzle-solving. From Zelda II, it adopted the more developed narrative structure, the presence of NPCs with dialogue and personality, and certain RPG elements like collecting various bottles for different purposes. But it refined everything, smoothing rough edges and adding layers of polish that made every system feel perfect.
The SNES hardware enabled visual presentation that was leagues beyond what the NES could achieve. A Link to the Past features gorgeous, detailed sprite work with rich colors, smooth animations, and environmental effects like rain, lighting, and transparency. The world feels alive in ways the original Zelda’s more abstract representation couldn’t quite manage. Link’s sword swing has weight and impact, enemies have personality in their designs and movements, and every location has a distinct visual identity that makes Hyrule feel like a real, coherent world rather than a collection of screens.
The Dual World Revolution
The game’s signature innovation is undoubtedly the Light World and Dark World mechanic. This wasn’t just a clever way to reuse assets (though it certainly maximized the game’s content)—it was a fundamental rethinking of how a game world could function and how players could interact with it. The Light World is Hyrule as Link knows it: green fields, friendly villages, familiar landmarks. The Dark World is a corrupted mirror version where everything familiar is twisted and dark, where forests become dead thickets, villages become monster lairs, and friendly NPCs have transformed into hideous creatures.
The brilliance of this dual-world design reveals itself gradually as you play. Initially, you explore the Light World, gathering the three Pendants of Virtue from the first three dungeons. Then, Agahnim’s magic sends Link into the Dark World, and suddenly you have an entirely new realm to explore. But the magic happens when you gain the Mirror item, allowing you to switch between worlds at will. Now every location exists in two states, and puzzles can span both realities—you might need to navigate to a specific spot in the Dark World to warp back to an otherwise unreachable Light World location, or vice versa.
This creates puzzle-solving opportunities that were unprecedented in gaming at the time. Secret caves in the Light World might lead to important Dark World locations. Obstacles that seem impassable in one world can be bypassed through the other. The way the worlds mirror each other creates an elegant spatial logic—once you understand how they correspond, you can intuit solutions to challenges by thinking dimensionally. It’s the kind of design that feels obvious in retrospect but was genuinely revolutionary at the time.
The dual-world system also serves narrative and thematic purposes. The Dark World’s corruption reflects Ganon’s influence and the power of the Triforce when wielded by evil. The transformation of familiar locations into nightmarish versions creates an emotional impact—you care about restoring the Light World because you’ve already explored it and met its inhabitants. The reveal that the Dark World’s monsters were once people from the Light World, transformed by their inner darkness when Ganon brought them into his realm, adds surprising depth to what could have been a simple “good vs. evil” story.
Perfecting the Difficulty Curve
One area where A Link to the Past absolutely excels is in its difficulty curve and game pacing. The game starts relatively gently, teaching basic mechanics through the opening castle infiltration sequence before opening up the world. The first three dungeons gradually increase in complexity, introducing puzzle concepts and combat challenges without overwhelming players. By the time you reach the Dark World and the difficulty spikes significantly, you’ve had thorough training in every system you’ll need.
The game never feels unfair, even in its most challenging moments. Deaths typically result from player mistakes rather than cheap tricks or unpredictable enemy behavior. Puzzles have logical solutions that reward observation and experimentation. The game provides enough hints through NPC dialogue, environmental clues, and the telepathic communication with Sahasrahla and later Zelda to keep players from getting hopelessly stuck, but it never holds your hand or makes discoveries feel unearned.
Heart Pieces and optional upgrades create a scalable difficulty curve where players struggling with combat can seek out additional health and better equipment, while skilled players can challenge themselves by heading straight for dungeons with minimal preparation. The game respects player agency, allowing you to approach challenges in your own way while ensuring that thorough exploration is always rewarded. This balance between guidance and freedom, between accessibility and challenge, is a significant part of what makes A Link to the Past feel perfectly designed.

The Story: A Tale of Light and Darkness
A Link to the Past’s narrative was surprisingly ambitious for its time, especially for a Zelda game. While the series had always had story elements, they were typically minimal—backstory in the manual, a simple rescue premise, and an ending cutscene. A Link to the Past dramatically expanded the series’ storytelling, creating a proper beginning, middle, and end with character development, plot twists, and emotional moments that elevated the game beyond simple adventure into something approaching genuine mythology.
The Opening: Destiny Calls on a Stormy Night
The game begins with one of the most atmospheric openings in gaming history. Rain falls steadily on Link’s house in the night. He’s asleep, but troubled—Princess Zelda’s voice echoes in his mind telepathically, calling for help. This isn’t exposition text or a cutscene showing events Link doesn’t witness; it’s a personal connection between the hero and the princess that immediately creates investment and urgency. When Link’s uncle prepares to venture out into the storm to investigate events at Hyrule Castle, warning Link to stay inside, we already know Link won’t listen. Destiny is calling.
The journey to Hyrule Castle sets the tone perfectly. The rain-soaked overworld, the ominous music, the sense that something terrible is happening while ordinary citizens sleep unaware—it’s brilliantly atmospheric. When you find your uncle mortally wounded in the castle’s underground passage, he passes his sword and shield to Link with his dying breath, making the quest personal and tragic. This isn’t just a hero answering an abstract call to adventure; this is Link avenging his uncle and fulfilling the duty the older man couldn’t complete.
Rescuing Zelda from the dungeons only to discover the true threat is Agahnim, the king’s wizard who has seized power and plans to break the seal on Ganon by sacrificing maidens descended from the Seven Sages, establishes the central conflict. The game’s early hours efficiently set up the stakes, the villain, and the hero’s motivation while teaching gameplay mechanics through the castle infiltration. By the time you escort Zelda to sanctuary and Sahasrahla begins explaining the backstory, you’re already emotionally invested in the quest.
The Quest for the Pendants and the Master Sword
The first act of A Link to the Past tasks Link with proving himself worthy to wield the Master Sword by collecting three Pendants of Virtue from dungeons hidden across Hyrule. This structure serves multiple purposes: it gives players clear initial objectives while allowing freedom in the order you tackle the first few dungeons, it teaches the core gameplay loop of exploring the overworld to find dungeons and conquering those dungeons to gain items, and it builds toward the crucial moment of drawing the Master Sword.
The Pendant of Courage comes from the Eastern Palace, the Pendant of Power from the Desert Palace, and the Pendant of Wisdom from the Tower of Hera. Each dungeon introduces Link to different environmental themes—the Eastern Palace’s basic rooms and simple puzzles, the Desert Palace’s labyrinthine layout and desert motifs, the Tower of Hera’s vertical structure and mountain-top location. These dungeons are designed to be manageable challenges that build confidence and teach the spatial reasoning skills that later Dark World dungeons will test much more rigorously.
Claiming the Master Sword from the Lost Woods is a milestone moment that the game builds toward effectively. The legendary blade, sitting in a forest clearing waiting for a worthy hero, represents Link’s transformation from a boy thrust into adventure to the true hero of legend. The Master Sword’s power is tangible—it deals more damage than your previous weapon, it can shoot beam projectiles when Link is at full health, and it’s essential for defeating Agahnim and certain Dark World enemies. This item rewards your efforts through the early game and empowers you for the challenges ahead.
Agahnim’s Betrayal and the Dark World Revelation
The confrontation with Agahnim in Hyrule Castle’s tower is the game’s first major climax and a brilliant story pivot. The wizard who appeared to be the primary antagonist is revealed as Ganon’s agent, working to break the seal imprisoning the ancient evil in the Dark World. When Agahnim’s magic sends Link into that corrupted realm, the scope of the adventure expands dramatically. What seemed like it might be the game’s ending is actually just the end of the first act, with an entire twisted version of Hyrule waiting to be explored.
The Dark World’s nature is explained gradually: long ago, Ganon found the Triforce and wished on it, but because his heart was full of evil, the Sacred Realm where the Triforce resided was transformed into the Dark World, reflecting his darkness. People brought into this realm are transformed based on their inner nature—those with evil in their hearts become monsters, while those pure of heart retain their forms but are trapped. Agahnim has been sending the maiden descendants of the Seven Sages into the Dark World, planning to use them to fully resurrect Ganon.
Link’s quest in the Dark World is to rescue these seven maidens from the dungeons where they’re imprisoned, simultaneously weakening Ganon’s power and gathering allies who can help seal him away once and for all. Each maiden rescued represents one step closer to the final confrontation, and their telepathic messages between dungeons provide encouragement and occasional hints. This structure gives emotional weight to each dungeon completion—you’re not just collecting keys or treasures, you’re saving innocent people and undoing Agahnim’s evil work.
The Truth Behind the Triforce and Ganon’s Power
A Link to the Past significantly expanded Zelda lore regarding the Triforce, establishing mythology that would define the series going forward. The Triforce, created by the three Golden Goddesses, was hidden in the Sacred Realm, and legend said that whoever touched it would have their heart’s desire granted. When Ganondorf (here called Ganon from the start) found it, his wish for power corrupted the Sacred Realm into the Dark World. The Triforce doesn’t grant wishes to those with balanced hearts containing power, wisdom, and courage; it splits into three pieces that seek hosts embodying each virtue.
This backstory establishes the cyclical nature of the conflict between Link, Zelda, and Ganon that would become central to Zelda mythology. Though A Link to the Past doesn’t explicitly detail the reincarnation cycle, it establishes the pattern: Ganon seeks the Triforce’s power, Zelda represents wisdom and the blood of the Sages, and Link embodies the courage necessary to stand against darkness. The game’s story resonates because it taps into archetypal hero’s journey elements while adding unique Zelda-specific mythology.
The seven maidens aren’t just damsels to rescue—they’re the spiritual successors to the Seven Sages who originally imprisoned Ganon. Their bloodline carries the power to seal evil, which is why Agahnim targeted them. This connects the present conflict to ancient history, suggesting that the battle against Ganon is part of a larger cosmic struggle that spans generations. The maidens’ prayers and power at the end of the game, when they help Link access Ganon’s Tower and ultimately help seal Ganon again, pay off this setup satisfyingly.
The Final Confrontation and the Triforce’s True Wish
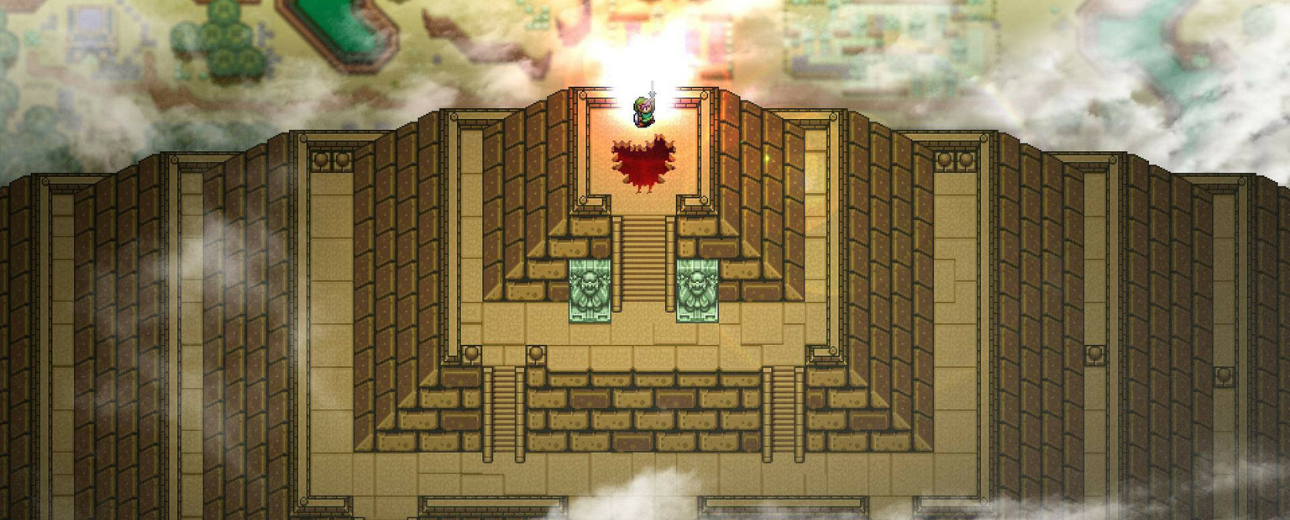
Ganon’s Tower serves as the game’s final dungeon and ultimate challenge, incorporating elements from all previous dungeons and requiring mastery of every item and technique Link has learned. The tower’s imposing presence—a massive structure that wasn’t there before, visible from across the Dark World—creates appropriate dread and anticipation. Climbing its floors, overcoming its challenges, represents Link’s final test before confronting the King of Evil himself.
The battle against Ganon is appropriately epic, going through multiple phases as the dark lord transforms and demonstrates different attack patterns. The fight takes place in a pyramid chamber beneath the tower, Ganon wielding his trident and teleporting around the room while bats circle and fireballs rain down. Defeating him requires mastering the Silver Arrows (found in the Pyramid earlier) and avoiding his increasingly desperate attacks. When he finally falls and the last maiden helps Link approach the Triforce, the game reaches its emotional and narrative climax.
Link’s wish on the Triforce undoes all of Ganon’s evil: the Dark World returns to the Sacred Realm, the transformed victims regain their true forms, Link’s uncle and the King are restored to life, and peace returns to Hyrule. The ending sequence showing the aftermath—all the NPCs you’ve met throughout your journey, now saved and happy, living their lives in a restored Hyrule—provides satisfying closure. The Triforce’s power, corrupted by Ganon, is finally used for its intended purpose: to grant the wish of a pure heart, bringing not selfish gain but restoration and healing to the entire world.
The game’s story works because it earns its moments. The opening’s urgency, the gradual revelation of the threat’s true scope, the personal stakes (your uncle’s death, Zelda’s capture, the maidens’ imprisonment), and the final triumph feel genuine because the game took time to establish them. A Link to the Past proved that Zelda games could tell compelling stories without sacrificing the focus on gameplay, creating a template for narrative integration that the series would follow for decades.
Dungeon Design Masterclass: All Twelve Temples Analyzed
The dungeons of A Link to the Past represent the absolute pinnacle of 2D Zelda dungeon design, each one a carefully crafted puzzle box that tests your mastery of specific items and game mechanics while gradually increasing in complexity and challenge. Unlike later 3D Zelda games where dungeons might take hours to complete, these SNES dungeons are compact but dense, typically completable in 20-30 minutes once you know the solutions but filled with enough secrets and optional challenges to reward thorough exploration. Let’s break down all twelve dungeons, examining what makes each special and providing strategies to conquer them.
Eastern Palace: The Perfect Introduction
The Eastern Palace serves as A Link to the Past’s tutorial dungeon, and it’s a masterclass in teaching through gameplay. Located east of Link’s house in the Light World, accessible after obtaining the Pendant quest from Sahasrahla, this dungeon introduces fundamental concepts that every dungeon afterward builds upon. The bow, this dungeon’s signature item, becomes one of your most-used tools throughout the entire game, capable of hitting distant switches, defeating certain enemies, and solving countless puzzles.
The dungeon’s layout is straightforward but not simplistic. You navigate rooms filled with simple enemies like Stalfos warriors and Eyegore statues, learning to use your sword effectively and recognize weak points (hitting Eyegores in their eye when it’s open). The puzzle elements introduce the core concepts: switches that open doors, buttons that need to be pressed, pots containing supplies, and the importance of paying attention to visual cues like cracked walls that can be bombed or different colored blocks indicating switches.
Armos Knights, the dungeon’s boss, is perfect for a first boss encounter. You face six knight statues that come to life when you approach the raised platform in the center of the room. The strategy is straightforward—attack them with your sword, dodge their hopping movements, and defeat all six. After the first five fall, the last one becomes powered up, moving faster and requiring more hits. This boss teaches pattern recognition, crowd control basics, and the importance of health management without being so difficult that new players will get stuck.
The dungeon’s pacing is deliberately gentle, giving players time to acclimate to the game’s rhythm without hand-holding. You learn through doing: trying to open a locked door teaches you to look for keys, encountering enemies teaches combat fundamentals, finding the compass and map teaches you to check your inventory, and discovering the big chest with the bow teaches you that dungeons reward thorough exploration. By the time you defeat the Armos Knights and claim the Pendant of Courage, you’ve received a complete education in how Zelda dungeons work.
Desert Palace: Labyrinthine Complexity
The Desert Palace, located in the Desert of Mystery southwest of Link’s starting area, is where A Link to the Past starts testing players more seriously. The dungeon has a much more complex layout than the Eastern Palace, with multiple floors, confusing corridors, and rooms that can be approached from different directions. The Power Glove found here becomes essential, allowing Link to lift light-colored rocks blocking paths throughout both Hyrule worlds.
Navigation is the primary challenge here. The Desert Palace’s layout deliberately disorients players, with corridors that snake around, staircases connecting floors in non-obvious ways, and dead-ends that force backtracking. The compass helps, but understanding the spatial relationship between rooms requires careful attention and mental mapping. This dungeon teaches you to be methodical, checking every room and trying both paths when corridors branch.
Lanmolas, the boss trio of giant worms, requires more advanced combat skills than the Armos Knights. These serpentine creatures burrow underground and emerge unpredictably, forcing you to stay mobile, watch for the dust clouds indicating their emergence point, and strike quickly before they dive back down. The fight is hectic and can be challenging if you’re not careful about health management. Defeating all three rewards you with another heart container and the Pendant of Power, marking the completion of your second dungeon.
Tower of Hera: Vertical Challenge
The Tower of Hera sits atop Death Mountain, accessible only after obtaining the Magic Mirror from the Old Man on the mountain. This dungeon emphasizes verticality, with Link ascending the tower floor by floor, each level introducing new challenges. The Moon Pearl found here is one of the game’s most important items, preventing Link from transforming into a helpless pink bunny in the Dark World—essential for exploring that realm effectively.
The dungeon’s challenges focus on precise platforming and multi-level puzzles. You push blocks onto lower levels to create pathways, activate switches that affect different floors, and navigate carefully around holes that can drop you back to previous sections. The Moldorm boss is an exercise in precision and patience—you must hit its tail while avoiding the rest of its body, all on a platform with no railings where falling means restarting the fight. Defeating it earns the final Pendant of Wisdom and opens the path to claiming the Master Sword.
Hyrule Castle Tower: Agahnim’s Lair
Before entering the Dark World dungeons, you must confront Agahnim in Hyrule Castle Tower. This isn’t a traditional dungeon—it’s more of a linear gauntlet of progressively harder enemies leading to the boss fight. The path up the tower tests your combat skills against powerful enemies like Ball and Chain Troopers while introducing environmental hazards like rotating spiked traps and floor tiles that hurt on contact.
Agahnim himself is a memorable boss fight that introduces the classic Zelda “dead man’s volley” mechanic where you must reflect projectiles back at the boss. He teleports around the room, firing energy balls that you must hit with your sword to send back at him. After enough hits, he adds additional attack patterns, firing multiple projectiles and creating rings of fire. The fight is challenging but fair, rewarding timing and positioning. Defeating him triggers Link’s banishment to the Dark World, beginning the game’s second act.
Palace of Darkness: Welcome to the Dark World
The Palace of Darkness is the first Dark World dungeon and immediately signals the difficulty increase. Located in the same position as the Eastern Palace in the Light World, this dungeon is massive, complex, and filled with tougher enemies and more devious puzzles. The Hammer obtained here becomes one of your most versatile items, smashing pegs, breaking certain blocks, and serving as a powerful weapon against armored enemies.
The palace’s defining feature is, appropriately, darkness. Many rooms are pitch black, with only a small circle of light around Link visible. You must navigate these dark rooms carefully, using enemy positions, wall collisions, and gradual mental mapping to find your way. Some rooms have torches you can light to reveal the full layout, adding a layer of strategy to exploration. The dungeon’s size means you’ll likely get lost initially, but its logical layout reveals itself with exploration.
Helmasaur King, the boss, requires the hammer to defeat. This massive insect-like creature has an armored mask protecting its face, which you must destroy by hitting it repeatedly with the Hammer. Once the mask breaks, its vulnerable green face is exposed, and you can attack with your sword. The boss also spawns mini-Helmasaurs and fires energy blasts from its tail, creating a multi-faceted challenge that tests both the new item and your combat fundamentals. Defeating it rescues the first maiden and establishes what Dark World dungeons will demand from you.
Swamp Palace: Waterlogged Challenges
The Swamp Palace, located in the Dark World’s swamp region (corresponding to the Light World’s dam area), is unique for its water-based puzzles and navigation challenges. The dungeon has a flooded bottom floor, requiring you to carefully manage water levels using switches and think about how changing water affects accessible paths. The Hookshot found here revolutionizes exploration and combat, allowing Link to grapple across gaps and pull certain enemies toward him.
The dungeon’s complexity comes from managing multiple interconnected systems: water levels, moving platforms, and rooms accessible only from specific directions. You’ll often need to drain water to access one area, then refill it to reach another, creating puzzles that require planning several steps ahead. The dungeon also features Swort enemies that must be defeated in a specific sequence, adding a layer of strategic thinking to combat.
Arrghus, the boss, is a floating jellyfish-like creature protected by orbiting Arrghi minions. The fight requires using your new Hookshot to pull the Arrghi away from the boss one at a time, then destroying them with your sword. Once all protectors are eliminated, Arrghus becomes vulnerable, bouncing around the room erratically. The fight tests your mastery of the Hookshot while maintaining the action-focused combat that Zelda bosses excel at.
Skull Woods: Forest of Fear
Skull Woods takes the multi-entrance concept to its logical extreme. Instead of a single dungeon entrance, Skull Woods has eight different entrances scattered across the forest area of the Dark World, each leading to separate sections that eventually interconnect underground. This creates a unique exploration experience where you must find and investigate all the entrances to fully map the dungeon.
The dungeon’s themes center on traps and misdirection. Walls that move to crush you, floors that collapse, enemies that spawn from unexpected locations, and confusing room layouts that loop back on themselves all create an atmosphere of danger and disorientation. The Fire Rod obtained here adds a powerful ranged weapon to your arsenal, useful for lighting torches, melting ice, and dealing fire damage to vulnerable enemies.
Mothula, the boss, is a giant moth that flies erratically around the room, occasionally firing a beam and constantly making the floor rotate with spikes moving across it. The fight requires constant movement to avoid both the boss and the environmental hazards while landing hits when opportunities present themselves. It’s chaotic and can be challenging, but learning the attack patterns and movement options turns it into a manageable encounter that rewards skill and persistence.
Thieves’ Town: Labyrinthine Complexity
Thieves’ Town, located in the Dark World’s Thieves’ Village (the corrupted version of Kakariko Village), is one of the largest and most complex dungeons in the game. Its labyrinthine structure includes multiple floors, invisible pathways, conveyor belt rooms, and numerous fake walls concealing secret passages. The dungeon demands careful exploration and mental mapping to conquer.
The standout feature is the invisible pathways section, where you must navigate across empty space using small visual cues—occasional pots or torches marking safe positions—to find the correct path. Falling means dropping to lower floors and needing to find your way back up. This section tests patience and observation, rewarding players who carefully study the room layout and move deliberately rather than rushing forward.
Blind the Thief, the boss, has an interesting gimmick—he initially appears as a young girl requesting rescue. When you lead her into the light of the main room, she transforms into her true form, a giant eyeless creature who attacks by spawning lasers from his head and shooting energy projectiles. The fight requires you to first blind him using the items you have, then attack his vulnerable points. It’s a creative boss that adds narrative intrigue to the standard combat challenge.
Ice Palace: Frozen Fortress
The Ice Palace, accessed from a large frozen lake in the Dark World, is notorious for being one of the game’s most challenging dungeons. The slippery ice floors that send Link sliding in whatever direction he’s moving create a constant navigation challenge. Puzzles involving pushing blocks become significantly harder when you slide past your intended stopping point, requiring precise positioning and spatial planning.
The dungeon’s complexity extends beyond the ice physics. Multiple floor levels, confusing room connections, and clever switch placement all contribute to making the Ice Palace a genuine test of patience and skill. The Blue Mail found here significantly reduces damage Link takes, making it an essential defensive upgrade for the challenging dungeons ahead. The ice theme is consistently applied throughout, with frozen enemies, icicle traps, and snow-covered rooms creating a cohesive aesthetic.
Kholdstare, the boss, is a frozen creature encased in ice that you must first melt using the Fire Rod, releasing three floating eyeballs that you must then defeat individually. The eyes move around the room spawning ice blocks that fall from the ceiling, creating environmental hazards to dodge while fighting. It’s a multi-phase boss that tests both your Fire Rod usage and your ability to manage multiple simultaneous threats.
Misery Mire: Desert of Despair
Misery Mire lives up to its name, presenting some of the game’s most devious puzzles and challenging enemy configurations. Located in the Dark World’s desert, this dungeon requires the Ether medallion to even enter—you must use it in front of the entrance to open the way. Inside, the dungeon features teleporter mazes, moving platforms, and rooms filled with powerful enemies that can quickly overwhelm careless players.
The dungeon’s standout feature is the teleporter puzzle section, where you must navigate a series of rooms with teleporter pads, mapping out which pads lead where and using this knowledge to reach otherwise inaccessible areas. This type of puzzle rewards methodical experimentation and note-taking, testing different aspects of player skill than combat or physical puzzles do. The Cane of Somaria found here creates movable blocks that can be used for puzzles and pushed onto switches, opening up new solution strategies throughout Hyrule.
Vitreous, the boss, is a giant eyeball surrounded by smaller eyeballs floating in lightning-charged slime. The fight involves destroying all the smaller eyes while avoiding contact with them and the slime, then attacking the main eye directly. The smaller eyes shoot lightning at you, requiring constant movement and careful positioning. It’s a frantic battle that demands good health management and awareness of your surroundings.
Turtle Rock: Multi-Level Madness
Turtle Rock is arguably the most complex dungeon in the game, featuring multiple floor levels, crystal switch mechanics, laser-shooting Beamos enemies, and puzzles that require using items in creative combinations. The dungeon sits atop a large mountain in the Dark World, its entrance shaped like a giant turtle’s head. Just reaching it requires using the Magic Mirror and precise navigation between worlds.
Inside, the dungeon’s vertical structure and crystal switch mechanic create layered puzzles where activating switches on one floor changes the state of blocks on other floors. You must think three-dimensionally, planning routes that account for how your actions on different floors interact. The Ice Rod found here (if you got the Fire Rod in Skull Woods) or Fire Rod (if you got Ice Rod) gives you the final elemental attack item, completing your magical arsenal.
Trinexx, the three-headed turtle dragon boss, is a spectacular multi-phase fight. The boss has a red fire-breathing head and a blue ice-breathing head, each vulnerable only to the opposite element—use the Ice Rod on the fire head and Fire Rod on the ice head. Once both side heads are destroyed, the shell falls away and the green central head becomes vulnerable to your sword. The fight tests mastery of multiple items and requires good positioning to avoid the various breath attacks.
Ganon’s Tower: The Ultimate Challenge
Ganon’s Tower serves as the game’s final dungeon and ultimate test of everything you’ve learned. The massive tower incorporates elements from all previous dungeons—ice floors, darkness, moving platforms, crystal switches, and more—while ramping up enemy difficulty and puzzle complexity. Each room feels like a callback to earlier challenges, but harder, demanding mastery rather than just familiarity.
The tower’s structure is deliberately overwhelming at first, with multiple floors, dead ends, and powerful enemies like Wizzrobes and Hokku-Bokku that require specific strategies to defeat efficiently. The sheer scope can be daunting, but the dungeon has a logical flow—each section leads naturally to the next once you find the correct path. The optional big key hunt adds extra challenge, requiring you to explore thoroughly to find the boss key rather than having it given as a standard dungeon reward.
Agahnim returns as a mid-boss, fought three times in succession throughout the tower. Each fight is slightly different, with additional attack patterns and increased speed. These battles test whether you’ve truly mastered the dead man’s volley mechanic and can handle it under pressure. Finally, you reach the pyramid room beneath the tower, where the true final boss awaits.
Ganon’s battle is the culmination of your entire journey. This massive, powerful form of Ganondorf wields a trident and uses both physical attacks and magic, teleporting around the room and requiring you to create openings to strike him. The Silver Arrows are essential for the final phase—once you’ve damaged him enough, you must shoot him with these blessed arrows to actually kill him. The fight is challenging but fair, a fitting test of all the skills you’ve developed across your adventure. When Ganon finally falls and the Triforce is yours to claim, the sense of accomplishment is immense.
The Items and Equipment: Tools of a Hero
One of A Link to the Past’s greatest achievements is how perfectly it balances its inventory of items and equipment. Every item serves multiple purposes, most have both combat and puzzle-solving applications, and the game provides a steady drip of new tools that consistently open up new possibilities without overwhelming players with too many options. Let’s explore every piece of equipment Link collects and how each contributes to the adventure.
Swords: The Blade of Evil’s Bane
Link’s primary weapon evolves throughout the adventure, each upgrade representing a significant power increase. The Fighter’s Sword inherited from your uncle is your starting weapon—functional but weak, requiring many hits to defeat even basic enemies. The Master Sword, pulled from the stone in the Lost Woods after collecting the three Pendants, is a massive upgrade, dealing double damage and shooting energy beams when Link is at full health. These beams make the Master Sword incredibly versatile, allowing you to attack distant enemies safely and hit switches from range.
The Tempered Sword, smithed by combining the Master Sword with Tempering Powder from the top of Death Mountain, doubles your attack power again, making you genuinely fearsome in combat. Finally, the Golden Sword (or Level 4 Sword), obtained by bringing the smiths a Super Bomb to access the Cursed Fairy, represents Link at maximum offensive power. Each upgrade feels earned and makes a tangible difference in how combat plays, encouraging exploration to find these power increases.
Shields: Defense and Deflection
Link starts with his uncle’s Fighter’s Shield, which adequately blocks basic projectiles and melee attacks but burns away if touched by fire. The Red Shield, purchasable from the shop or found in certain locations, is fireproof and essential for dungeons like the Palace of Darkness with fire-shooting enemies. The Mirror Shield, found in Turtle Rock, is the ultimate defense—not only fireproof but capable of reflecting enemy magic back at them, turning defensive equipment into a weapon.
The shield’s functionality in A Link to the Past is perfectly tuned. It automatically blocks attacks from the front when Link isn’t swinging his sword, meaning defensive play happens naturally without awkward button-holding mechanics. You can manually block while moving by pressing the attack button without direction input, useful for advancing against projectile-shooting enemies. This elegant system means the shield feels useful without requiring constant management or manual activation.
The Bow and Arrows: Precision Strikes
The Bow, found in the Eastern Palace, becomes one of your most-used items throughout the game. Basic arrows are purchasable from shops and enemy drops, making them a reliable ranged option that never runs out as long as you have rupees. The bow is essential for hitting distant switches, attacking flying enemies, and dealing damage from safety.
Silver Arrows, obtained near the end of the game, are crucial for the final boss battle and deal massive damage to all enemies. While regular arrows are your workhouse ranged option, Silver Arrows are your trump card, saved for the most dangerous encounters. The game’s resource management is perfect here—arrows are common enough that you’ll use them regularly, but Silver Arrows are rare enough that firing them feels significant.
Bombs and Bomb Upgrades
Bombs are perhaps the most versatile tool in Link’s arsenal, used for destroying cracked walls to find secret passages, defeating certain enemies, blowing up obstacles, and solving specific puzzles. You start with limited bomb capacity, but upgrades scattered throughout Hyrule (and one purchasable from the bomb shop after saving its owner) increase your maximum to fifty bombs.
The game teaches bomb usage organically—cracked walls look slightly different from regular walls, inviting experimentation. Bombing the wrong wall wastes resources but doesn’t break anything, teaching through safe experimentation. Some of the game’s best secrets hide behind bombable walls, rewarding players who investigate suspicious looking surfaces and making the sound of bombs a regular part of the Hyrule soundscape.
The Hookshot and Extended Reach
The Hookshot, found in the Swamp Palace, fundamentally changes how you navigate Hyrule. This extendable chain can grab onto certain blocks and objects, pulling Link across gaps or pulling light enemies toward him. After obtaining it, you notice hookshot targets everywhere—in dungeons, across chasms, on high platforms—opening shortcuts and new areas.
The genius of the Hookshot is how it teaches players to reconsider their assumptions. That distant platform you couldn’t reach before? Now accessible. That flying enemy annoying you? Pull it down to sword range. That row of pots across a pit? Hook to them and cross. The Hookshot expands your toolkit in ways that encourage creative problem-solving and make returning to previous areas rewarding as you discover secrets that were impossible before.
The Pegasus Boots: Speed and Power
The Pegasus Boots, obtained from Sahasrahla, allow Link to run at high speed after charging up, slamming into walls, trees, and enemies with significant force. Running into trees drops items like fairies and rupees, running into walls can break through certain weakened sections, and dashing into enemies deals damage while potentially stunning them.
The boots’ primary utility is opening dash-through passages scattered throughout both Light and Dark worlds—darker colored walls that Link can smash through when running. These passages often lead to heart pieces, important items, or dungeon entrances. The boots also enable the dash attack, where Link runs and swings his sword for a powerful spinning strike. This becomes one of your most reliable combat techniques against tough enemies.
The Magic Cape: Temporary Invincibility
The Magic Cape, found in the graveyard, makes Link invisible and invulnerable while consuming magic power. This seems like it could be game-breaking, but the limited magic supply (even with upgrades) prevents abuse while still making the Cape incredibly useful for specific situations. Walking through spike traps unharmed, avoiding enemy attacks during boss fights, passing through certain barriers—the Cape solves problems that would otherwise require tedious enemy management or precise timing.
The key is resource management. Magic is finite, refillable only through magic jars from pots or purchased magic potions. Using the Cape recklessly drains your magic, leaving you without it when you really need it. This creates interesting decisions—do I use magic to avoid this annoying section, or save it for the upcoming boss battle? This tension between convenience and conservation makes the Cape powerful without being broken.
Medallions: Elemental Power
The three medallions—Bombos, Ether, and Quake—provide screen-clearing magic attacks that consume magic power. Bombos creates a pillar of fire that damages all enemies on screen and lights torches. Ether freezes enemies and reveals hidden objects. Quake shakes the screen and damages grounded enemies. Beyond combat, certain dungeon entrances require specific medallions to open, making them key items in both senses.
These medallions create satisfying moments of power when surrounded by enemies—unleashing a medallion and watching everything on screen take damage or freeze feels appropriately magical. The magic cost prevents spam but still allows regular use with careful magic management. Some puzzles specifically require medallions, like using Ether to reveal invisible platforms or Bombos to light torches in a specific order.
Bottles: The Most Valuable Items
Bottles might be the most important collectible in the game despite not being weapons or traditional tools. These four containers scattered throughout Hyrule can hold various substances—red potions (restore health), green potions (restore magic), blue potions (restore both), fairies (auto-revive when you die), bees (attack enemies), and more. Having fairies in bottles is essentially having extra lives, making difficult sections more manageable.
The genius is making bottles rare and missable. Only four exist in the entire game, hidden in clever locations that require exploration and puzzle-solving to discover. Finding a bottle feels genuinely rewarding because you know how valuable it is. The bottle management system—deciding what to carry in your limited bottles—creates interesting decisions. Do you carry all fairies for safety, or keep a potion for emergency health restoration, or free a bottle for catching useful items?
The Book of Mudora and Other Key Items
The Book of Mudora, obtained from the Kakariko Library, allows Link to read ancient Hylian inscriptions scattered throughout Hyrule. These inscriptions provide hints, open paths (the book is required to enter the Desert Palace), and add lore to the world. Similarly, the Magic Mirror allows Link to warp between Light and Dark Worlds from anywhere outdoors, fundamentally enabling the dual-world puzzle-solving that defines the latter half of the game.
These key items don’t have the flashy appeal of weapons or the obvious utility of bottles, but they’re essential for progression and deepen the game’s world. The Flute summons a duck that flies Link to various locations, making travel more convenient. The Moon Pearl prevents transformation in the Dark World, enabling basic functionality in that realm. Each key item solves a specific problem and enables new possibilities, maintaining the sense of steady progression throughout the adventure.
The Music: A Symphony of 16-Bit Perfection
If there’s one aspect of A Link to the Past that has aged flawlessly, it’s the music. Koji Kondo’s compositions for this game represent some of the finest work in video game history, creating themes that are not only memorable and emotionally resonant but perfectly integrated with gameplay and atmosphere. Even players who have never touched A Link to the Past often recognize its iconic themes, testament to how these melodies have transcended the game itself to become part of gaming culture.
The Iconic Overworld Theme
The Light World overworld theme is perhaps the most perfect piece of video game music ever composed. It’s triumphant yet somehow melancholic, adventurous yet tinged with longing. The melody captures exactly what it feels like to be a young hero setting out on an impossible quest—brave despite fear, determined despite doubt. When that familiar tune starts playing as you first step out into Hyrule, sword in hand and adventure ahead, it creates an emotional resonance that never fades no matter how many times you hear it.
The composition’s brilliance lies in how it evolves and layers. The main melody is strong enough to carry the entire piece, but Kondo adds countermelodies, basslines, and harmonic progressions that reveal themselves the more you listen. The SNES’s sound chip, while limited by today’s standards, had enough channels and sample quality that Kondo could create lush, orchestral-feeling arrangements that sounded rich and full despite the technical constraints.
The Dark World overworld theme provides perfect contrast—taking the Light World’s triumphant melody and transforming it into something ominous and oppressive. The same basic structure exists, recognizable enough that you understand the connection between the worlds, but corrupted and darkened to match the twisted realm you’re exploring. This musical mirroring of the world’s dual nature is thematic storytelling through composition, communicating mood and setting without a single word.
Dungeon Themes: Atmosphere Through Music
Each dungeon in A Link to the Past has carefully crafted music that enhances its specific atmosphere and challenges. The gentle, mysterious theme of the Eastern Palace introduces you to dungeon exploration with a sense of wonder and discovery. The Desert Palace’s music adds an exotic, vaguely Middle Eastern flavor that reinforces its desert setting. The Tower of Hera’s theme builds tension as you climb higher, the music itself creating a sense of ascending urgency.
The Dark World dungeons take this further, with each temple having music that reflects its particular theme and danger level. The Palace of Darkness has an oppressive, heavy theme that matches its labyrinthine corridors and constant danger. The Skull Woods theme is unsettling and creepy, perfectly scoring your journey through the monster-filled forest. The Ice Palace has a cold, crystalline sound that makes the frozen fortress feel even more inhospitable.
Boss battle music deserves special mention. The standard boss theme is intense and driving, with its pounding percussion and urgent melody creating the perfect backdrop for frantic combat. When that music kicks in, your heart rate increases, your focus sharpens, and the stakes feel immediately higher. This is music designed to enhance gameplay rather than just accompany it—the rhythm and pacing of the boss theme encourages aggressive play and maintains pressure without becoming overwhelming or annoying through repetition.
Character and Location Themes
Zelda’s Theme, which plays during story moments and certain locations, is beautiful and emotional, capturing the princess’s grace and the weight of her responsibility. It’s one of the series’ most enduring melodies, refined to perfection in A Link to the Past and used in some form in nearly every subsequent Zelda game. The theme communicates nobility, wisdom, and a hint of sadness—perfect for the character who must bear the burden of her bloodline and destiny.
Kakariko Village’s theme is warm and welcoming, creating a sense of safety and community in what serves as your home base throughout much of the adventure. This is music that makes you want to slow down, talk to villagers, and simply exist in this peaceful place. The contrast between Kakariko’s gentle theme and the tense dungeon music or urgent overworld exploration creates pacing through sound design, guiding player emotions as effectively as any cutscene could.
Ganon’s theme and the music for Ganon’s Tower are appropriately dark and threatening. The final boss theme for Ganon himself is intense and chaotic, matching the desperate nature of the climactic battle. When you finally defeat him and the triumphant Triforce theme plays, the musical journey comes full circle—from the ominous opening, through adventures triumphant and dangerous, to final victory and peace restored.
The Cultural Impact of A Link to the Past’s Music
These compositions have influenced countless games since 1991, establishing musical themes and leitmotifs that define the Zelda series and inspiring composers across the industry. The main theme appears in virtually every Zelda game in some form. Zelda’s Lullaby, which has its roots here, became perhaps the series’ most iconic melody. The pattern of having distinct overworld, dungeon, and boss themes became industry standard for adventure games.
Fan arrangements and covers of A Link to the Past music number in the thousands. Orchestras perform these pieces in concert halls worldwide. YouTube and Spotify are filled with metal versions, piano covers, acapella arrangements, and remixes that testify to the strength of Kondo’s melodies. The music has transcended its 16-bit origins to be recognized as genuinely great composition regardless of medium.
Most importantly, the music works perfectly with the gameplay. It enhances exploration, builds tension, provides relief, and guides emotions without ever overwhelming or distracting from the player’s actions. This is functional art at its finest—beautiful enough to appreciate on its own merits, but integrated so seamlessly that it enhances the total experience without calling attention to itself. Koji Kondo achieved something special here, creating music that is both timeless in quality and perfectly timed to the medium it serves.
Why A Link to the Past Endures: The Legacy of Perfection
Over thirty years after its release, A Link to the Past continues to top “greatest games of all time” lists, regularly competing with Ocarina of Time for the title of best Zelda game and standing alongside Super Metroid, Super Mario World, and a handful of other SNES classics as defining examples of what makes a perfect video game. This enduring relevance isn’t just nostalgia—it’s testament to design principles and execution quality that remain exemplary even as gaming technology has advanced exponentially.
Timeless Design Principles
A Link to the Past succeeds because it prioritizes fundamental design excellence over technological showiness. The game understands that tight controls, clear feedback, logical progression, fair challenge, and meaningful exploration never go out of style. Every aspect of the game serves the player experience—there are no features included because they’re trendy or to show off hardware capabilities, just systems that work together to create the best adventure possible.
The difficulty curve is exemplary, teaching mechanics gradually while respecting player intelligence. You’re never forced through painful tutorials or talked down to with obvious instructions, but you’re also never left completely lost without guidance. The balance between teaching and testing, between accessibility and challenge, remains something modern games struggle to match. A Link to the Past makes hard work fun without being frustrating, and success feel earned without being punishing.
The pacing is perfect from beginning to end. The opening castle infiltration hooks you immediately with story and stakes. The first three dungeons provide escalating challenge while building your capabilities. The Master Sword moment delivers a satisfying milestone. The Dark World reveal expands the adventure when it could have been ending. The steady acquisition of new items maintains forward momentum. And the final tower and Ganon battle provide appropriate climax and closure. There’s no filler, no padding—every hour of the game feels purposeful and engaging.
The Power of Polish
A Link to the Past is meticulously polished in ways both obvious and subtle. Hit detection is pixel-perfect. Animation feels smooth and responsive. Sound effects provide clear feedback for every action. Transitions between areas are seamless. The game runs at a rock-solid framerate with no slowdown even during chaotic combat. These technical excellences might go unnoticed consciously, but they create a subconscious sense of quality that makes the game feel good to play even if you can’t articulate exactly why.
The attention to detail extends everywhere. NPCs have distinct personalities conveyed through brief dialogue. Environmental storytelling reveals character and history without exposition. Secret passages and hidden rooms reward careful exploration. Optional heart pieces and items create scalable difficulty where skilled players can tackle challenges undergeared while struggling players can build themselves up. This density of thoughtful design creates a game that respects and rewards player investment at every level.
Influence on the Series and Gaming
Every Zelda game since A Link to the Past owes it a debt, from the obvious (Link’s Awakening using the same engine and many identical mechanics) to the foundational (Ocarina of Time adapting the Light/Dark World concept as child/adult Link and time travel). The formula established here—overworld connecting themed dungeons, each dungeon granting an item that unlocks new abilities, gradual power increase through heart containers and equipment—became the series template.
But the influence extends beyond just Zelda. The action-adventure genre as we know it today owes enormous debt to A Link to the Past’s design. Games from Okami to Darksiders, from the 2D Metroids to countless indie titles have borrowed elements pioneered or perfected here. The idea of using items as both combat tools and puzzle-solving devices, the structure of gating progress behind acquiring specific abilities, the balance between combat and exploration—these are now genre conventions, but A Link to the Past codified them.
Modern Accessibility
A Link to the Past remains easily accessible to modern players, unlike many classic games that have aged poorly or require nostalgic goodwill to appreciate. The game has been rereleased on multiple platforms—GBA, Wii Virtual Console, Wii U Virtual Console, 3DS Virtual Console, Nintendo Switch Online—ensuring new generations can experience it. The core gameplay holds up completely, with controls that feel responsive and mechanics that remain fun.
The pixel art style has aged beautifully, looking charming and artistic rather than dated. While certainly not photorealistic, the SNES’s color palette and sprite capabilities created a visual style that many modern indie games deliberately emulate. The clarity of the graphics, the readability of environments, and the expressiveness of character sprites mean the game never feels visually confusing or unclear despite its age.
For new players approaching A Link to the Past today, some conventions may feel different from modern games (limited fast travel, less explicit objective markers, dungeons that require some trial and error), but these differences are features rather than bugs. The game respects player intelligence and agency in ways that feel refreshing compared to more hand-holding modern designs. Playing A Link to the Past is discovering why certain design choices became standard and understanding the foundation that modern games build upon.
The Eternal Appeal
Why do we keep returning to A Link to the Past? Partially it’s the comfort of familiarity—knowing these dungeons, hearing this music, exploring this world creates a sense of homecoming that’s deeply satisfying. But it’s also because the game is genuinely fun regardless of how many times you’ve played it. The tight controls, creative puzzles, satisfying progression, and perfectly tuned challenge never stop being engaging.
Speedrunners have found endless depth in A Link to the Past, with multiple categories and routing optimizations creating competition that keeps the community active decades later. Randomizers that shuffle item locations create endless replayability and fresh challenges. ROM hacks create entirely new adventures using the same engine and mechanics. The game’s excellence creates a foundation that supports infinite variation and continued exploration.
Ultimately, A Link to the Past endures because it achieved something rare: near perfection within its chosen form. It’s not trying to be revolutionary or experimental; it’s trying to be the absolute best version of what a 2D action-adventure game can be. And it succeeded so completely that even thirty-plus years later, it remains the gold standard, the measuring stick, the proof that timeless design beats temporal technology every single time.
Conclusion: The Legend Lives On
The Legend of Zelda: A Link to the Past is more than just a great game—it’s a masterclass in design, a testament to what dedicated craftsmanship can achieve, and a reminder that the most important elements of game design are timeless. After exploring every dungeon, analyzing every system, and celebrating every innovation, the core truth remains: this game represents the absolute pinnacle of what the action-adventure genre can achieve in two dimensions.
We’ve journeyed through the rain-soaked opening where a young boy answered destiny’s call, through the quest for three Pendants and the claiming of the Master Sword, into the corrupted Dark World and the rescue of seven maidens, and finally to the climactic battle with Ganon and the wish upon the Triforce that restored peace to Hyrule. We’ve explored twelve ingeniously designed dungeons, each a self-contained puzzle box that tests different skills and rewards mastery. We’ve examined the items and equipment that gradually transform Link from a boy with his uncle’s sword into the legendary Hero bearing the blade of evil’s bane.
The game’s influence cannot be overstated. It established formulas that define not just Zelda but the entire action-adventure genre. It demonstrated that games could tell emotionally resonant stories while prioritizing gameplay. It showed that polish and attention to detail create experiences that outlast technical innovation. It proved that respecting player intelligence and agency creates more satisfying adventures than guided tours ever could.
For those playing A Link to the Past for the first time, you’re about to experience something special. Don’t rush through following a walkthrough—explore, experiment, get lost and find your way again. Talk to NPCs, bomb suspicious walls, try using items in unexpected places. The game rewards curiosity and punishes nothing except recklessness in combat. You’re not just playing a game; you’re experiencing a piece of gaming history that continues to define excellence.
For returning players revisiting this classic, you’ll find that the magic hasn’t faded. The dungeons you remember are just as clever as you recall. The music still stirs the same emotions. The satisfaction of progression and discovery remains potent. But you’ll also notice new details, appreciate design choices you didn’t understand before, and gain fresh respect for how perfectly every element was crafted and balanced.
A Link to the Past matters because it represents a peak, a moment when everything aligned perfectly—talented developers, capable hardware, refined design philosophy, and the creative freedom to pursue excellence over everything else. It matters because it proved that games could be art, that interactive experiences could create lasting emotional and intellectual impact. It matters because it remains fun, engaging, and rewarding regardless of how old it gets or how much gaming evolves.
So whether you’re drawn to the Light World’s bright fields or the Dark World’s corrupted landscapes, whether you’ve played this game once or a hundred times, whether you’re here for nostalgia or genuine curiosity about a legendary title, know that A Link to the Past will deliver. It’s been delivering for over thirty years, and it will continue delivering for however long people care about what makes games great.
The legend of the Hero of Light who ventured into darkness to save two worlds will endure. The Master Sword will always be there in the Lost Woods, waiting for the next worthy hero to grasp its hilt. The Triforce will always grant wishes to those pure of heart. And A Link to the Past will always stand as proof that perfect design is truly timeless.
For those seeking deeper insights into A Link to the Past’s development and design philosophy, Nintendo’s Iwata Asks archives contain fascinating interviews with the development team discussing the creative decisions that shaped this masterpiece, though specific ALTTP content varies by region and archive availability. The game’s technical achievements and lasting influence on the action-adventure genre are extensively documented at Zelda Wiki’s comprehensive A Link to the Past page, which provides exhaustive information on every item, enemy, location, and gameplay mechanic with meticulous detail that complements our guide. Speedrunning enthusiasts will find an incredibly active community at speedrun.com’s ALTTP leaderboards, where you can watch world record runs, learn advanced techniques like the barrier skip and fake flippers, and discover routing optimizations that have evolved over decades of dedicated play. For those interested in extending their adventure beyond the original game, ALttP Randomizer offers an exceptional way to experience A Link to the Past with completely shuffled item locations, creating endless replayability and fresh challenges that have revitalized the game for both veterans and newcomers. Finally, the retro gaming community at Reddit’s r/alttpr provides active discussion, strategy sharing, and community events that demonstrate how this 30-year-old game continues to foster engaged communities and inspire passionate players worldwide.
Thank you for joining me on this comprehensive journey through one of gaming’s genuine masterpieces. Now, if you’ll excuse me, I have a Dark World to explore and a pig wizard to defeat. The adventure never ends, and that’s exactly how it should be.