There’s a reason why A Link to the Past continues to dominate “greatest games of all time” lists over three decades after its 1991 release. This isn’t just nostalgia talking—though there’s plenty of that to go around. This Super Nintendo masterpiece represents the perfect crystallization of everything that makes The Legend of Zelda special, packaged in a way that feels timeless rather than dated. While newer 2D Zelda titles have introduced innovative mechanics and fresh ideas, none have captured the magic, the balance, and the sheer perfection of design that makes A Link to the Past not just great, but the definitive 2D Zelda experience. Whether you first played it in 1991 or discovered it through modern re-releases, the game’s brilliance shines through immediately, proving that true excellence in game design transcends technological advancement and generational preferences.
The Perfect Foundation: How A Link to the Past Defined Modern Zelda
Understanding why A Link to the Past remains the 2D pinnacle requires recognizing how fundamentally it shaped everything that came after. This wasn’t just another sequel—it was the game that took the experimental ideas of the original Legend of Zelda and the bold but flawed departure of Zelda II, then synthesized them into something that would become the template for the entire franchise moving forward.
Establishing the Formula That Still Works Today
The original Legend of Zelda was revolutionary but rough around the edges, a pioneering open-world adventure that sometimes confused players more than it guided them. Zelda II took the series in a radically different direction with side-scrolling action-RPG gameplay that, while interesting, felt disconnected from what made the first game special. A Link to the Past found the perfect middle ground, taking the top-down perspective and exploration-focused design of the original while adding structure, narrative, and polish that elevated the experience without sacrificing the sense of discovery.
The game introduced the overworld-dungeon structure that became Zelda’s signature rhythm. You explore the expansive overworld, gathering items and solving environmental puzzles, then tackle elaborate dungeons that test your mastery of new tools and abilities. This pattern creates natural progression—each dungeon completion provides new capabilities that unlock previously inaccessible areas of the overworld, which in turn leads to the next dungeon. It’s elegant, intuitive, and endlessly satisfying. Every Zelda game since, whether 2D or 3D, owes its fundamental structure to the framework A Link to the Past perfected.
The item progression system established here became the gold standard. Heart Pieces scattered throughout the world reward thorough exploration. Bottles for carrying potions and fairies provide strategic resource management. The Magic Meter introduced a resource cost to powerful abilities, creating meaningful decision-making about when to use special powers. Equipment upgrades like the Tempered and Golden Swords, the various shields, and armor improvements create tangible power progression that makes Link noticeably stronger without breaking the game’s carefully calibrated difficulty curve.
The save system deserves recognition for how perfectly it balanced convenience and consequence. You could save at any time from the inventory menu, a mercy for players compared to the password systems or limited save points common in that era. Yet death still mattered—you’d restart from your last save point, creating tension during difficult sections without the frustration of losing hours of progress. This balance between accessibility and stakes feels perfectly judged even by modern standards.
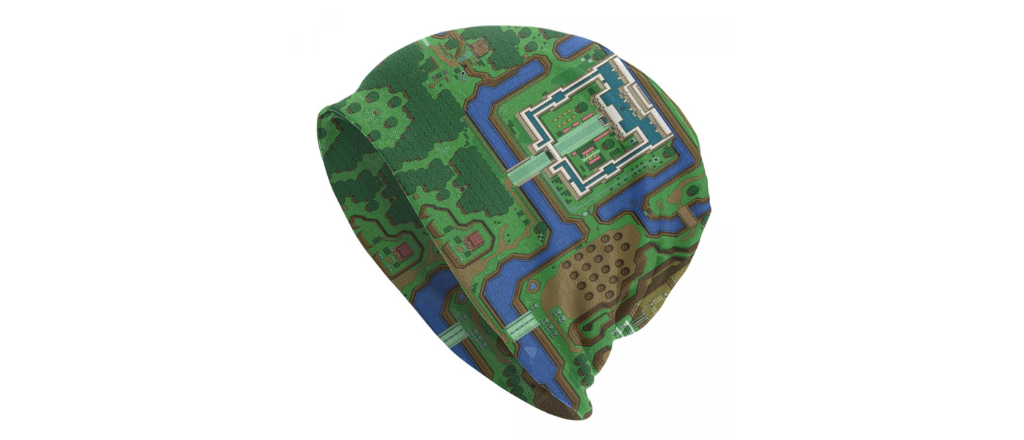
Perhaps most importantly, A Link to the Past established the “multiple world” concept that would recur throughout the series. The Light World and Dark World aren’t just palette swaps—they’re fundamentally different versions of Hyrule with unique challenges, secrets, and aesthetics. This duality created depth and replayability, encouraging players to explore familiar areas with fresh eyes once the Dark World opened up. The genius of this design is how it effectively doubles the game’s content without actually requiring double the development resources, a trick of efficiency that benefits both developers and players.
The Narrative Template: Storytelling Done Right
While A Link to the Past’s story might seem simple by modern standards—rescue the seven maidens, defeat Ganon, save Hyrule—the execution demonstrates masterful restraint and pacing that many later games forgot. The game doesn’t waste time with excessive cutscenes or dialogue. Instead, it trusts players to be engaged by gameplay while using sparse but effective storytelling moments to provide context and motivation.
The opening sequence is a perfect example of economy in narrative design. You wake in a storm, your uncle leaves mysteriously, and you venture into the rainy night to find him wounded in the castle dungeons. Within minutes, you’re invested—not through lengthy exposition but through immediate stakes and emotional connection. Your uncle’s sacrifice and final words (“You are the one who must save Zelda… our Princess… Zelda is… your…”) create mystery and urgency simultaneously. The game hooks you narratively without ever taking control away from the player for extended periods.
The seven maidens storyline provides clear progression milestones while allowing freedom in the order you tackle certain dungeons. Each maiden you rescue adds to the narrative momentum, revealing more about Ganon’s plans and the history of Hyrule. The twist that Agahnim was merely Ganon’s alter ego, revealed when you defeat him and get pulled into the Dark World, is telegraphed subtly enough to surprise first-time players while feeling inevitable in retrospect. This balance between surprise and logical progression is incredibly difficult to achieve, yet A Link to the Past makes it seem effortless.
The game also introduced many narrative elements that became Zelda staples: the Master Sword as Link’s legendary weapon, Ganon as the ultimate evil rather than just a final boss, the backstory of the Golden Land (later known as the Sacred Realm), and the idea of a bloodline of heroes destined to face evil across generations. These concepts, introduced here, would be expanded upon in Ocarina of Time and subsequent games. A Link to the Past wrote the lore bible that the entire franchise still references.
What makes the storytelling particularly effective is its use of environmental narrative. The Dark World isn’t just explained through dialogue—you see what Ganon’s influence has done to Hyrule, transforming familiar locations into corrupted, dangerous versions of themselves. The villages are empty or filled with monsters. The peaceful woods become twisted forests. This “show, don’t tell” approach to storytelling makes the stakes feel real and immediate without requiring extensive cutscenes or text dumps.
The minimalist approach to dialogue also means every conversation carries weight. When characters speak, it’s usually to provide valuable information, emotional context, or humor. There’s no padding, no unnecessary exposition, no characters who exist merely to fill space. Even minor NPCs often have something useful or interesting to say, making exploration of towns and villages rewarding rather than tedious. Modern games could learn from this discipline—if you’re going to interrupt gameplay for dialogue, make it count.
The Technical Marvel: Pushing the SNES to Its Limits
In 1991, A Link to the Past was a technical showcase for the Super Nintendo, demonstrating capabilities that many developers hadn’t yet figured out how to utilize. The game’s visual and audio presentation wasn’t just good for its time—it established an aesthetic that remains beautiful and distinctive even today, proving that art direction and design coherence trump raw technical power.
The graphics demonstrated the SNES’s Mode 7 capabilities sparingly but effectively, using the effect for the title screen’s rotating Triforce and certain magical transitions. But the real visual achievement was in the sprite work and color palette. Link’s sprite is iconic, immediately recognizable and perfectly animated for the top-down perspective. Every enemy is distinct and visually interesting, from the simple soldiers to the elaborate bosses. The environments showcase incredible variety, from the serene Kakariko Village to the ominous Skull Woods, from the bright Lake Hylia to the oppressive Misery Mire.
The use of color particularly stands out. The Light World employs warm, inviting colors that make Hyrule feel like a place worth saving. The Dark World’s palette is dominated by darker purples, browns, and sickly greens that perfectly convey corruption and danger. This isn’t just aesthetic choice—the color theory actively supports the emotional journey of the game, making the transition between worlds feel meaningful beyond just the gameplay differences.
Animation quality consistently impresses throughout the adventure. Link’s sword swings, item usage, walking, and damage reactions are all smooth and readable. Enemies telegraph their attacks clearly through animation, allowing skilled players to avoid damage through observation and timing rather than memorization or luck. Boss animations are particularly impressive, with creatures like Mothula, Vitreous, and Trinexx having distinct movement patterns and attack animations that make each encounter memorable.
The audio design deserves as much praise as the visuals. Koji Kondo’s soundtrack for A Link to the Past is arguably the finest work of his legendary career, featuring themes that have become as iconic as anything in gaming. The overworld theme perfectly captures the sense of adventure and heroism. The Dark World theme creates an atmosphere of corruption and danger. Each dungeon has its own musical identity, from the energetic Eastern Palace to the somber Skull Woods to the chaotic Ganon’s Tower.
Sound effects are equally masterful. The sword slash, the “secret found” jingle, the heartbeat when Link is low on health, the distinctive sound of finding a heart piece—these audio cues are so perfectly crafted that they’ve been reused or referenced in nearly every Zelda game since. The sound design creates a audio-feedback loop that makes every action satisfying, whether you’re slashing grass, opening a chest, or defeating an enemy. This attention to audio detail might seem minor, but it’s crucial to why the game feels so good to play even thirty years later.
The technical achievement extends to the game’s size and scope. A Link to the Past was enormous by 1991 standards, featuring a vast overworld, twelve major dungeons, dozens of secrets, and hours of gameplay. Yet despite this scope, the game rarely has loading times beyond brief screen transitions, maintains smooth performance throughout, and fits on a relatively small cartridge. The optimization and compression techniques Nintendo employed were cutting-edge, allowing for an experience that felt vast without technical compromises.
The Light and Dark World: Dual Dimensions Done Perfectly
The dual-world system isn’t just A Link to the Past’s most famous mechanic—it’s the design innovation that elevates the game from great to legendary. This wasn’t the first game to feature multiple versions of the same world (Metroid and others had played with similar concepts), but A Link to the Past implemented it with such elegance and purpose that it became the template for how to do parallel worlds in gaming.
The Light World: Establishing Comfort Before the Fall
The Light World serves crucial psychological purposes before becoming mechanically essential. When you first step out of Hyrule Castle after rescuing Zelda, the overworld that greets you is welcoming, colorful, and filled with life. Kakariko Village bustles with NPCs offering advice and selling goods. The Lost Woods are mysterious but not threatening. Lake Hylia sparkles invitingly. Death Mountain looms imposingly but is clearly conquerable. This Hyrule feels like home, a place that you want to explore and protect.
The design of the Light World overworld demonstrates Nintendo’s mastery of environmental storytelling and spatial design. Each region has a distinct identity: the peaceful fields around Link’s house, the commercial hub of Kakariko, the magical atmosphere of the Lost Woods, the industrial zone around the blacksmith, the cemetery’s morbid charm, and the wilderness of Death Mountain. These aren’t just different tilesets slapped together—they’re carefully designed areas that feel geographically and thematically coherent, creating a sense that Hyrule is a real place with logical geography rather than a video game level.
The placement of secrets and side content in the Light World rewards curiosity without overwhelming players. Heart Pieces are hidden in clever but fair locations—under rocks, behind bombable walls, in caves that require specific items to reach. Fairies can be found in wells and fountains. Rupees are scattered in grass and bushes, creating the iconic “slash all the grass” behavior that became a Zelda trademark. Every screen has the potential for discovery, training players to be thorough and observant without making exploration feel like a checklist.
The progression through Light World dungeons establishes the game’s difficulty curve and teaches fundamental mechanics. The Eastern Palace introduces the basic dungeon structure and the Bow, one of the most versatile items. The Desert Palace teaches the importance of using items to manipulate the environment with the Power Glove and Book of Mudora. The Tower of Hera on Death Mountain provides a vertical challenge and the Moon Pearl, which becomes crucial later. Each dungeon isn’t just a test of combat and puzzle-solving—it’s a teaching tool that prepares you for the Dark World’s enhanced challenges.
By the time you’ve completed the first three dungeons and claimed the Master Sword, you’re intimately familiar with Hyrule’s geography. You know where the villages are, how to navigate between regions, where secrets might be hidden. You’ve grown comfortable with this world. This familiarity is essential for the Dark World’s impact to land with maximum force.
The Dark World: Corruption and Consequence
The transition into the Dark World after defeating Agahnim is one of gaming’s most memorable moments. You’re pulled into what appears to be the same Hyrule you’ve been exploring, but everything is wrong. The bright colors are replaced with sickly hues. The friendly NPCs are gone, replaced by monsters. The music shifts from heroic adventure to ominous corruption. Even Link himself has been transformed—without the Moon Pearl’s protection, he becomes a helpless bunny, forcing you to retrieve the Pearl before you can properly explore.
The genius of the Dark World is how it leverages your familiarity with the Light World geography to create both comfort and dissonance. You know this landscape—you’ve spent hours exploring it—but now it’s twisted and dangerous. The palace guards that you could defeat easily are now stronger enemies. The peaceful village of Kakariko has become the Thieves’ Town, a den of criminals. Lake Hylia’s clear waters are now the murky Ice Lake. Every familiar location has been corrupted, making the stakes feel personal in a way that abstract “save the world” narratives often fail to achieve.
The Dark World dungeons represent a significant difficulty spike that feels earned rather than arbitrary. Dark Palace, Swamp Palace, Skull Woods, Thieves’ Town, Ice Palace, Misery Mire, and Turtle Rock are all more complex, longer, and more challenging than their Light World counterparts. They require mastery of items you’ve already obtained while introducing new mechanics and enemy types that test your skills. The Ice Palace’s icy floors demand precise movement. Misery Mire’s dark rooms require the Cane of Somaria for navigation. Turtle Rock combines multiple previous mechanics into a final exam of your abilities.
What makes the Dark World exceptional is how it’s not merely a harder version of the Light World but a genuinely different space with its own rules and logic. The geography is similar but not identical—barriers exist in different places, caves lead to different destinations, and the whole world is shifted slightly askew. This means you can’t rely entirely on your Light World knowledge; you must relearn and remap Hyrule from a new perspective. It’s familiar enough to be navigable but different enough to keep you discovering new secrets.
The Magic Mirror, which allows you to flip between Light and Dark Worlds at will (with some restrictions), is one of gaming’s most elegant traversal mechanics. Suddenly every location exists in two states, and clever use of the Mirror allows you to reach areas impossible to access in a single world. Need to get to a high ledge in the Light World? Find its Dark World equivalent, climb there, and Mirror back. This creates a three-dimensional quality to what’s nominally a 2D map, adding layers of depth to both worlds simultaneously.
The Interconnection: Making Two Worlds Feel Like One
What separates A Link to the Past’s dual-world design from inferior imitators is how the two worlds are fundamentally interconnected rather than simply parallel. The Light World isn’t just “the first half” and the Dark World “the second half”—they remain relevant to each other throughout the entire game. Secrets in one world often require access to the other. Progression through Dark World dungeons sometimes requires detours to the Light World. NPCs in the Light World provide hints about Dark World challenges.
The Crystal Maidens system reinforces this interconnection brilliantly. Unlike the Light World’s dungeons where progression is relatively linear, the Dark World allows you to tackle several dungeons in different orders, creating a sense of freedom and player agency. However, certain areas remain locked until you’ve freed enough maidens, creating natural gates that prevent you from attempting challenges you’re not ready for. This balance between freedom and structure is incredibly difficult to achieve, yet A Link to the Past makes it feel effortless.
The items you gather throughout both worlds create an ever-expanding toolkit that opens up the entire map progressively. The Hookshot lets you cross gaps. The Flippers allow water navigation. The Hammer breaks through barriers. The Cane of Somaria creates platforms. Each item doesn’t just unlock its associated dungeon—it fundamentally changes how you can navigate both worlds, making revisiting old areas worthwhile because you’ll find secrets that were previously inaccessible. This creates the perfect Metroidvania loop decades before that term was coined.
The thematic relationship between Light and Dark Worlds adds narrative weight to the gameplay structure. The Dark World is literally what Ganon has done to the Sacred Realm, showing players the consequences of his power rather than just telling them about it. Every twisted tree, every corrupted landmark, every transformed NPC is evidence of what’s at stake. When you finally defeat Ganon and watch the Dark World transform back into the Golden Land, the visual transformation carries emotional weight because you’ve seen both states and understand what’s being restored.
Dungeon Design: The Perfect Balance of Combat and Puzzles
If the dual-world system is A Link to the Past’s most famous innovation, the dungeon design is its greatest ongoing achievement—the aspect that holds up best under modern scrutiny and sets the bar that later Zelda games (2D and 3D alike) would struggle to reach. These twelve dungeons represent the platonic ideal of what a Zelda dungeon should be: challenging but fair, complex but navigable, combat-heavy but puzzle-focused, linear in structure but non-linear in feel.
The Light World Dungeons: Teaching Through Design
The Eastern Palace serves as the perfect introduction to the game’s dungeon philosophy. It’s straightforward enough for newcomers to navigate without frustration, teaching fundamental concepts like hitting switches, fighting room-clearing enemy waves, and using new items (the Bow) to solve puzzles. Yet it’s substantial enough to feel like a real accomplishment, with a memorable boss fight against the Armos Knights that requires pattern recognition and dodging skills. The dungeon establishes a template: explore rooms, find keys, unlock doors, discover the Big Key, obtain the dungeon item, reach the boss, claim your heart container.
The Desert Palace introduces environmental hazards and the importance of the map/compass items. The desert setting allows for a different aesthetic and enemy types (Beamos, Popos) while the dungeon’s internal structure teaches players to think in multiple dimensions—literal dimensions, as you navigate between different floor levels via holes and staircases. The Lanmolas boss fight is mechanically simple but feels epic due to the arena size and the creatures’ imposing presence.
The Tower of Hera represents the first significant difficulty spike and vertical dungeon design. Climbing Death Mountain to reach it is itself a challenge, requiring navigation through caves and past tough enemies. The tower’s structure—ascending through floors with minimal backtracking—feels different from the more sprawling earlier dungeons, providing variety in dungeon architecture. The Moon Pearl reward is crucial for Dark World exploration, making this dungeon feel essential rather than just another checkbox.
What makes these Light World dungeons pedagogically brilliant is how they teach without tutorials or explicit instruction. Players learn through doing: you need to shoot that eye switch with an arrow, so you figure out the bow is necessary. You need to lift that pot to find a switch, so you learn to check under everything. You need to light torches, so you experiment with the Fire Rod or Lamp. The dungeons are structured lessons in Zelda’s language of puzzles and progression, ensuring players have the vocabulary necessary for the Dark World’s more complex sentences.
The Dark World Dungeons: Mastery Required
Where Light World dungeons teach, Dark World dungeons test. These are longer, more labyrinthine, more enemy-dense, and more mechanically complex than their predecessors. They assume mastery of items and combat fundamentals while introducing new challenges that push your skills to the limit.
The Dark Palace, first of the Dark World dungeons, immediately signals the increased difficulty. The dungeon sprawls across multiple floors with complex connectivity between rooms. Enemies hit harder and have more health. The turtle enemies require the Hammer to flip before you can damage them. The Helmasaur King boss has armor that must be destroyed before it’s vulnerable, adding a phase-based structure to the fight. Everything about this dungeon says “the training wheels are off.”
Skull Woods takes the multi-building structure to an extreme, with eight separate entrances leading to interconnected dungeon sections. Figuring out which entrance leads where and how the sections connect is a puzzle in itself before you even start tackling the internal challenges. Mothula, the boss, is one of the game’s most challenging fights, requiring constant movement to avoid the circling spikes while dealing damage to the flying moth. It’s a pure skill check that many players remember failing repeatedly before finally achieving victory.
The Ice Palace might be the most divisive dungeon in the game—some players love its intricate puzzles and icy floor mechanics, while others find it tedious and confusing. The slippery ice floors require precision movement, the hidden passages demand thorough exploration, and the multiple small keys scattered throughout necessitate careful planning about which doors to open in which order. Kholdstare, the frozen eyeball boss, provides a satisfying conclusion that requires the Fire Rod to melt the ice before you can deal damage—a perfect example of how boss fights reinforce the importance of items beyond their puzzle-solving utility.
Turtle Rock serves as the ultimate test before Ganon’s Tower, combining virtually every mechanic and enemy type you’ve encountered into one massive dungeon. Crystal switches, roller sections, laser eyes, multiple mini-boss encounters, complex key progression—everything is here. Trinexx, the three-headed turtle-dragon boss, requires using both the Fire and Ice Rods to defeat the elemental heads before attacking the core. It’s a challenging but fair final exam that ensures you’re ready for the ultimate challenge.
Ganon’s Tower: The Perfect Finale
Ganon’s Tower represents the culmination of everything A Link to the Past has taught you, a greatest-hits compilation of the game’s best ideas wrapped in an appropriately climactic package. The tower’s structure takes you through different themed sections—an ice room, a fire room, enemy gauntlets, puzzle chambers—each testing different skills you’ve developed throughout the adventure.
The mini-boss rush toward the tower’s end is particularly memorable, forcing you to fight powered-up versions of bosses you’ve already defeated. Some players find this tedious, but there’s thematic brilliance to the idea that you must overcome your past challenges once more before facing the ultimate evil. It’s a reminder of how far you’ve come and what you’ve accomplished on this journey.
The Agahnim fight atop the tower is mechanically similar to your earlier encounter but harder, requiring better timing and reflexes. Then comes the reveal—defeating Agahnim opens the path to the Pyramid, where Ganon himself awaits. The Ganon fight is one of the series’ best final boss encounters, with multiple phases, varied attacks, and the satisfying requirement to use the Silver Arrows for the finishing blow. The torch-lit arena, the dramatic music, the sense of confronting ultimate evil—it all comes together perfectly.
What makes Ganon’s Tower work so well is how it respects the player’s time while still providing a substantial challenge. The warp tile near the entrance means you don’t have to repeat the entire tower if you fail at Ganon, showing mercy without removing all consequences. The shops selling potions and fairies nearby allow for preparation without making victory trivial. The difficulty is high but fair, never feeling cheap or arbitrary. It’s the perfect capstone to an already excellent game.
Why These Dungeons Remain the Gold Standard
Dungeon design in A Link to the Past succeeds because of the careful balance between multiple design pillars: combat, puzzles, exploration, progression, and aesthetics. Modern Zelda games often emphasize one pillar at the expense of others—some favor combat arenas with minimal puzzles, others feature elaborate puzzle boxes with trivial combat. A Link to the Past understands that the magic emerges from the intersection of all these elements working in harmony.
The dungeons are complex enough to provide challenge and a sense of accomplishment when completed, but they’re never so obtuse that players get hopelessly lost without a guide. The map and compass provide essential navigational aids. The dungeon layouts, while intricate, follow internal logic that rewards observation and deduction. Small keys are distributed throughout the dungeon, requiring exploration but never hidden so cleverly that they feel unfair. The Big Key is always in a distinctive chest, providing a clear milestone toward completion.
The variety in dungeon themes and mechanics prevents fatigue over the twelve-dungeon adventure. No two dungeons feel identical mechanically or aesthetically. Each has its own identity, its own challenges, its own memorable moments. Players decades later can describe specific rooms or encounters from individual dungeons, proving that these spaces made lasting impressions beyond just “I completed Dungeon X to get Item Y.”
The balance between linear and non-linear progression creates an illusion of freedom while maintaining careful difficulty scaling. While you must complete certain dungeons to progress the story, others can be tackled in different orders, allowing player agency without creating the possibility of attempting challenges far beyond your current capabilities. This is incredibly difficult to design, requiring careful gating through item requirements and geographical barriers, but when done well (as here) it creates a perfect sense of adventure guided just enough to prevent frustration but not so much that it feels on-rails.
The Overworld: Exploration as Art
While dungeons are the set pieces, the overworld of A Link to the Past is where the sense of adventure truly lives. This is the space between dungeons where the game doesn’t just pause but continues to engage, challenge, and reward. Too many games treat their overworlds as mere connective tissue between real content. A Link to the Past understands that traversing and exploring the world should be content in itself, filled with secrets, challenges, optional objectives, and moments of discovery that make every screen potentially meaningful.
Geographic Coherence and Memorable Landmarks
The overworld of A Link to the Past feels like a real place rather than a video game level because every region has geographic logic and memorable landmarks that create a mental map. The castle sits prominently in the center-north, establishing Hyrule’s political center. Kakariko Village nestles at the base of Death Mountain, logically positioned as the gateway to the mountain region. The Lost Woods sprawl in the northwest, appropriately isolated and mysterious. Lake Hylia dominates the southern region, providing a distinctive water feature that breaks up the terrestrial exploration.
Each area transitions naturally into adjacent regions without the jarring disconnection that plagues some game worlds. The fields around Link’s house gradually give way to the forested areas near Kakariko. The elevation changes leading to Death Mountain feel organic rather than gamey. The swampy area near the Dark World’s Swamp Palace has appropriate geography—lowlands where water would collect. This attention to environmental believability makes Hyrule feel like a coherent kingdom rather than a collection of disconnected zones.
The landmarks scattered throughout the overworld serve as both navigation aids and interesting locations worth visiting. The Sanctuary offers shelter and story advancement. The Blacksmith provides equipment upgrades. The Racing Game offers a fun diversion and rewards. The Cemetery hides secrets among its graves. The various caves, wells, and hidden grottos create a sense that Hyrule extends beyond just the visible surface—there’s a whole world of secrets beneath and behind the main map.
Death Mountain deserves special mention as perhaps the game’s most iconic overworld location. The climb from Kakariko to the Tower of Hera is an adventure in itself, requiring navigation through cave systems, past powerful enemies, and across treacherous exterior sections. The mountain’s vertical nature creates gameplay variety—you’re not just moving left-right across the map but ascending toward a goal. The view from the mountain’s peak, looking out over Hyrule, provides a rare moment of perspective that reinforces the scale of the world you’re exploring.
Secrets, Secrets Everywhere
What truly separates A Link to the Past’s overworld from mediocre efforts is the density and variety of secrets hidden throughout Hyrule. Not every secret is earth-shaking or essential—many are just minor rewards like rupees or single fairies. But the possibility that any screen, any rock, any suspicious wall might hide something creates constant engagement. You’re not just passing through the overworld to reach the next dungeon; you’re actively exploring, testing, investigating.
The game teaches you to question everything. That conspicuous rock formation? Probably hiding a cave underneath. That isolated patch of grass? Might contain a hidden staircase. That crack in the wall? Almost certainly bombable. This training in observational gameplay creates a detective mindset where you’re constantly scanning the environment for clues and irregularities. It’s Metroidvania design philosophy applied to an action-adventure framework.
Heart Pieces are the perfect carrot to incentivize thorough exploration. Scattered throughout both worlds in clever but discoverable locations, they provide tangible power-ups (four pieces = one heart container) that make Link noticeably tougher. Some are simple finds that reward basic exploration. Others require specific items to reach. A few demand careful observation or sequence-breaking thinking. The variety ensures that throughout the entire game, you’re regularly finding new heart pieces, providing constant rewards for curiosity.
The game’s various caves and grottos each have personality beyond just their rewards. The Fortune Teller offers cryptic hints. The Treasure Chest Game provides a gambling minigame. The Fairy Fountains restore health and magic. The various Old Men scattered throughout provide helpful tips, items, or upgrades. Even small caves with simple rewards often have some distinctive quality—a memorable enemy placement, a unique visual flourish, a cryptic message—that makes them more than just mechanical reward dispensers.
The Magic Upgrade quests (finding the ½ Magic and ¼ Magic upgrades) reward exploration with significant power increases that change how you approach magic usage. Similarly, the various equipment upgrades scattered throughout the world—sword upgrades, shield upgrades, armor upgrades—provide clear power progression beyond just heart containers. These upgrades aren’t just handed to you as quest rewards; you find them through exploration, making them feel earned and reinforcing the idea that exploration itself is rewarding rather than just a means to an end.
Environmental Storytelling Through Design
The overworld doesn’t just tell you about Hyrule’s corruption through dialogue—it shows you through environmental changes between the Light and Dark Worlds. The Sanctuary becomes a ruin. The Master Sword’s pedestal in the Light World corresponds to the Pyramid of Power in the Dark World. The various villages and populated areas become monster-infested wastelands. Every location transformed is a reminder of what’s been lost and what you’re fighting to restore.
Weather and time-of-day effects (the latter being limited but present in certain areas) add atmosphere and variety to exploration. The rain during the opening sequence immediately sets a dark, urgent tone. Finding sun-dappled clearings or crossing moonlit waters creates memorable moments that lodge in player memory. These aren’t just visual flourishes—they contribute to the emotional texture of the adventure, making different parts of Hyrule feel distinct not just geographically but atmospherically.
The monster distribution across the overworld creates natural difficulty zones. Areas near the starting location feature weaker enemies. Death Mountain and its surroundings host tougher foes. The Dark World is consistently more dangerous than the Light World. This gradient allows skilled players to challenge themselves by venturing into harder areas early, while less confident players can stick to safer zones until they’ve powered up. The game never explicitly tells you “this area is for level X,” but the environmental design communicates it clearly.
NPC placement and behavior reinforce the world’s believability. The people of Kakariko go about their daily business, gossiping, selling goods, and living their lives. The Lumberjacks work in the forest. The various hermits and eccentrics scattered throughout Hyrule each have distinct personalities conveyed through minimal dialogue. Even minor NPCs feel like inhabitants of this world rather than mere quest markers or exposition dispensers. This attention to detail in making Hyrule feel lived-in creates investment in protecting it beyond just following the game’s directive to save the world.
Combat and Challenge: Difficulty Done Right
One of A Link to the Past’s most impressive achievements is how it maintains challenge throughout its runtime without ever feeling unfair or artificially difficult. The game respects the player’s skill and intelligence, providing tools and information sufficient to overcome obstacles through mastery rather than grinding or luck. This philosophy of fair challenge has become increasingly rare in modern gaming, making A Link to the Past’s approach feel refreshing even by contemporary standards.
Enemy Design: Diverse, Distinctive, Dangerous
Every enemy in A Link to the Past has clear behavioral patterns that can be learned and exploited, yet very few enemies are so simple that they become trivial once understood. The basic soldiers swing swords in predictable arcs but move unpredictably enough that you can’t just stand in one spot and spam attacks. The Archers fire arrows at regular intervals but require positioning to avoid. Even the simplest enemies like Ropes (snakes) and Keese (bats) demand attention and proper timing to defeat without taking damage.
The enemy variety is staggering, with dozens of unique enemy types each requiring different tactics to defeat efficiently. Hardhat Beetles can’t be damaged until flipped with the Hookshot. Eyegore statues only take damage from certain angles. Wizzrobes teleport around the room firing spells. Bubbles are invincible until specific conditions are met. This variety ensures that combat remains engaging throughout the adventure, always presenting new tactical challenges rather than just reskinned versions of the same encounters.
What’s particularly impressive is how enemies are combined in specific encounters to create emergent difficulty. A single Darknut isn’t too threatening. A room full of them becomes a genuine challenge. Soldiers alone are manageable, but soldiers plus archers firing from elevated positions demand careful positioning. The game rarely relies on single powerful enemies to create challenge; instead, it uses composition and positioning to turn even familiar foes into threats requiring strategic thinking.
The difficulty curve through enemy progression is perfectly calibrated. Light World enemies teach combat fundamentals without overwhelming new players. Early Dark World enemies provide a noticeable but manageable step up. Mid-to-late Dark World enemies genuinely threaten even experienced players who aren’t careful. By the time you reach Ganon’s Tower, the enemy encounters are legitimately challenging, ensuring the finale feels appropriately climactic rather than a victory lap.
Boss design showcases similar philosophy. Each boss has a clear pattern that can be learned through observation. None are completely opaque requiring guides to defeat, yet none are so simple that they die in seconds without strategy. The Armos Knights require prioritizing the real Knight among six enemies. Helmasaur King demands destroying armor before vulnerability. Moldorm punishes aggressive play with its knock-back tail attack. Each boss teaches a lesson about combat while testing your mastery of items and fundamentals.
Resource Management: Magic, Health, and Items
The resource management systems in A Link to the Past create strategic depth without the frustration of overly punishing scarcity. Hearts are precious but not so rare that you’re constantly on the verge of death. Grass, pots, and defeated enemies regularly drop hearts, ensuring that careful players can maintain health through exploration and combat efficiency. However, damage hurts enough that you can’t just face-tank everything; proper dodging and strategic use of health resources matters.
The Magic Meter adds a resource cost to powerful abilities like the Cane of Somaria, Ether and Quake medallions, and extended use of rods. This creates meaningful decisions about when to use magic versus conserving it for later challenges. Green Magic potions can refill magic but are limited in quantity and must be used judiciously. The various Magic upgrades (½ Magic and ¼ Magic usage reductions) are significant power spikes that change how freely you can use magical abilities, providing clear progression beyond just health and damage.
Bottles are perhaps the game’s most important resource management tool. You can carry up to four bottles, each capable of holding potions, fairies, or other useful items. Deciding what to carry in your bottles—Red Potion for health restoration, Green Potion for magic, Blue Potion for both, or Fairies for automatic revives—is a strategic decision that depends on your playstyle and the challenges ahead. The fact that bottles are optional collectibles scattered throughout the world rewards exploration while allowing less thorough players to still complete the game with fewer resources.
Ammunition-based items like Bombs and Arrows have limited capacity but are renewable through shops, enemy drops, and environmental sources. This creates tension in dungeon situations where you might need bombs to progress but only have a few remaining. The decision between spending resources to explore optional areas versus conserving for essential progression creates engaging moment-to-moment gameplay. Upgrades that increase maximum carrying capacity (Silver Arrows upgrade, Bomb capacity increase) provide tangible benefits that justify the exploration required to obtain them.
Death and Consequence: Stakes That Matter
When you die in A Link to the Past, you restart from your last save point, potentially losing progress since your last save if you hadn’t saved recently. This creates actual stakes—death has consequences beyond just minor inconvenience. However, the ability to save at any time from the inventory means the consequence is entirely within player control. If you’re about to attempt a challenging section, you can save first, minimizing potential loss while still maintaining tension during the actual attempt.
This balance between consequence and convenience feels perfectly judged. It’s not as punishing as games that send you back to the very beginning or use limited lives systems. It’s not as toothless as modern games where death means respawning three seconds earlier with no loss whatsoever. The consequence is real enough to make you care about avoiding death but not so severe that death feels devastating. It’s the sweet spot that keeps tension high without inducing frustration-based rage-quits.
The game’s difficulty overall sits in that same sweet spot. It’s challenging enough that you’ll die occasionally, especially in late-game dungeons and boss fights, but not so hard that it’s only beatable by elite players. Most players will finish the game feeling accomplished but not traumatized. Skilled players can pursue self-imposed challenges like low-heart runs or speedruns. Casual players can take their time, grind rupees for potions, and max out their hearts before tackling harder content. The difficulty accommodates a wide skill range without compromising its fundamental challenge.
The Items: Tools That Transform Gameplay
The inventory in A Link to the Past is a masterclass in item design, with each piece of equipment serving distinct purposes while many having applications beyond their primary function. Unlike games where items are hyper-specialized to the point of being nearly useless outside specific puzzles, or so generic that they all feel interchangeable, A Link to the Past strikes the perfect balance between specialization and versatility.
Essential Equipment: The Core Toolkit
The Bow is arguably the most versatile item in the game. It’s essential for hitting distant switches and eye statues, crucial for several boss fights, useful for defeating enemies from range, and consumes an abundant resource (arrows) that makes using it feel less costly than magic-based items. The Silver Arrow upgrade transforms it into one of the most powerful weapons in the game, capable of defeating certain enemies and bosses that are otherwise nearly invincible. Few items in gaming feel as universally useful and satisfying to use as A Link to the Past’s bow.
The Hookshot completely changes traversal and combat once obtained. It allows crossing gaps that would otherwise be impassable, creates shortcut routes through dungeons and the overworld, can stun certain enemies from range, and feels incredibly satisfying to use thanks to perfect animation and sound design. The mechanical simplicity—aim, fire, attach to hookable surface, get pulled toward it—belies the strategic depth it adds to navigation puzzles and combat encounters. It’s a perfect example of a simple tool with complex applications.
The Bombs serve as both weapons and dungeon tools, used to destroy cracked walls, defeat certain enemy types, damage bosses, and solve puzzles requiring explosive force. The limited carrying capacity (maximum 50 with upgrades) creates tension, forcing decisions about when to use bombs versus conserving them. The various bomb-resistant enemies and the need to sometimes use bombs to find other bombs creates interesting risk-reward calculations. It’s a simple concept executed with mechanical depth.
The Pegasus Boots might seem like a simple sprint function, but they enable sequence-breaking, make traversal more fluid, are required for certain puzzles, can destroy enemies through dashing, and allow the spin attack to charge while moving. The Boots transform exploration from methodical to dynamic, making the later game when you have them feel noticeably faster-paced than the early hours. They’re an example of how a seemingly simple mobility upgrade can have cascading effects on how the entire game feels to play.
Specialized Tools: Purpose-Built Excellence
While the core items are broadly useful, A Link to the Past also features specialized tools that excel in specific contexts, creating situations where switching items becomes strategically important rather than just following puzzle prompts.
The Fire Rod, Ice Rod, and Cane of Byrna are magic-consuming items with specific applications. The Fire Rod lights torches, melts ice, and deals fire damage to enemies. The Ice Rod freezes enemies solid and creates platforms on water. The Cane of Byrna creates a protective barrier that makes Link invincible while draining magic. These items are situationally powerful, making magic management important and creating moments where the right tool makes a challenging situation trivial while the wrong approach struggles.
The Cane of Somaria is one of the most mechanically interesting items, creating blocks that can serve as platforms, weights for switches, or projectiles when launched with sword strikes. The puzzles built around this item require thinking about spatial relationships and timing in ways that other items don’t demand. It’s complex enough to feel sophisticated but never so obscure that players can’t figure out what the game wants, striking the perfect balance between challenge and clarity.
The Magic Powder, Bug Net, and Bottles are utility items that seem minor but have surprising depth. Powder can transform enemies into slimes or reveal invisible platforms. The Net can catch fairies, bees, or the magic golden bee that’s more valuable than it initially appears. Bottles can carry multiple item types and serve as emergency healing storage. These seemingly basic items become essential parts of your strategic toolkit, especially once you learn their less obvious applications.
The Medallions (Ether, Bombos, Quake) are powerful screen-clearing attacks that consume significant magic but can trivialize certain encounters. They’re almost comically overpowered when used correctly—Ether can freeze all enemies on screen, Bombos creates a fire explosion damaging everything, Quake stuns ground-based enemies. Their high magic cost prevents abuse, but finding situations where they’re optimal creates satisfying moments of power. They make you feel like you’re wielding legendary magic rather than just clicking through a menu of abilities.
Progression Through Acquisition
The order in which you acquire items is carefully designed to create a satisfying progression curve. Early items like the Lamp and Bow are immediately useful and relatively simple, teaching you to pay attention to your inventory. Mid-game items like the Hookshot and Pegasus Boots dramatically expand your mobility and combat options. Late-game items like the Cane of Somaria and Medallions are mechanically complex and situationally powerful, requiring mastery of earlier concepts before you can fully utilize them.
This progression isn’t just mechanical—it’s psychological. Each new item acquisition feels like leveling up, not through abstract stat increases but through concrete new capabilities. Getting the Hookshot means you can now reach areas that were previously tantalizingly visible but inaccessible. Getting the Pegasus Boots means traversal becomes faster and more dynamic. Each item opens up the world in tangible ways, making progression feel rewarding beyond just checking boxes on a quest list.
The game also cleverly uses item acquisition to gate content without it feeling arbitrary. You literally cannot reach certain areas without specific items, but these barriers are telegraphed clearly through environmental design. See a gap too wide to jump? You’ll need the Hookshot later. See water you can’t cross? The Flippers will help eventually. The barriers are obvious enough that you understand they’re intentional rather than frustrating, creating anticipation for the moment when you’ll return with the proper tool.

The Music and Sound: An Auditory Masterpiece
Koji Kondo’s soundtrack for A Link to the Past is arguably the finest work of his legendary career, and considering his resume includes Super Mario Bros., The Legend of Zelda, and Ocarina of Time, that’s an extraordinary claim. Yet it’s justified by the sheer quality, variety, and emotional resonance of the music that accompanies Link’s adventure through Hyrule.
Iconic Themes That Define Adventure
The Overworld Theme is one of gaming’s most recognizable melodies, perfectly capturing the spirit of adventure, heroism, and exploration that defines the Zelda series. The ascending fanfare, the heroic main melody, the optimistic chord progressions—every element combines to create a piece that makes you want to grab a sword and save a kingdom. It’s adventurous without being overly militaristic, heroic without being pompous, catchy without being annoying even after hours of hearing it loop. It’s the platonic ideal of adventure game music.
The Dark World Theme provides the perfect counterpoint, taking the Light World melody and twisting it into something ominous and corrupted. The same chord progressions are there but rendered in minor keys with harsher instrumentation, creating a sense of familiarity corrupted into wrongness. It’s not just “spooky music”—it’s specifically the Light World theme perverted, reinforcing through audio the visual corruption you’re seeing on screen. This thematic connection between the two main overworld themes is compositional genius that elevates both pieces.
The Dungeon Theme is appropriately tense and mysterious, creating atmosphere without being oppressive. It loops seamlessly, maintaining tension during extended exploration without becoming grating. The composition leaves space for sound effects to cut through clearly, ensuring that audio cues like switches activating or secret doors opening remain audible and clear. It’s functional music in the best sense—serving the gameplay without overwhelming it.
Specific dungeon themes showcase incredible variety. Skull Woods has an eerie, unsettling theme that perfectly matches the cursed forest aesthetic. Ice Palace’s music is cold and crystalline, with high-pitched notes evoking icicles and frozen winds. Misery Mire’s theme is oppressively dark and swampy. Each dungeon theme is distinct enough that years later, players can hear the music and immediately recall which dungeon it’s from, proving the effectiveness of the compositional and thematic choices.
Boss Music and Emotional Peaks
The Boss Battle Theme is adrenaline incarnate, a driving, urgent composition that raises your heart rate the moment it kicks in. The pounding rhythm, the dramatic chord changes, the sense of mounting tension—everything about this piece screams “this is important, this is dangerous, you need to focus.” It’s perfect pump-up music that makes even simpler boss fights feel epic and important. The transition from exploration music to boss music creates an emotional crescendo that physically changes how you approach the encounter.
The Ganon Battle Theme is even more intense, befitting the ultimate confrontation. The darker tonality, the heavier instrumentation, the relentless drive—it communicates that this is the final battle, the culmination of everything you’ve worked toward. When this music plays, you know you’re facing the ultimate evil, and the composition makes you feel both the danger and the importance of this moment. It’s perfectly calibrated to create maximum dramatic impact without tipping over into melodrama.
The Triforce Room music that plays when you obtain a pendant or crystal is pure triumph and resolution. That ascending fanfare, the feeling of accomplishment and progress—it’s pavlovian conditioning at its finest. Hundreds of hours across countless playthroughs, and that jingle still triggers a dopamine response, still feels like victory and advancement. This kind of emotional conditioning through music is incredibly difficult to achieve, yet Kondo makes it seem effortless.
Sound Design: The Unsung Hero
While the music rightfully receives extensive praise, the sound design deserves equal recognition for how perfectly it complements and enhances the gameplay experience. Every action in the game has a distinct, satisfying sound effect that provides essential feedback about what’s happening.
The sword slash sound is iconic—sharp, decisive, impactful. The difference between hitting an enemy versus hitting a wall versus hitting nothing is communicated through audio, allowing skilled players to understand combat outcomes without even looking at the screen. The spin attack has a distinctive whoosh building to a powerful release. The sound of defeating an enemy with a final hit versus damaging it without finishing it communicates important information about enemy health state.
Environmental sounds add atmosphere and information. The low-health heartbeat warning is anxiety-inducing by design, creating urgency when Link is near death. The “secret discovered” jingle is perfectly calibrated to trigger satisfaction. The sound of opening a treasure chest, especially one containing an important item, is pure joy. These sounds become so ingrained that they trigger emotional responses independent of context—hearing the secret jingle in isolation still feels rewarding decades later.
The way music and sound interact is particularly elegant. Sound effects are mixed to cut through the music clearly without overpowering it. Important sounds like switches activating or doors unlocking are distinct enough to be noticed even when multiple things are happening simultaneously. The music dynamically adjusts in certain situations (like becoming muted when you’re low on health so the heartbeat warning is more prominent), showing sophisticated audio mixing that was ahead of its time.
Why Modern 2D Zelda Games Don’t Surpass It
Since A Link to the Past’s release, Nintendo has produced numerous 2D Zelda titles across various platforms. Some are excellent games in their own right. Yet none have surpassed A Link to the Past as the definitive 2D Zelda experience. Understanding why requires examining what later games tried and where they fell short of the ALTTP standard.
The Oracle Games: Solid But Fragmented
Oracle of Seasons and Oracle of Ages (2001) were ambitious GBA titles developed by Capcom with Nintendo’s supervision. They introduced innovative linking mechanics between the two games, seasonal changes in Seasons, and time travel in Ages. Both are good games with interesting ideas. However, they suffer from being split across two cartridges, meaning you need both games to experience the complete story and get the true ending. This fragmentation, while creating a unique gimmick, ultimately weakens both games individually.
The dungeons in the Oracle games are well-designed but lack the memorable quality of ALTTP’s dungeons. The overworlds feel smaller and less interconnected. The difficulty is sometimes uneven, with certain sections spiking frustratingly hard while others feel too easy. The visual aesthetic, while charming, doesn’t have the timeless quality of ALTTP’s SNES graphics—it looks distinctly like a GBA game rather than transcending its hardware limitations.
Most significantly, the Oracle games feel more like good imitations of A Link to the Past rather than evolutions of the formula. They don’t meaningfully advance what ALTTP established—they just iterate on it with different gimmicks. The seasonal changes and time travel mechanics are interesting but don’t fundamentally transform the experience the way ALTTP’s dual-world system did. They’re very good Zelda games, but they don’t surpass the original.
The Minish Cap: Charming But Slight
The Minish Cap (2004) for GBA is perhaps the most visually beautiful 2D Zelda, with gorgeous sprite work and art direction. The shrinking mechanic is genuinely clever, creating puzzles around scale changes and allowing exploration of familiar areas from radically different perspectives. The Kinstones collecting and fusion system adds an optional layer of completionist content. The game is charming, well-crafted, and fun.
However, The Minish Cap is notably shorter and easier than A Link to the Past. The dungeons, while good, are fewer in number and less challenging. The overworld is smaller with less exploration and secret-finding. The game clearly targets a younger or less experienced audience, which is a valid design choice but means it doesn’t match ALTTP’s balance of accessibility and challenge. It’s a great introduction to 2D Zelda but doesn’t reach the heights of complexity and depth that make ALTTP compelling for experienced players.
The Minish Cap also suffers from pacing issues in its opening hours, with extended tutorials and relatively slow story progression before the adventure really begins. A Link to the Past drops you into the action within minutes, trusting players to figure things out through exploration and experimentation. The Minish Cap holds your hand more, which helps newcomers but can frustrate veterans looking for the trust and respect for player intelligence that characterized ALTTP.
The DS Games: Innovation Over Cohesion
Phantom Hourglass (2007) and Spirit Tracks (2009) for the Nintendo DS are bold experiments with touch controls and different visual styles. Phantom Hourglass’s central Temple of the Ocean King, which must be repeatedly revisited with slight variations, is a divisive mechanic that many players find tedious. Spirit Tracks’ train-based traversal is interesting but limits the sense of freedom that makes Zelda exploration compelling. Both games force you to use stylus controls exclusively, which some players love but others find cumbersome compared to traditional button inputs.
The games also feel mechanically simplified compared to ALTTP, likely due to the touch control limitations and the DS’s technical capabilities. Dungeons are generally shorter and easier. Combat is less precise. The worlds feel more segmented and less like cohesive kingdoms. They’re interesting experiments and have their fans, but the experimental mechanics often work against the core Zelda formula rather than enhancing it. Innovation for its own sake doesn’t automatically lead to better games.
A Link Between Worlds: The Closest Challenger
A Link Between Worlds (2013) for 3DS is the only post-ALTTP 2D Zelda that seriously challenges for the crown. It’s set in the same Hyrule as ALTTP, features similar dual-world mechanics with the wall-merging twist, and recaptures much of what made the original special. The item rental system allows tackling dungeons in various orders, creating genuine non-linearity. The difficulty is well-calibrated. The dungeons are creative and challenging. The game is excellent.
However, even ALBW doesn’t quite surpass its inspiration. The story is thinner and less engaging than ALTTP’s economical but effective narrative. The dungeon designs, while good, lack some of the intricate interconnectedness of ALTTP’s best dungeons. The overworld, being largely a recreation of ALTTP’s Hyrule, doesn’t have the same impact for players who know every secret location already. The wall-merging mechanic is clever but doesn’t have the same transformative effect on exploration that the Magic Mirror and dual worlds had in the original.
Most critically, A Link Between Worlds exists in ALTTP’s shadow—it’s explicitly positioned as a sequel/homage rather than a replacement or evolution. It can be excellent without surpassing the original because it’s not trying to replace it; it’s celebrating and building upon it. This is the right approach, but it also means ALBW accepts ALTTP’s supremacy rather than challenging it.
What These Games Reveal About ALTTP’s Strengths
The various attempts to recapture ALTTP’s magic reveal what makes the original so special: perfect balance. Every later 2D Zelda either simplifies elements for accessibility (Minish Cap), experiments with mechanics at the cost of core formula (DS games), fragments the experience (Oracle games), or explicitly positions itself as derivative (ALBW). A Link to the Past didn’t need to make these compromises. It hit the sweet spot of complexity and accessibility, innovation and tradition, challenge and fairness on its first try.
The later games also reveal how difficult it is to improve on ALTTP’s dungeon design specifically. Numerous talented developers across multiple studios have tried to create better 2D Zelda dungeons, and while they’ve created some excellent ones, none have consistently matched the quality, variety, and perfect difficulty balance of ALTTP’s twelve dungeons. This suggests that ALTTP wasn’t just good but lightning in a bottle—a perfect combination of designer vision, hardware capabilities, and development circumstances that’s incredibly difficult to deliberately replicate.
The Timeless Quality: Why It Still Plays Perfectly Today
Perhaps the ultimate test of a game’s quality is how well it holds up when played today, divorced from nostalgia and historical context. By this measure, A Link to the Past not only passes but excels, playing as smoothly and engagingly in 2024 as it did in 1991. This timelessness isn’t accidental but the result of design choices that prioritized fundamental quality over technical flash.
Controls and Feel: Tight, Responsive, Perfect
The moment-to-moment feel of controlling Link is fluid, responsive, and precise in ways that many modern games still struggle to achieve. Link moves exactly as you’d expect, with no sluggishness or input lag. The sword swings instantly when you press the button. Items activate immediately. Dodging enemy attacks through precise movement works consistently because the controls are tight enough to allow it.
The game runs at a solid framerate with minimal slowdown even during chaotic moments with many enemies and projectiles on screen. This consistency means you can rely on your inputs having predictable effects, essential for the kind of skill-based combat and platforming the game demands. Modern games with fancier graphics often sacrifice this responsiveness for visual flair, making them feel worse to play despite looking better.
The UI is clean and intuitive. The item selection system allows quick swapping between tools. The map and inventory screens provide all necessary information without overwhelming clutter. Everything about the interface feels designed for efficiency and clarity, getting out of the way and letting you focus on the actual game. This restraint and focus on functionality over flashiness makes the game feel modern despite being decades old.
Visual Clarity: Readable, Beautiful, Functional
The sprite work and visual design prioritize clarity and readability above all else, ensuring you can always understand what’s happening on screen. Enemies are visually distinct from backgrounds. Projectiles are clearly visible. Interactive elements look different from decorative ones. The game rarely leaves you confused about what you’re looking at or what it means, a problem that plagues many modern pixel-art games that prioritize aesthetic over functionality.
The art direction has aged gracefully because it worked within the hardware limitations rather than fighting against them. The SNES color palette and sprite capabilities were accepted as parameters, and the art was designed to look excellent within those constraints. The result is a game that looks like a perfected SNES game rather than a game trying to overcome SNES limitations. This coherent vision means it still looks good today, whereas games that pushed too hard against their hardware often look awkward and dated.
The animations, while simpler than modern games, convey all necessary information through clear, readable movements. You can tell what an enemy is about to do by watching its animation. You can judge distances and timing. The game communicates mechanically relevant information through its visuals, which is the most important function of game graphics. Photorealism or visual complexity wouldn’t improve this fundamental communicative quality—they might actually hurt it.
Pacing: Respecting Player Time and Attention
A Link to the Past has virtually no downtime or filler content. When you’re playing, you’re either exploring, fighting, solving puzzles, or progressing the story. There are no mandatory padding sections, no forced grinding, no artificial time-wasters extending playtime without adding value. The game respects that your time is valuable and ensures that playing feels consistently rewarding and engaging.
The difficulty curve and progression pacing feel modern in their sophistication. You’re never stuck for extended periods without clear direction, yet you’re also not hand-held or over-tutorialized. The game strikes the perfect balance between guiding players and trusting their intelligence, a balance that many modern games struggle with, erring too far in either direction. Playing ALTTP in 2024, you’re struck by how much better it respects player agency compared to many contemporary titles.
The game length is perfect—15-25 hours for most players on a first playthrough, long enough to feel substantial but not so long that it overstays its welcome. Modern games often confuse length with value, padding 100-hour experiences with repetitive content. ALTTP understands that tight, focused experiences with consistent quality are more valuable than bloated games half-full of filler. Every hour of ALTTP is worthwhile; few games can claim that.
The Lack of Dated Elements
Remarkably, there are almost no mechanically dated elements in A Link to the Past that genuinely hurt the experience. Some quality-of-life features that modern games take for granted (like quest markers or ability to save anywhere without accessing the menu) are absent, but their absence doesn’t create frustration because the game was designed around not having them. You don’t miss features that the game never needed in the first place.
Compare this to many “classic” games that are genuinely difficult to enjoy today without nostalgia goggles. ALTTP doesn’t require mental adjustments or forgiveness for its era. It plays well, period. Someone discovering it for the first time in 2024 would experience a great game, not a historically important but mechanically obsolete artifact. This is the mark of true timeless design—when the passage of time doesn’t diminish quality.
Conclusion: The Undisputed Champion
After examining every aspect of A Link to the Past—its perfect game structure, revolutionary dual-world design, exemplary dungeons, engaging overworld, balanced difficulty, brilliant item design, masterful audiovisual presentation, and timeless quality—the conclusion is inescapable: this is not just a great 2D Zelda game but the greatest 2D Zelda game, the standard by which all others are measured and found wanting.
The game achieved perfection in 1991 and has never been surpassed, not because later developers lacked talent or ambition, but because ALTTP represents the ideal expression of what a 2D Zelda should be. It’s the perfect balance of exploration and direction, challenge and fairness, complexity and accessibility. Every subsequent 2D Zelda has either simplified elements that didn’t need simplifying, complicated elements that didn’t need complicating, or experimented with mechanics that distract from the core formula rather than enhancing it.
This isn’t to say other 2D Zelda games are bad—many are excellent. But excellence is not the same as perfection, and A Link to the Past is as close to perfect as games get. It succeeds on every level: as a technical showcase for its era, as a narrative experience, as a combat-puzzle hybrid, as an exploration platformer, as an audiovisual presentation, and most importantly, as a game that remains endlessly replayable and enjoyable decades after release.
For anyone who hasn’t played A Link to the Past or hasn’t revisited it in years, the game is readily available on multiple platforms through Nintendo Switch Online, various re-releases, and the original hardware for purists. Experiencing it today, you’ll find not a dusty relic kept alive by nostalgia but a vital, engaging game that stands proud among the best the medium has ever produced.
A Link to the Past is the greatest 2D Zelda ever made because it understood something fundamental: great game design is timeless, built on principles of clear communication, fair challenge, consistent rewards, and respect for player intelligence. These principles don’t age. Graphics technology improves, sound capabilities expand, but the fundamentals of what makes a game feel good to play remain constant. A Link to the Past mastered those fundamentals, and thirty-plus years later, nothing has done it better.
The crown remains firmly on Link’s head, the Master Sword still rests in its pedestal, and the greatest 2D Zelda adventure still awaits in the land of Hyrule. Long may it reign.
External Resources:
- Zelda Dungeon Wiki – A Link to the Past: https://www.zeldadungeon.net/wiki/A_Link_to_the_Past
- Nintendo Life – A Link to the Past Review & Retrospective: https://www.nintendolife.com/games/snes/the_legend_of_zelda_a_link_to_the_past
- Zelda Universe – ALTTP Guide & Analysis: https://zeldauniverse.net/guides/a-link-to-the-past/